1. Generate skeleton project
Begin by generating a project skeleton using the Spring Initializr:
-
Visit http://start.spring.io/
-
Select
Gradlefor the project type and click the buttonGenerate Project
A file, demo.zip will download to your computer, in the Downloads folder.
2. Setup a workspace
Next, create a work area for yourself:
-
Open a command shell (this can be the "cmd" shell if you’re on windows, or perhaps the "bash" shell)
-
From your home directory, create a folder named
workspace. From now on, all of our projects will reside in this directory. -
Navigate to this newly-created folder, and move the above zip file into it
-
Unzip demo.zip
You should now have a folder named demo/ with the fully qualified path of ${HOME}/workspace/demo.
Your first project’s directory structure should look like this:
.
├── build.gradle
├── gradle
│   └── wrapper
│       ├── gradle-wrapper.jar
│       └── gradle-wrapper.properties
├── gradlew
├── gradlew.bat
└── src
    ├── main
    │   ├── java
    │   │   └── com
    │   │       └── example
    │   │           └── demo
    │   │               └── DemoApplication.java
    │   └── resources
    │       └── application.properties
    └── test
        └── java
            └── com
                └── example
                    └── demo
                        └── DemoApplicationTests.java

14 directories, 8 files
We have:
-
A basic Java project directory structure
-
A Gradle build file, and the build wrapper script
-
A class which will serve as the entry point to our application
-
A configuration file:
application.properties -
A test class
3. Import to your IDE
The instructions here will vary depending on your IDE. Here are basic instructions for STS:
-
From the menu, select
-
Be sure to specify that you wish to import an existing gradle project (look for a Gradle project type from a list of options)
-
Browse to and select the folder where your project is located, which should be
${HOME}/workspace/demo
If you’re using IntelliJ, you can directly select the build.gradle file; IntelliJ should know what to do.
Finish the import process. The IDE should proceed to configure the project, and to download dependencies.
From the project’s nativation panel, you should be able to navigate the project structure, and open any project resource: its build file, Java classes, or configuration files.
4. Study the code
Open the class named DemoApplication (it’s in the package named com.example.demo).
package com.example.demo;

import org.springframework.boot.SpringApplication;
import org.springframework.boot.autoconfigure.SpringBootApplication;

@SpringBootApplication
public class DemoApplication {

	public static void main(String[] args) {
		SpringApplication.run(DemoApplication.class, args);
	}
}
Notice that it has a main() method. This is the entry point into our Spring Boot application.
The one line SpringApplication.run(…) puts the application in motion: Spring Boot constructs the Spring application context and initializes the application. The first argument to this method designates the main configuration class for your Spring Boot application.
5. Run the application
From your IDE, right-click on the DemoApplication class, and look for a command titled Run... In STS, it’s titled Run as Java Application. Your IDE may also have Spring Boot-specific integrations: a custom Boot dashboard with play and pause buttons to conveniently start and stop your application.
Running your application should produce the following console output:
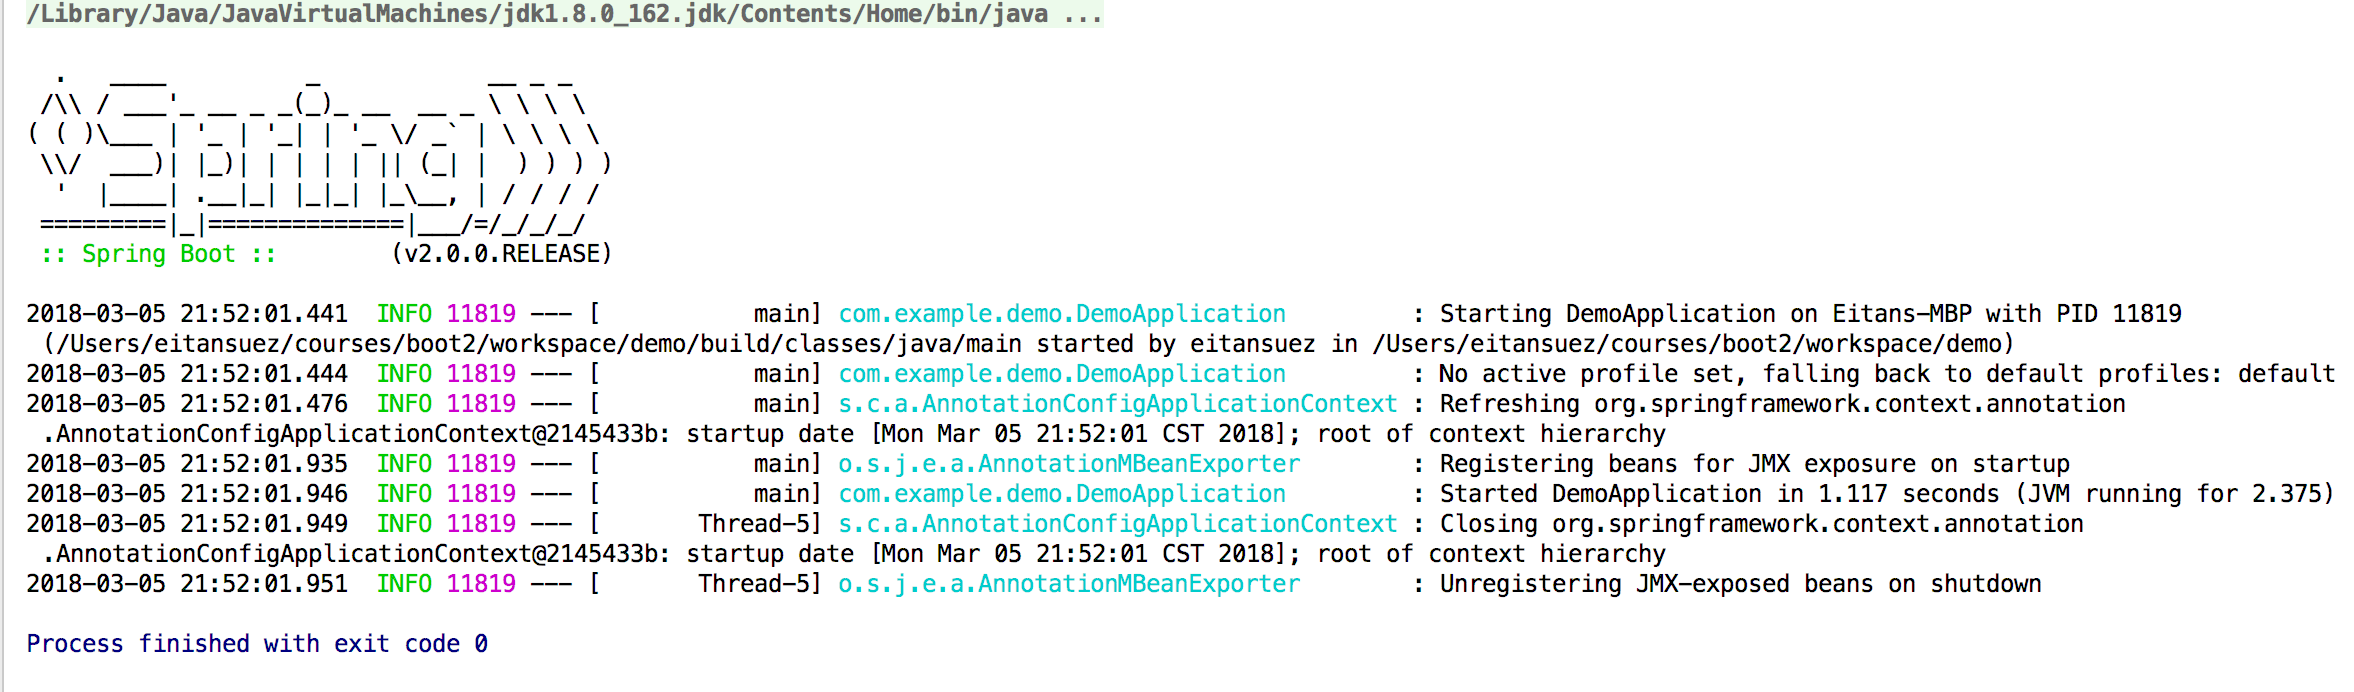
The application ran and exited.
It doesn’t really do anything interesting yet, since we haven’t written any code. But it’s useful even at this point to review the log output and get a sense for what Spring Boot is doing.
|
The
|
6. Hello Spring Boot
-
Create a new class, name it
Runner.java -
Make this class implement the interface
CommandLineRunner -
Prepare to implement this simple interface
So far, our code should look like this:
package com.example.demo;

import org.springframework.boot.CommandLineRunner;

public class Runner implements CommandLineRunner {
  @Override
  public void run(String... args) throws Exception {
    // todo..
  }
}
Any Spring component of this type will automatically have their run() method invoked after Spring Boot has finished starting up our application. It’s a great place to put any sort of initialization logic.
➜ log a simple Hello World message inside this method:
-
Instantiate a static SLF4J Logger
-
Log the message using the INFO logging level
-
Also, go ahead and add a second log message using the DEBUG logging level
Don’t forget to also mark the class a Spring @Component so it can be detected by Spring. Here’s the resulting code:
package com.example.demo;

import org.slf4j.Logger;
import org.slf4j.LoggerFactory;
import org.springframework.boot.CommandLineRunner;
import org.springframework.stereotype.Component;

@Component
public class Runner implements CommandLineRunner {

  private final Logger logger = LoggerFactory.getLogger(Runner.class);

  @Override
  public void run(String... args) throws Exception {
    logger.info("Hello world");
    logger.debug("exiting run method..");
  }
}-
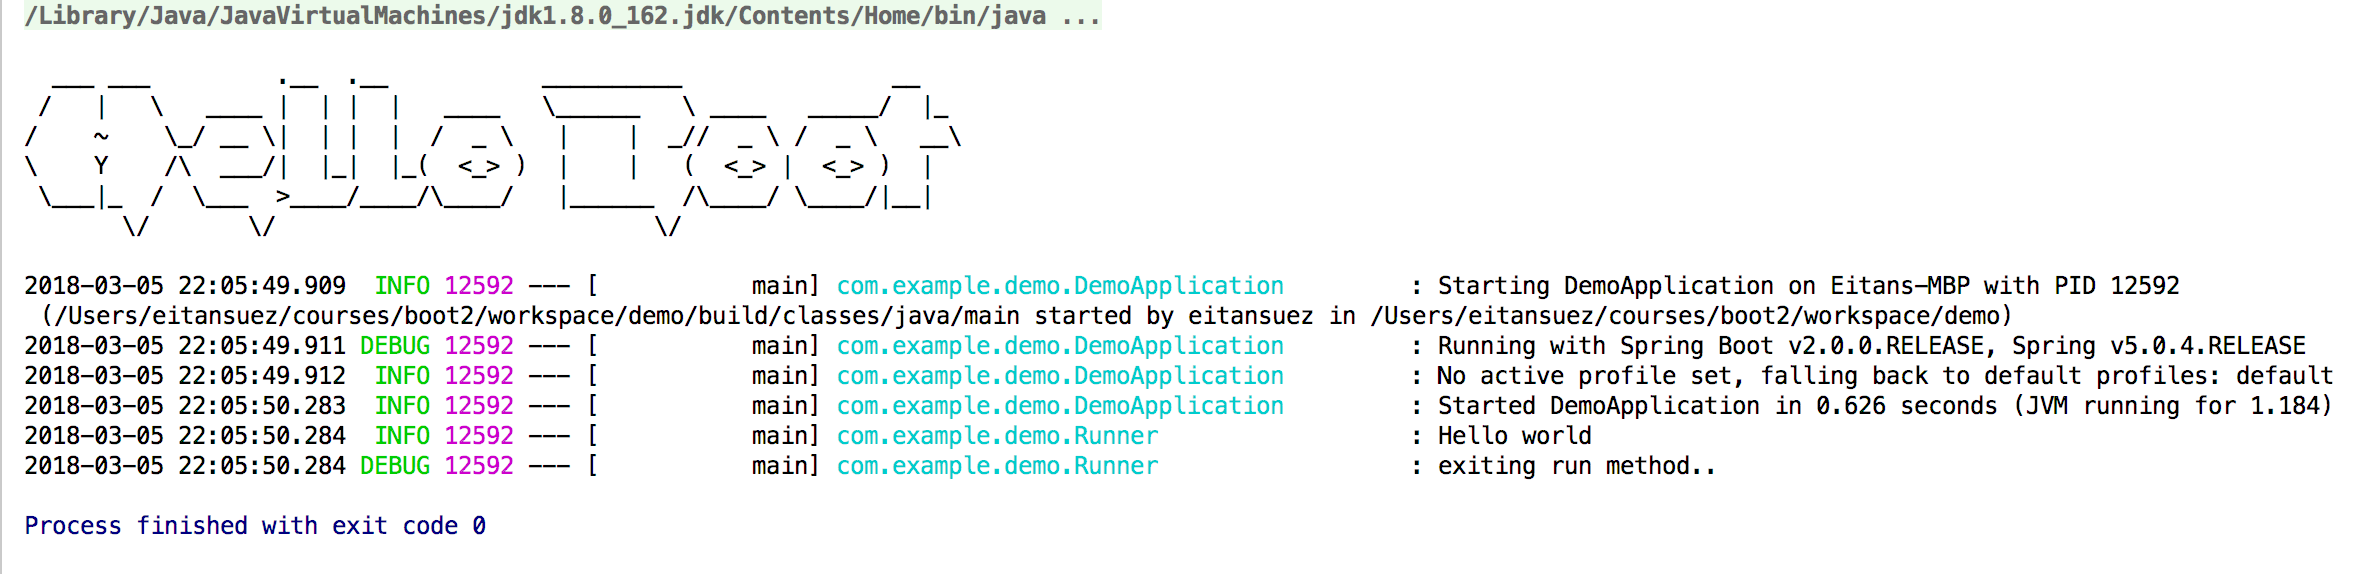
Re-run the application
-
You should now see the INFO message in the console output, but not the DEBUG message
7. Configure logging
application.properties is a convenient place to configure our application. Spring boot will automatically look for a file by that name on the classpath. See the
Spring Boot user guide for more information on this topic.
Edit the application.properties file as follows:
logging.level.com.example=DEBUGYour IDE should automatically be aware of this configuration property and provide autocompletion assistance.
Re-run the application. You should now see both log messages.
Modify the log level for all other packages to WARN, like this:
logging.level.root=WARN
logging.level.com.example=DEBUG
Explore how the above change alters the console output.
8. Customize the banner
Spring Boot also leverages simple configuration and conventions for the banner. We can turn it off with spring.main.banner-mode. We can also customize it by placing our own custom banner in a file named banner.txt on the classpath.
-
Visit the following asciiart banner generator: http://patorjk.com/software/taag/
-
Name your banner
Hello Boot -
Pick a font
-
Click the button 'Select and Copy' to copy the text
-
In
src/main/resources, create a new file. Be sure to name itbanner.txt -
Paste the banner into this file
-
Finally, re-run the application and see that the banner has now changed
9. Hello Service
Let’s sort out concerns by applying basic Spring dependency injection:
Create the following HelloService Java interface:
package com.example.demo;

public interface HelloService {
  void greet();
}
Next, create an implementation of this interface, perhaps a class by the name of LoggingHelloService, and move the "logic" out of the Runner class into it, like this:
package com.example.demo;

import org.slf4j.Logger;
import org.slf4j.LoggerFactory;
import org.springframework.stereotype.Component;

@Component
public class LoggingHelloService implements HelloService {

  private final Logger logger = LoggerFactory.getLogger(LoggingHelloService.class);

  @Override
  public void greet() {
    logger.info("Hello world");
  }

}
Finally, revise Runner so that the HelloService is injected (or autowired), via the constructor, like this:
package com.example.demo;

import org.slf4j.Logger;
import org.slf4j.LoggerFactory;
import org.springframework.boot.CommandLineRunner;
import org.springframework.stereotype.Component;

@Component
public class Runner implements CommandLineRunner {

  private final Logger logger = LoggerFactory.getLogger(Runner.class);

  private final HelloService helloService;

  public Runner(HelloService helloService) {
    this.helloService = helloService;
  }

  @Override
  public void run(String... args) throws Exception {
    helloService.greet();
    logger.debug("exiting run method..");
  }
}
Re-run the application and make sure that the "Hello world" message still appears in the log output.
10. Externalized configuration
Instead of printing "Hello world", parameterize the greeting, and externalize that configuration so it can be specified from the application.properties file. If the greeting is, for example: Bonjour, the message should be "Bonjour world." We can default to "Hello" if no configuration is provided.
Select hello.greeting as the configuration property name.
In application.properties, set hello.greeting to "Bonjour":
logging.level.root=WARN
logging.level.com.example=DEBUG

hello.greeting=Bonjour
In the LoggingHelloService class, define a field named greeting, and use constructor injection to set its value. The parameter on the constructor can be made to bind to the configuration field with the @Value annotation, like this:
package com.example.demo;

import org.slf4j.Logger;
import org.slf4j.LoggerFactory;
import org.springframework.beans.factory.annotation.Value;
import org.springframework.stereotype.Component;

@Component
public class LoggingHelloService implements HelloService {

  private final Logger logger = LoggerFactory.getLogger(LoggingHelloService.class);

  private final String greeting;

  public LoggingHelloService(@Value("${hello.greeting:Hello}") String greeting) { (1)
    this.greeting = greeting;
  }

  @Override
  public void greet() {
    logger.info("{} world", greeting); (2)
  }

}| 1 | The ${:} expression is a special format where, if hello.greeting is not set, we fall back (or default) to "Hello". |
| 2 | The {} placeholder in the log message is a feature of the logging library. |
Re-run the application and verify that the message now displays with the externalized configuration value.
11. Externalized configuration and Relaxed binding
Spring Boot provides many mechanisms for externalizing configuration. Properties files are not the only option. The configuration values can be specified as Java system properties, environment variables, and more.
Together with another feature, known as relaxed binding, Spring Boot provides an elegant way to handle differing naming conventions for variables.
For example, in properties files, lower case "dot" notation is conventional. But for environment variables, the convention is to use upper case letters and underscores as separators. Spring Boot considers hello.greeting and HELLO_GREETING as the same configuration property. Furthermore, there’s a hierarchy: environment variables trump (or override) properties set in a configuration file.
This is very convenient and flexible, where environment variables can be supplied to alter configuration in different deployment environments (it’s also considered a best practice).
Let’s test this.
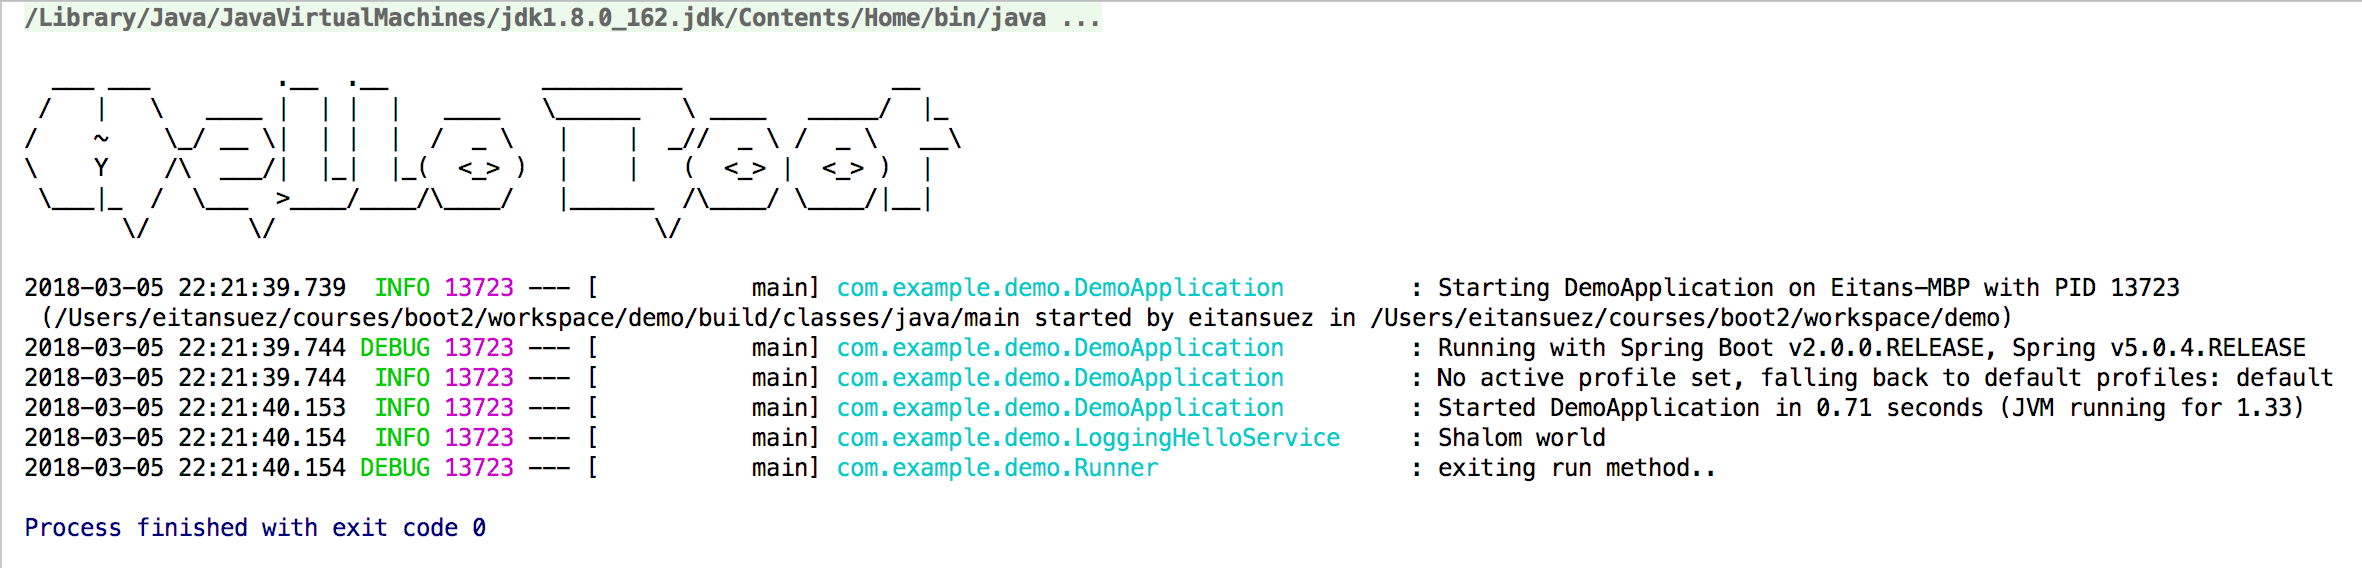
In your IDE, modify your run configuration to set an environment variable, named HELLO_GREETING, to a different greeting, say "Shalom". Here’s an example using IntelliJ IDEA:
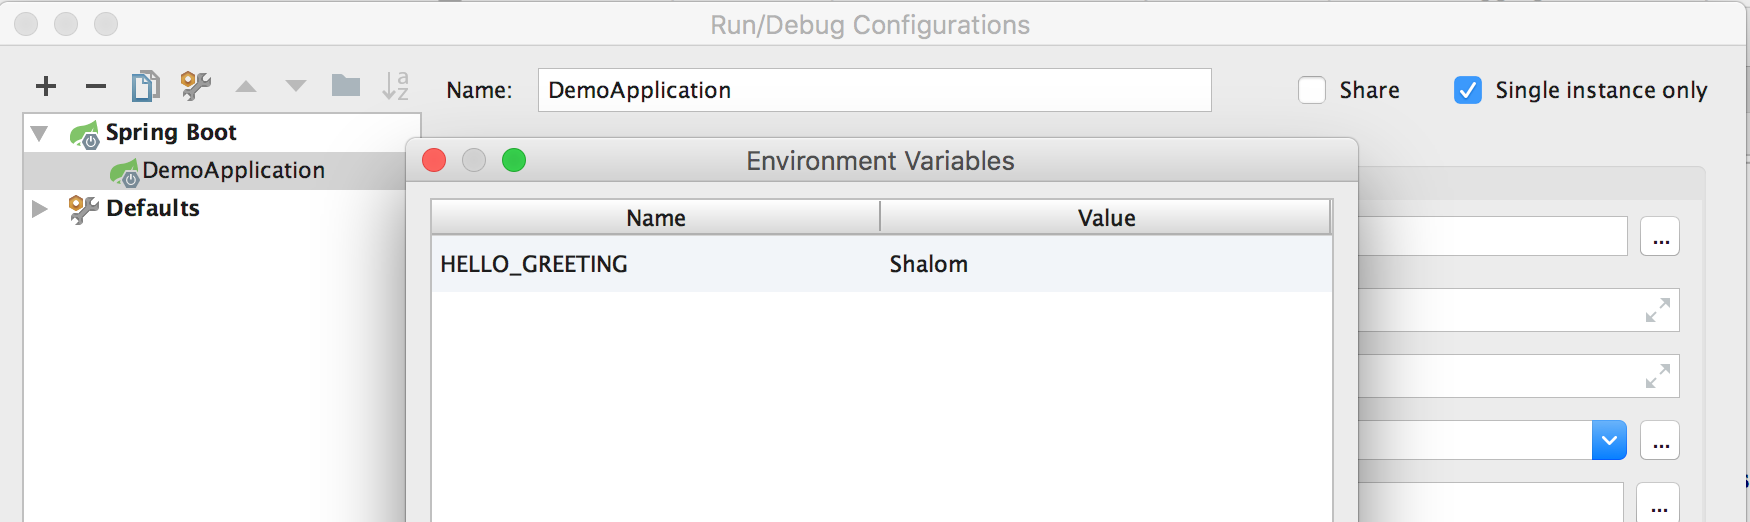
Now, re-run the application and verify that the greeting is now configured via the environment, which supersedes the property file configuration.
12. Yaml
Yaml has become a popular alternative format to property files. It’s similar to JSON, but less verbose. It relies on indentation, using spaces only (no tabs).
Spring Boot now supports either .properties or .yml formats.
Writing Yaml takes a little getting used to. So let’s practice by replacing our properties file with a yaml file:
-
Rename
application.propertiestoapplication.yml -
Revise the formatting to adhere to the Yaml format
Here’s the resulting file:
---
logging:
  level:
    root: WARN
    com.example: DEBUG

hello:
  greeting: Bonjour
Note how with Yaml:
-
It’s customary to begin a document with a line containing three hyphens (known as the document separator)
-
We don’t need to repeat the keywords "logging.level" each time we add another logging configuration
-
Keys and values are separated by a colon
-
Values often do not need to be wrapped in quotes (the parser is smart enough to tell a key from a value without them)
If you’re unfamiliar with Yaml, take a little time to familiarize yourself with this format.
Once more, re-run the application and make sure that it still functions after this refactoring.
13. Configuration Properties
Spring Boot provides another configuration-related convenience: the ability to automatically bind multiple related configuration fields to a single bean.
The HelloService bears only a single configuration property at the moment, but who knows, that could grow over time.
-
Declare a new class, name it
HelloProperties.java -
Annotate it with the
@ConfigurationPropertiesannotation -
In the annotation, specify the prefix argument as "hello"
-
Define a String field by the name of
greetingand make sure to add getter and setter methods
The idea is that every field defined in this class will map to a configuration property with a suffix by the same name. So, for example, a String field named greeting will map to a configuration property named hello.greeting. This is precisely what we want.
package com.example.demo;

import org.springframework.boot.context.properties.ConfigurationProperties;

@ConfigurationProperties(prefix="hello")
public class HelloProperties {

  private String greeting = "Hello"; // default value

  public String getGreeting() {
    return greeting;
  }

  public void setGreeting(String greeting) {
    this.greeting = greeting;
  }
}
There are two alternatives for exposing this ConfigurationProperties object to Spring:
-
annotate this class with Spring’s
@Component -
annotate our application class with a special annotation
@EnableConfigurationProperties, passing in the list of classes as an argument
If you choose the second option, here’s an example of how the annotation is specified:
package com.example.demo;

import org.springframework.boot.SpringApplication;
import org.springframework.boot.autoconfigure.SpringBootApplication;
import org.springframework.boot.context.properties.EnableConfigurationProperties;

@SpringBootApplication
@EnableConfigurationProperties(HelloProperties.class)
public class DemoApplication {

  public static void main(String[] args) {
    SpringApplication.run(DemoApplication.class, args);
  }
}
Finally, to actually use these fields, go back to LoggingHelloService, and instead of autowiring a single field using @Value, autowire the HelloProperties object.
package com.example.demo;

import org.slf4j.Logger;
import org.slf4j.LoggerFactory;
import org.springframework.stereotype.Component;

@Component
public class LoggingHelloService implements HelloService {

  private final Logger logger = LoggerFactory.getLogger(LoggingHelloService.class);

  private final String greeting;

  public LoggingHelloService(HelloProperties helloProperties) {
    this.greeting = helloProperties.getGreeting();
  }

  @Override
  public void greet() {
    logger.info("{} world", greeting);
  }

}
Re-run your refactored solution one last time, and make sure that the application still functions as expected.
Run the application in debug mode:
-
Place a breakpoint in the
LoggingHelloServiceconstructor and inspect theHelloPropertiesargument. -
Place a breakpoint in
Runner.run(), and verify that thehelloServiceSpring bean is properly autowired.
14. Summary
In this lab, we took our first steps exploring Spring Boot. We:
-
Used the Spring Initializr at http://start.spring.io/ to generate a boot project
-
Reivewed the directory structure of a Spring Boot project
-
Learned about the Application class, the entry point to a Spring Boot application
-
Configured logging
-
Customized the banner
-
Learned how to externalize configuration with the
@Valueannotation -
Learned about other ways to externalize configuration, via environment variables, and relaxed bindings
-
Learned about configuration using YAML files
-
Learned about
@ConfigurationPropertiesobjects
Some of Spring Boot’s themes include:
-
Convention over configuration
-
Simplifying the task of building Spring applications
-
Reducing the amount of work needed to get started with a project
Next, let’s turn our attention to our project’s build file, and how Spring Boot simplifies the management of dependencies in Spring projects.