JPA, the Java Persistence API, is the standard for relational database access using Object-Relational mapping techniques in Java. Hibernate is a popular implementation of the standard, and is the default JPA library in Spring Boot.
1. Dependencies
➜ Add spring-boot-starter-data-jpa to the dependencies list
@@ -15,6 +15,7 @@ repositories {
 dependencies {
   compile 'org.springframework.boot:spring-boot-starter-web'
   compile 'org.springframework.boot:spring-boot-starter-thymeleaf'
+  compile 'org.springframework.boot:spring-boot-starter-data-jpa'

   compile 'org.springframework.boot:spring-boot-devtools'
➜ Check what libraries get added to the classpath as a consequence
➜  gradle dependencies --configuration compile

...
\--- org.springframework.boot:spring-boot-starter-data-jpa -> 2.0.3.RELEASE
     +--- org.springframework.boot:spring-boot-starter:2.0.3.RELEASE (*)
     +--- org.springframework.boot:spring-boot-starter-aop:2.0.3.RELEASE
     |    +--- org.springframework.boot:spring-boot-starter:2.0.3.RELEASE (*)
     |    +--- org.springframework:spring-aop:5.0.7.RELEASE (*)
     |    \--- org.aspectj:aspectjweaver:1.8.13
     +--- org.springframework.boot:spring-boot-starter-jdbc:2.0.3.RELEASE
     |    +--- org.springframework.boot:spring-boot-starter:2.0.3.RELEASE (*)
     |    +--- com.zaxxer:HikariCP:2.7.9
     |    |    \--- org.slf4j:slf4j-api:1.7.25
     |    \--- org.springframework:spring-jdbc:5.0.7.RELEASE
     |         +--- org.springframework:spring-beans:5.0.7.RELEASE (*)
     |         +--- org.springframework:spring-core:5.0.7.RELEASE (*)
     |         \--- org.springframework:spring-tx:5.0.7.RELEASE
     |              +--- org.springframework:spring-beans:5.0.7.RELEASE (*)
     |              \--- org.springframework:spring-core:5.0.7.RELEASE (*)
     +--- org.hibernate:hibernate-core:5.2.17.Final
     |    +--- org.jboss.logging:jboss-logging:3.3.1.Final -> 3.3.2.Final
     |    +--- org.hibernate.javax.persistence:hibernate-jpa-2.1-api:1.0.0.Final -> 1.0.2.Final
     |    +--- org.javassist:javassist:3.22.0-GA
     |    +--- antlr:antlr:2.7.7
     |    +--- org.jboss:jandex:2.0.3.Final
     |    +--- com.fasterxml:classmate:1.3.0 -> 1.3.4
     |    +--- dom4j:dom4j:1.6.1
     |    \--- org.hibernate.common:hibernate-commons-annotations:5.0.1.Final
     |         \--- org.jboss.logging:jboss-logging:3.3.0.Final -> 3.3.2.Final
     +--- javax.transaction:javax.transaction-api:1.2
     +--- org.springframework.data:spring-data-jpa:2.0.8.RELEASE
     |    +--- org.springframework.data:spring-data-commons:2.0.8.RELEASE
     |    |    +--- org.springframework:spring-core:5.0.7.RELEASE (*)
     |    |    +--- org.springframework:spring-beans:5.0.7.RELEASE (*)
     |    |    \--- org.slf4j:slf4j-api:1.7.25
     |    +--- org.springframework:spring-orm:5.0.7.RELEASE
     |    |    +--- org.springframework:spring-beans:5.0.7.RELEASE (*)
     |    |    +--- org.springframework:spring-core:5.0.7.RELEASE (*)
     |    |    +--- org.springframework:spring-jdbc:5.0.7.RELEASE (*)
     |    |    \--- org.springframework:spring-tx:5.0.7.RELEASE (*)
     |    +--- org.springframework:spring-context:5.0.7.RELEASE (*)
     |    +--- org.springframework:spring-aop:5.0.7.RELEASE (*)
     |    +--- org.springframework:spring-tx:5.0.7.RELEASE (*)
     |    +--- org.springframework:spring-beans:5.0.7.RELEASE (*)
     |    +--- org.springframework:spring-core:5.0.7.RELEASE (*)
     |    \--- org.slf4j:slf4j-api:1.7.25
     \--- org.springframework:spring-aspects:5.0.7.RELEASE
          \--- org.aspectj:aspectjweaver:1.8.13
hibernate, spring-data-jpa, and spring-jdbc are notable items on the list. As with other types of Spring Boot starters, it’s easy to override defaults, and to select a different implementation of the JPA standard.
|
Spring Data JPA is one of a number of Spring projects that address application integration with database back-ends. Each project focuses on a specific data technology such as MongDB, GemFire, Redis, and Cassandra. Together, these projects are a part of the Spring Data umbrella project. All Spring Data projects have a common foundation and consistent design, facilitating the task of moving from one persistence back-end to another. |
2. A database
Along with a database framework, we need a database. For this lab, we’ll pick something lightweight, and that requires no additional installation: H2.
The H2 database has many merits. Not only is it lightweight, it’s implemented in Java, and supports in-memory mode, which makes is very useful for testing scenarios. Spring Boot makes it easy to swap the database implementation with a different product, such as mysql, or postgres.
➜ Add h2 as a runtime dependency:
@@ -21,5 +21,7 @@ dependencies {

   compileOnly 'org.projectlombok:lombok'

+  runtime 'com.h2database:h2'
+
   testCompile 'org.springframework.boot:spring-boot-starter-test'
 }
➜ Start the application:
$ gradle bootRun
Spring Boot automatically detects the new dependency and automatically makes the H2 database web console accessible as an application endpoint.
-
Visit the H2 console at http://localhost:8080/h2-console
-
Set the JDBC URL to
jdbc:h2:mem:testdb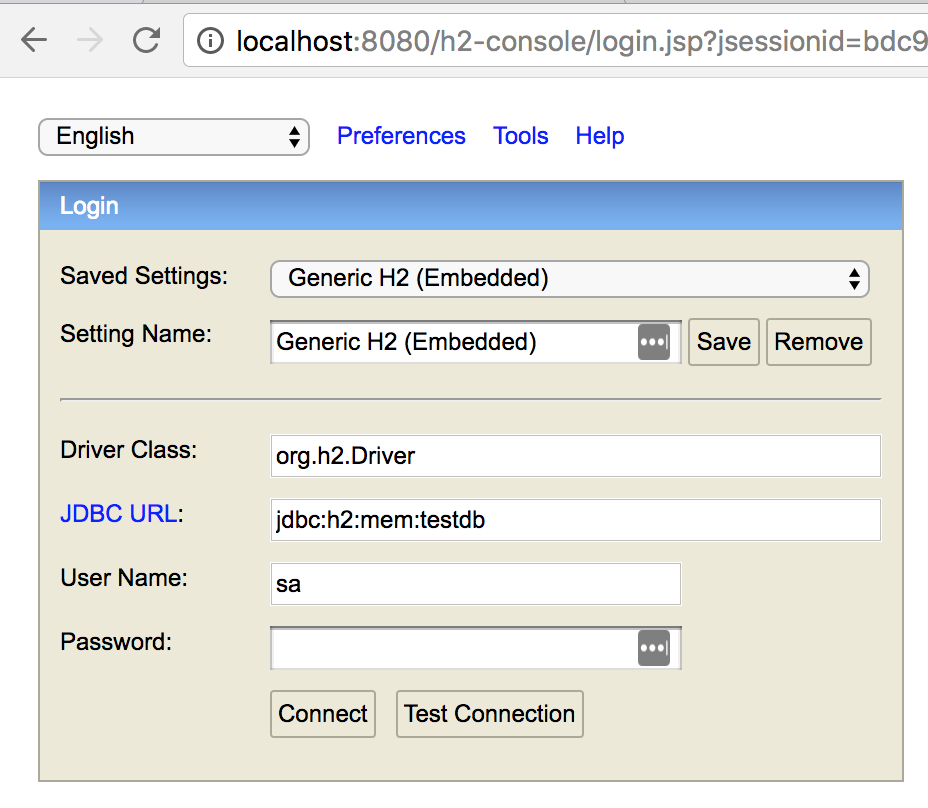
-
Click Test Connection to verify our connection to the in-memory database
-
Click Connect
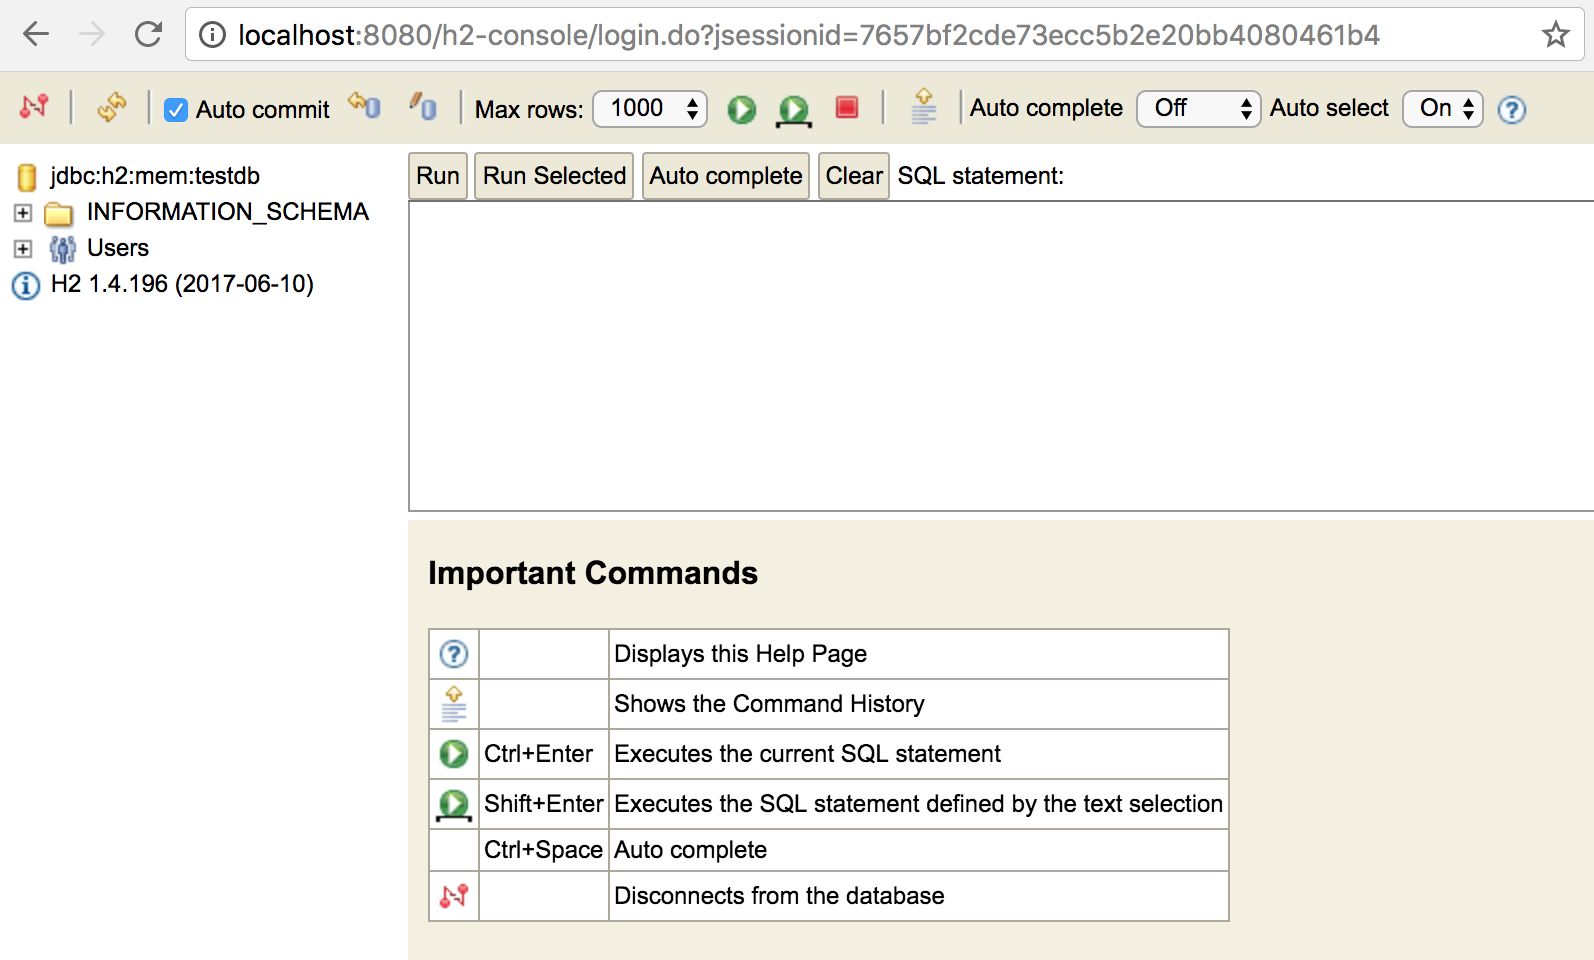
From this console, we can easily view and navigate the list of tables, issue queries, and more.
Now that we have a database, let’s move Todo’s off of our home-grown in-memory repository from the previous lab and to an actual database.
3. Make Todo.java a JPA Entity
The first step is to mark our Todo domain object as a persisted entity. We use JPA annotations for that:
-
In your IDE, open
Todo.java -
Annotate the class with
@Entity(from javax.persistence) -
Annotate the
idfield with the@Idannotation -
Also add the
@GeneratedValueannotation to the field, so that the database can be in charge of generating a unique id for each new instance created
@@ -3,11 +3,16 @@ package com.example.demo;
 import lombok.Builder;
 import lombok.Data;

+import javax.persistence.Entity;
+import javax.persistence.GeneratedValue;
+import javax.persistence.Id;
 import java.time.LocalDate;

+@Entity
 @Builder(toBuilder = true)
 @Data
 public class Todo {
+  @Id @GeneratedValue
   private final Long id;
   private final String title, description;
   private final LocalDate dueDate;
➜ Run the application once more and re-visit the H2 console:
$ gradle bootRun
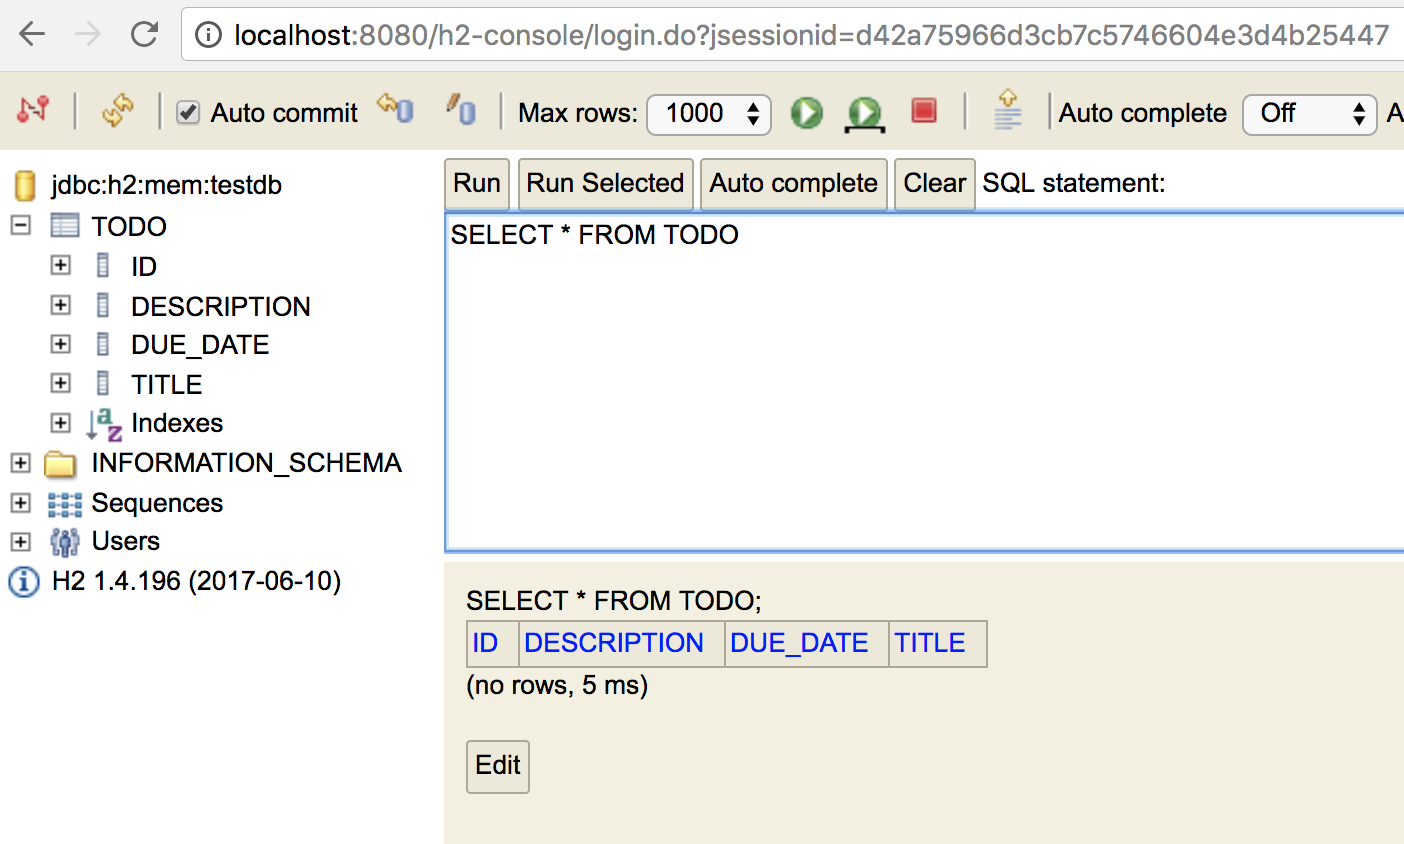
Notice that we now automatically get a database table named TODO!
3.1. Schema Creation
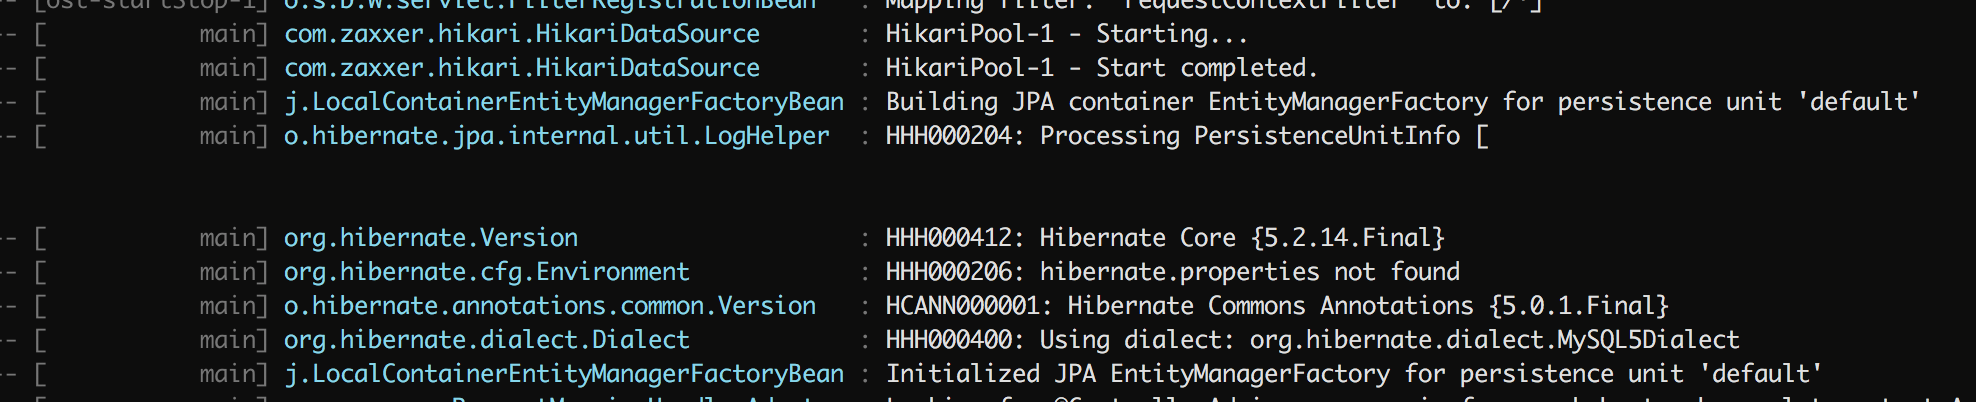
➜ Review the application’s startup logs
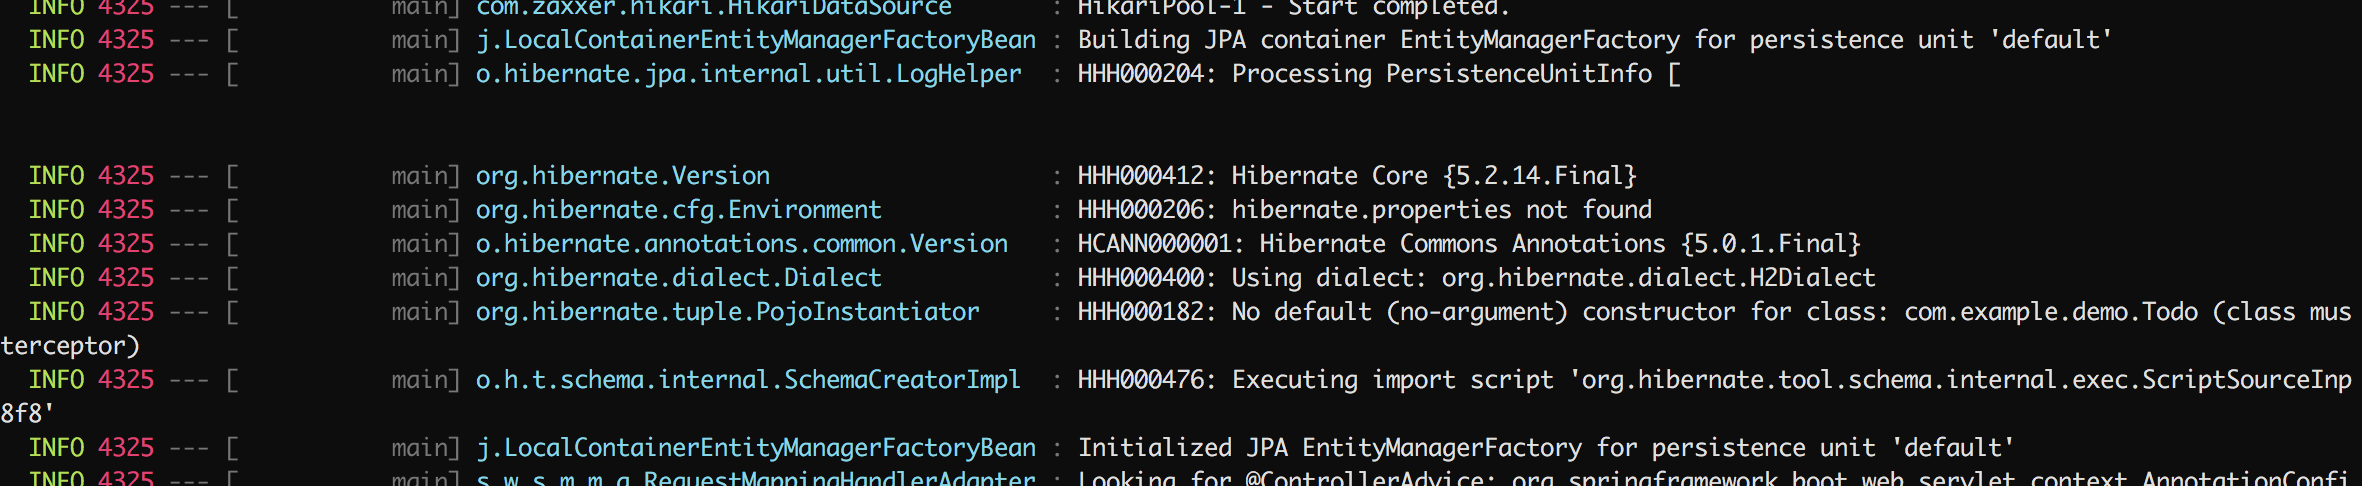
Observe how Hibernate initializes, detects the H2 database, and exports the schema after scanning the Todo domain object as an entity. Hibernate also warns us that Todo.java is lacking a default (no-argument) constructor, which is a requirement for reconstituting Todo objects from a database result set.
How did we obtain a connection to the database without configuring a DataSource?
Spring Boot’s autoconfiguration detects spring-boot-data-jpa and h2 in the classpath, notices that we haven’t configured a datasource ourselves, and so automatically volunteers one our behalf. Since it finds no database configuration in the application, it falls back to the only thing it can do: configure an in-memory database.
3.2. Review Auto-Configured Spring Beans
Spring Boot provides a number of ways for us to discover what Spring Beans it auto-configures. One is to simply run our application in debug mode, like this:
$ gradle build
$ java -jar build/libs/demo-0.0.1-SNAPSHOT.jar --debug
Spring Boot will output to the console a long "auto-configuration report" (also known as the "conditions evaluation report") of all beans it added to the application context, and why.
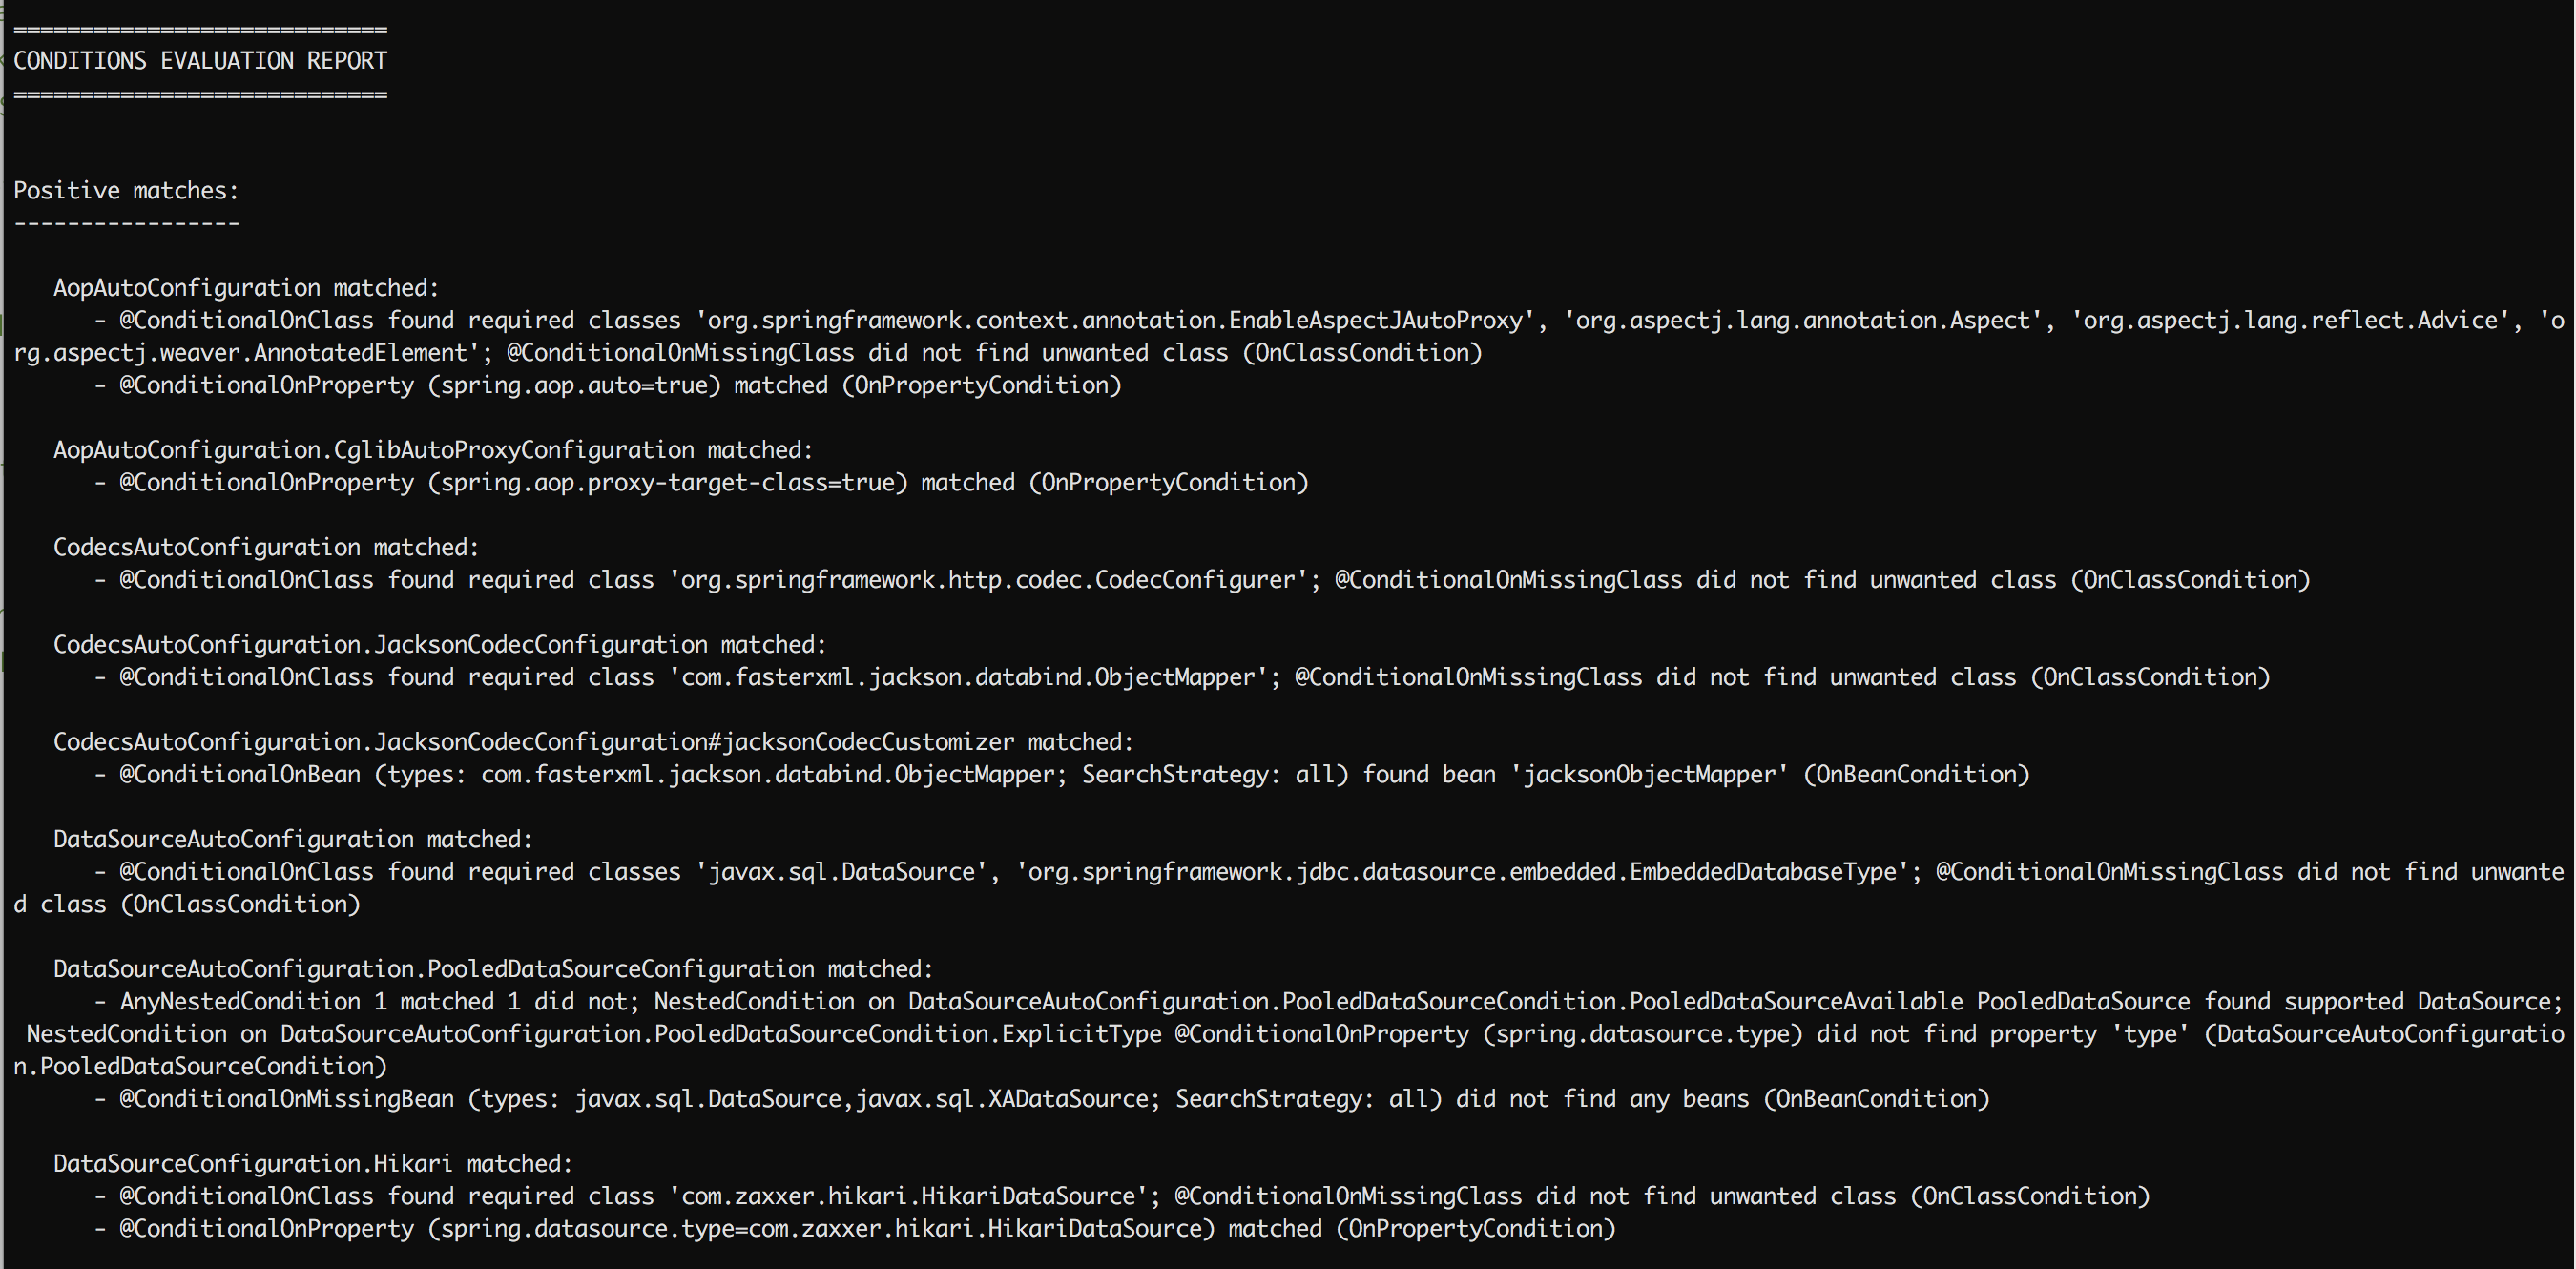
The list of "Positive Matches" clearly shows that DataSource AutoConfiguration took place.
|
If you’re running the STS or IntelliJ IDE, they both sport Spring Boot integration, and there’s a good chance that you can run the application in debug mode from the comfort of your IDE. In IntelliJ, it’s configured with a checkbox from the launch configuration dialog: 
|
3.3. JPA Repositories
Spring Data has the concept of a repository. It supports CRUD Operations (Create, Read, Update, Delete), via the CrudRepository interface. It extends this base interface with paging and sorting capabilities via the PagingAndSortingRepository interface.
Both are defined in a library common to all Spring Data projects: spring-data-commons. Spring Data JPA adds its own specialized interface, the JPARepository.
The interesting aspect of this design is that Spring Data can automatically synthesize an implementation of the repository from an interface definition, for any domain type, by simply defining a sub-interface of JpaRepository.
➜ Create the interface:
package com.example.demo;

import org.springframework.data.jpa.repository.JpaRepository;

public interface TodoJpaRepository extends JpaRepository<Todo, Long> {
}
The generic types Todo and Long indicate that this interface represents a repository of Todos whose primary key is of type Long.
Armed with our new TodoJpaRepository, it’s time to exercise it.
➜ Inject it into Runner.java and TodoController.java (not the Rest Controller, the plain html one), like this:
@@ -14,9 +14,9 @@ public class Runner implements CommandLineRunner {
   private final Logger logger = LoggerFactory.getLogger(Runner.class);

   private final HelloService helloService;
-  private final TodoRepository todoRepository;
+  private final TodoJpaRepository todoRepository;

-  public Runner(HelloService helloService, TodoRepository todoRepository) {
+  public Runner(HelloService helloService, TodoJpaRepository todoRepository) {
     this.helloService = helloService;
     this.todoRepository = todoRepository;
   }
diff --git a/src/main/java/com/example/demo/TodoController.java b/src/main/java/com/example/demo/TodoController.java
index d88615b..4cfacc0 100644@@ -13,9 +13,9 @@ import java.util.stream.Collectors;
@Controller
public class TodoController {
- private final TodoRepository todoRepository;
+ private final TodoJpaRepository todoRepository;
- public TodoController(TodoRepository todoRepository) {
+ public TodoController(TodoJpaRepository todoRepository) {
this.todoRepository = todoRepository;
}We wish to find out whether we can actually store Todo entries in the database (instead of in memory) and fetch them back.
-
Re-run the application
-
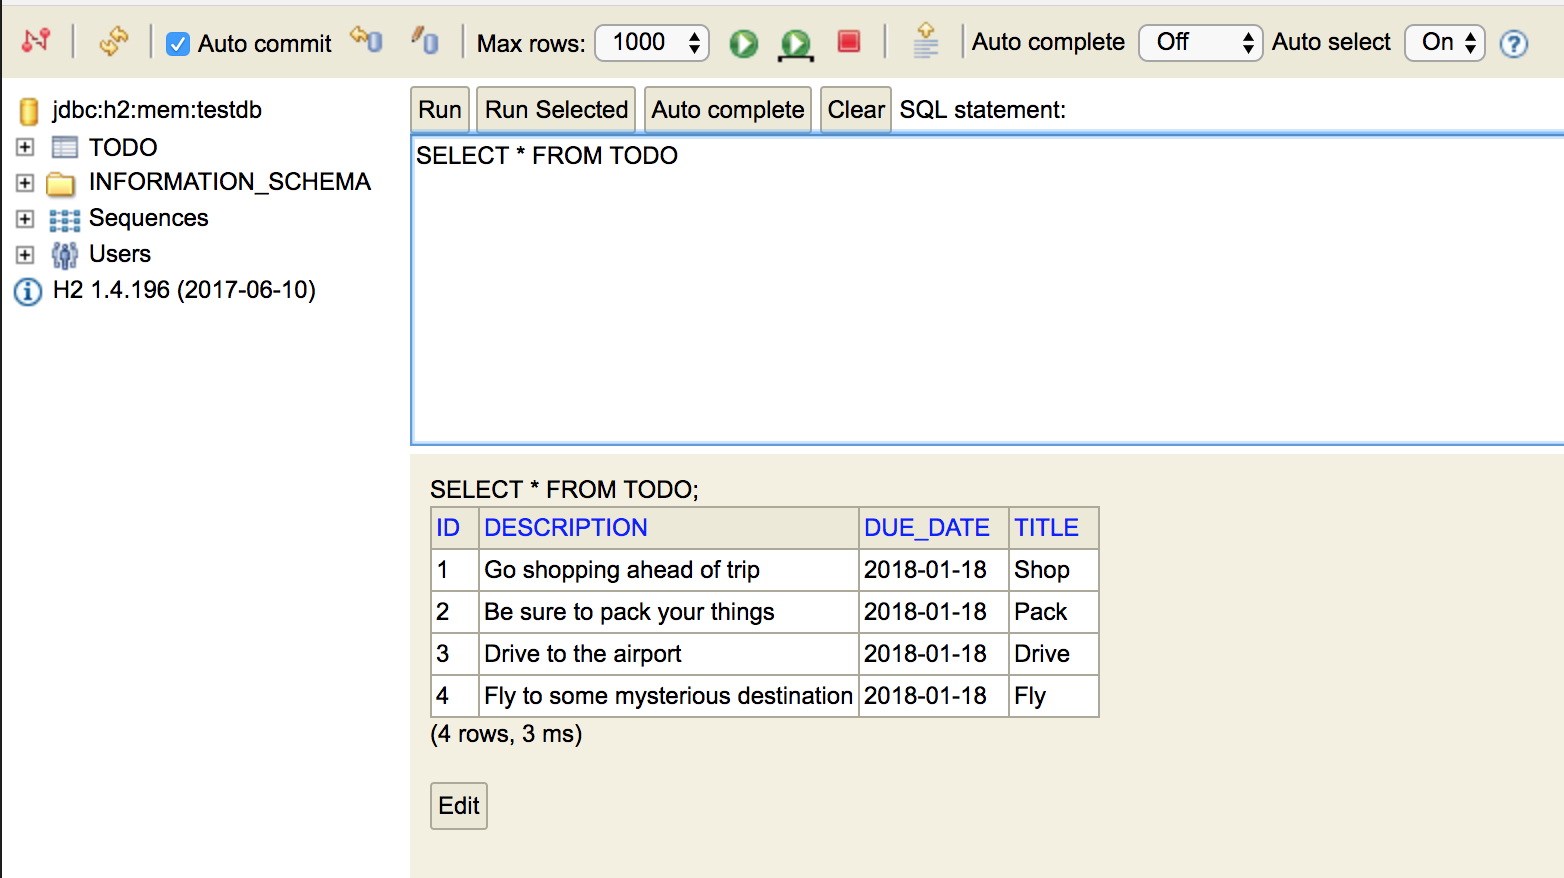
Check the h2 console and run a query against the todo table
Were the entries saved by the runner?
-
Visit the http://localhost:8080/todos page.
Did the todos appear on the page?
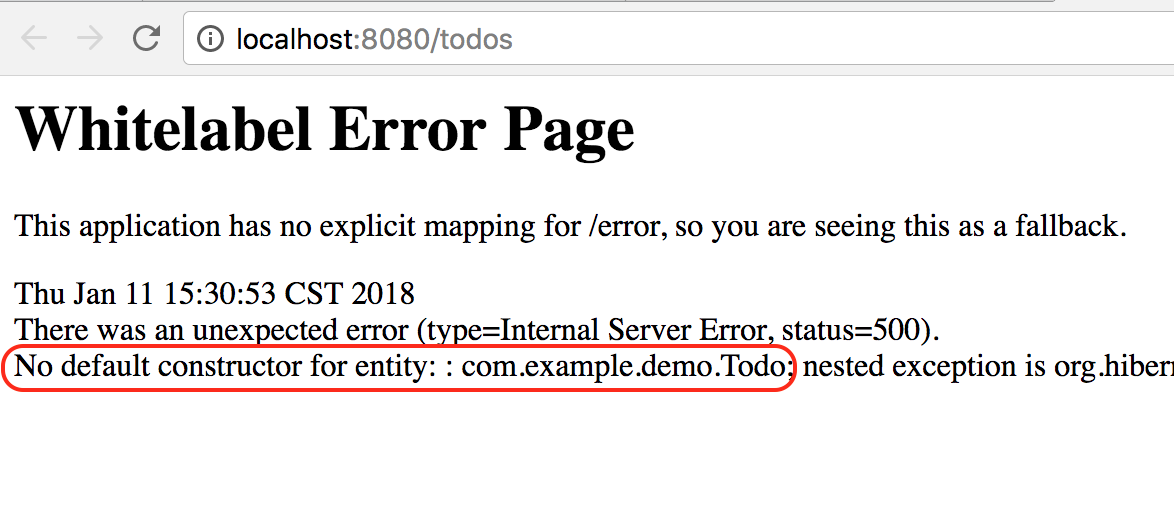
Now we understand the original warning: JPA expects entities to have a no-argument constructor. This presents a problem for us, given that Todo defines all its fields as final. To solve this problem, let’s relax this requirement and modify Todo.java accordingly:
-
Remove the final keyword from all the fields
-
Add both a no-argument constructor, and an "all-arguments" constructor (the lombok builder needs it to build the Todos)
@@ -1,7 +1,9 @@
 package com.example.demo;

+import lombok.AllArgsConstructor;
 import lombok.Builder;
 import lombok.Data;
+import lombok.NoArgsConstructor;

 import javax.persistence.Entity;
 import javax.persistence.GeneratedValue;
@@ -11,9 +13,11 @@ import java.time.LocalDate;
 @Entity
 @Builder(toBuilder = true)
 @Data
+@NoArgsConstructor
+@AllArgsConstructor
 public class Todo {
   @Id @GeneratedValue
-  private final Long id;
-  private final String title, description;
-  private final LocalDate dueDate;
+  private Long id;
+  private String title, description;
+  private LocalDate dueDate;
 }
Repeat the test. This time, the TodoController should work properly.
3.4. Retrofit the TodoRestController
Let’s continue:
➜ Retrofit TodoRestController as follows:
@@ -11,9 +11,9 @@ import java.util.Optional;
 @RequestMapping("/api/todos")
 public class TodoRestController {

-  private final TodoRepository repository;
+  private final TodoJpaRepository repository;

-  public TodoRestController(TodoRepository repository) {
+  public TodoRestController(TodoJpaRepository repository) {
     this.repository = repository;
   }
Because we modeled the original TodoRepository as a subset of the full Spring Data CrudRepository interface, the above swap requires no code changes: it remains compatible with the interface we’d originally coded against.
Re-run the application, test some of the REST API endpoints, such as http://localhost:8080/api/todos, and verify that the REST Controller functions as expected.
3.5. Make the tests pass again
Re-run the tests. There should be some failures.
-
Have a closer look at
TodoRestControllerTest.java
Notice that @MockBean is now mocking the wrong bean. We need to mock TodoJpaRepistory.
-
Revise the test:
@@ -31,7 +31,7 @@ public class TodoRestControllerTests {
   private TestRestTemplate template;

   @MockBean
-  private TodoRepository repository;
+  private TodoJpaRepository repository; (1)
   private Todo todo1;

@Before| 1 | Replace TodoRepository with TodoJpaRepository |
The tests should now pass!
3.6. Cleanup
-
We could, though we don’t have to, delete the original
TodoRepositoryinterface, and theInMemoryTodoRepository(along with its test). -
We can definitely remove the now unused
TodoRepositorybean from the DemoApplication class:
@@ -13,8 +13,4 @@ public class DemoApplication {
     SpringApplication.run(DemoApplication.class, args);
   }

-  @Bean
-  public TodoRepository todoRepository() {
-    return new InMemoryTodoRepository();
-  }
 }
For good measure, re-build and re-run the tests for your project to be sure that your code is in a working state.
4. Switch to Mysql (Optional)
Before proceeding with this portion of the lab, you’ll need to install mysql on your platform, and know your mysql root username and password.
|
Assuming you have mysql installed on your local machine, with an admin user named root with no password, log in to mysql:
$ mysql -u root
Here are the commands to create a database, a user, and to give that user privileges over the database just created:
mysql> SHOW DATABASES;
mysql> CREATE DATABASE todos;
mysql> SHOW DATABASES;
mysql> CREATE USER 'todo_user'@'localhost' IDENTIFIED BY 'secret';
mysql> GRANT ALL PRIVILEGES ON todos.* TO 'todo_user'@'localhost';
mysql> FLUSH PRIVILEGES;
In build.gradle add the mysql jdbc driver:
@@ -22,6 +22,8 @@ dependencies {
   compileOnly 'org.projectlombok:lombok'

   runtime 'com.h2database:h2'
+  runtime 'mysql:mysql-connector-java'
+

   testCompile 'org.springframework.boot:spring-boot-starter-test'
 }
Configure the datasource:
@@ -4,4 +4,10 @@ logging:
     com.example: DEBUG

 hello:
   greeting: Bonjour
+
+spring:
+  datasource:
+    url: jdbc:mysql://localhost:3306/todos?autoReconnect=true&useSSL=false
+    username: todo_user
+    password: secret
+  jpa:
+ generate-ddl: true (1)| 1 | With H2, we didn’t have to explicitly ask for Hibernate to generate the DDL for us. With mysql, we have to be explicit. |
|
For version 8.0 of MySQL server, add the option |
➜ Start the application once more.
Note how the console output shows Hibernate detecting the MySQL dialect:
Log in once more to the mysql console, and issue a query to list the contents of the newly-created todo table:
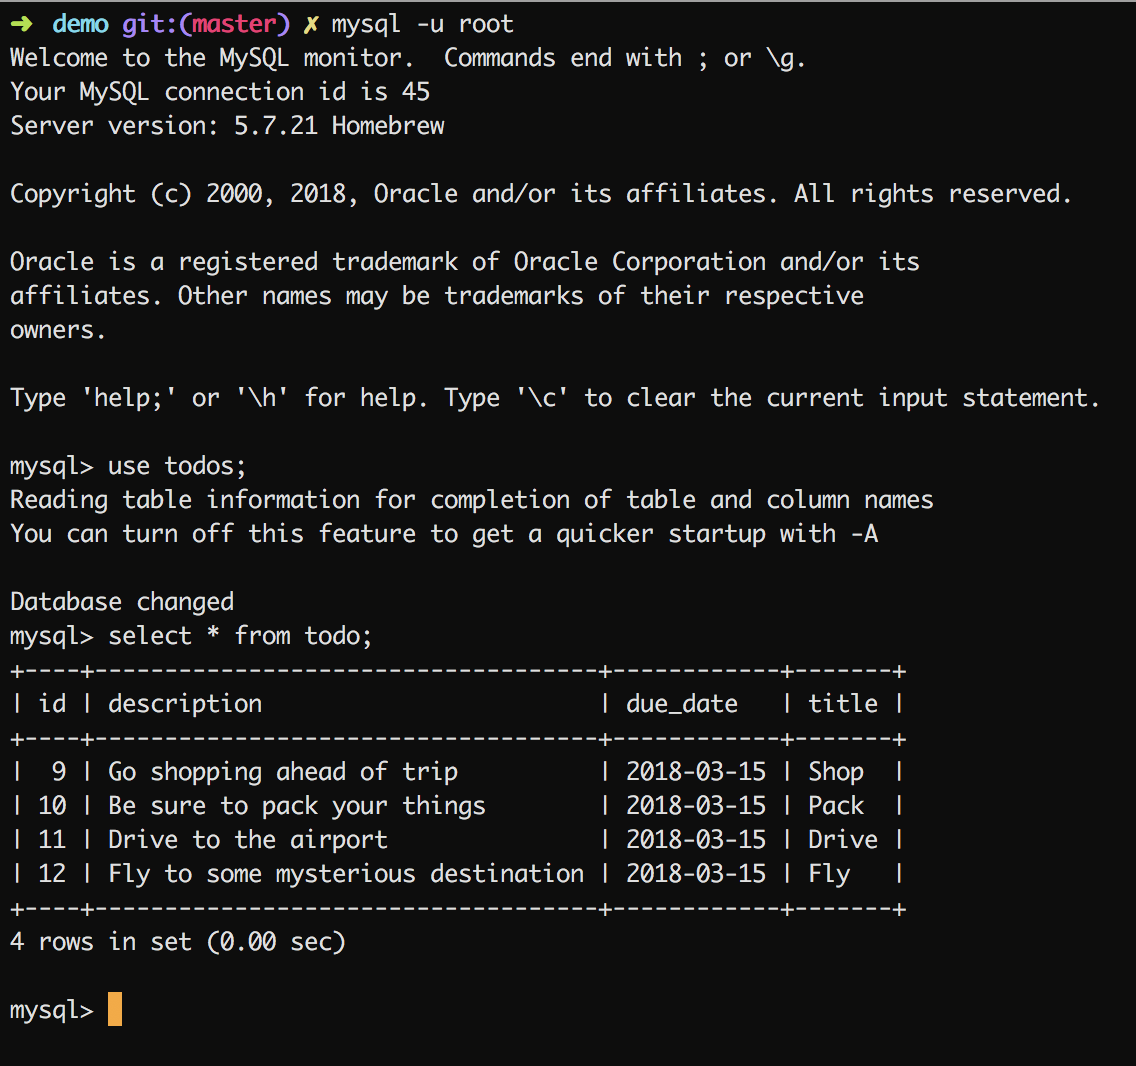
Notice how seamless it was to move from our original H2 database to using a different RDBMS.
4.1. Data Initialization on Startup
Now that we’re no longer using an in-memory database, it is no longer appropriate to assume the TODO table is empty on startup, and to unconditionally initialize the table with todos in Runner.java.
➜ Modify Runner.java: add a condition around the todoRepository.save() statements. The condition should ensure that the initialization takes place only if the table is empty (repository.count() == 0):
@@ -25,6 +25,14 @@ public class Runner implements CommandLineRunner {
   public void run(String... args) {
     helloService.greet();

+    if (todoRepository.count() == 0) {
+      initializeTodos();
+    }
+
+    logger.debug("exiting run method..");
+  }
+
+  private void initializeTodos() {
     LocalDate nextWeek = LocalDate.now().plus(7, ChronoUnit.DAYS);

     todoRepository.save(Todo.builder()
@@ -43,8 +51,5 @@ public class Runner implements CommandLineRunner {
         .title("Fly")
         .description("Fly to some mysterious destination")
         .dueDate(nextWeek).build());
-
-
-    logger.debug("exiting run method..");
   }
 }
4.2. Profiles
It would be convenient to have the option to choose H2 in some cases, and mysql in others. For example, colleagues might want to play with the application without having to install mysql.
Spring Profiles is perfect for this scenario. We can define the configuration of the mysql datasource only when the profile named mysql is active.
Spring Boot provides conventions for configuration for specific profiles:
-
For .properties files: the naming convention is
application-<profilename>.properties; for example place mysql-specific configuration in the file namedapplication-mysql.properties -
For .yml files, we can do even better: YAML supports the notion of multiple documents defined within the same file, with the
---document separator
Here’s an example:
---
logging:
  level:
    com.example: DEBUG

hello:
  greeting: Bonjour

---
spring:
  profiles: mysql
  datasource:
    url: jdbc:mysql://localhost:3306/todos?autoReconnect=true&useSSL=false
    username: todo_user
    password: secret
  jpa:
    generate-ddl: true
Above, we’re moving the mysql datasource [and other pertinent] configuration to a section labeled with the Spring profile named mysql.
This basically means that by default, when no profile is set, we’ll use H2. And when we specify the mysql profile, we’ll get the mysql configuration.
➜ Start the application normally, and verify that data is now saved to H2 and not mysql
Inspect the console output on application startup: do you see what dialect Hibernate selected?
.. org.hibernate.dialect.Dialect : HHH000400: Using dialect: org.hibernate.dialect.H2Dialect
To specify the list of active profiles when starting an application, use the spring.profiles.active configuration property.
It’s often simpler to use an environment variable before starting the application, like so:
$ SPRING_PROFILES_ACTIVE=mysql gradle bootRun
Verify that this time, Hibernate selects the mysql dialect.
This can be baked into the build process by adding a task named, say, bootRunMysql, as follows (credit):
task bootRunMysql(type: org.springframework.boot.gradle.tasks.run.BootRun, dependsOn: 'build') {
  group = 'Application'
  description = 'Run the boot application with the mysql profile'
  doFirst() {
    main = 'com.example.demo.DemoApplication'
    classpath = sourceSets.main.runtimeClasspath
    systemProperty 'spring.profiles.active', 'mysql'
  }
}
IDEs make this process even simpler. They have built-in support for multiple run configurations, as shown in the following screenshot:
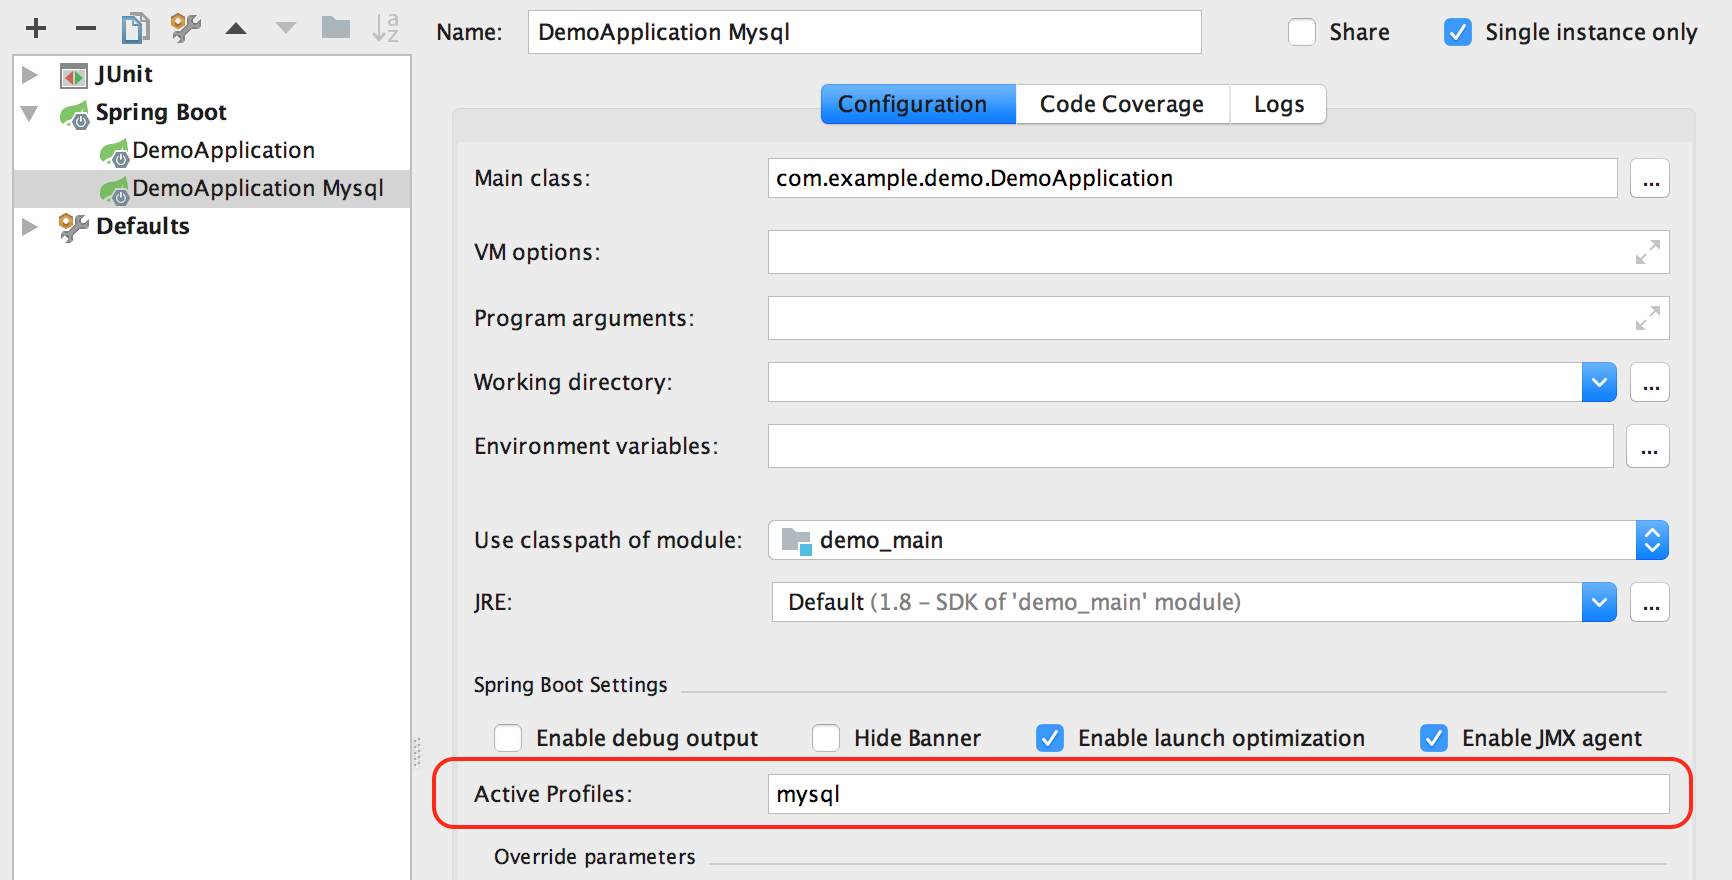
Above, I’ve duplicated my existing run configuration, and explicitly set the active profile to mysql.
5. Summary
The goal of this lab was not to show how to build database applications, but rather to demonstrate how, here too (in the data domain), Spring Boot simplifies development:
-
Autoconfiguration goes a long way to configuring the Spring application context according to the dependencies we have declared.
-
By using conventions, configuration is simplified: just edit
application.ymland setspring.datasource.url. -
Retrospect on how easy (or difficult) it was to switch from our own
InMemoryTodoRepositoryto one using JPA. -
[Opinion:] Spring Boot makes development a more pleasurable activity.
5.1. Explore Further
Here are some resources to explore, as suggestions for going further:
-
Database migrations with flyway.
-
Database integration with Spring’s jdbcTemplate and
spring-boot-starter-jdbcinstead of JPA. Here’s a short self-paced guide. -
Spring Data with MongoDB: Here’s a short self-paced guide.
-
Spring Data REST is a unique project that automatically generates REST API controllers for CrudRepositories. Here’s a short self-paced guide on this topic.