Estimated Time: 25 minutes
1. Preface
There’s something special about setting up the automation to produce a new build artifact for an application as soon as a commit is made to version control, and then automatically deploying that application to cloudfoundry.
In this lab, you’ll do precisely that. For the CI/CD server, you’ll use Concourse, with CloudFoundry as your target deployment platform.
To proceed, you’ll need access to a Concourse instance, and know its URL, and perhaps also a team name: an area within Concourse where pipelines can be created and run.
2. Setup Github Repository
-
Locate the
Articulateproject on GitHub -
Use the
Forkbutton to make your own private copy of the project in your own GitHub account. -
Clone your repository to your local machine
3. Concourse instance
In a web browser, visit the concourse instance home page: {{concourse_url}}
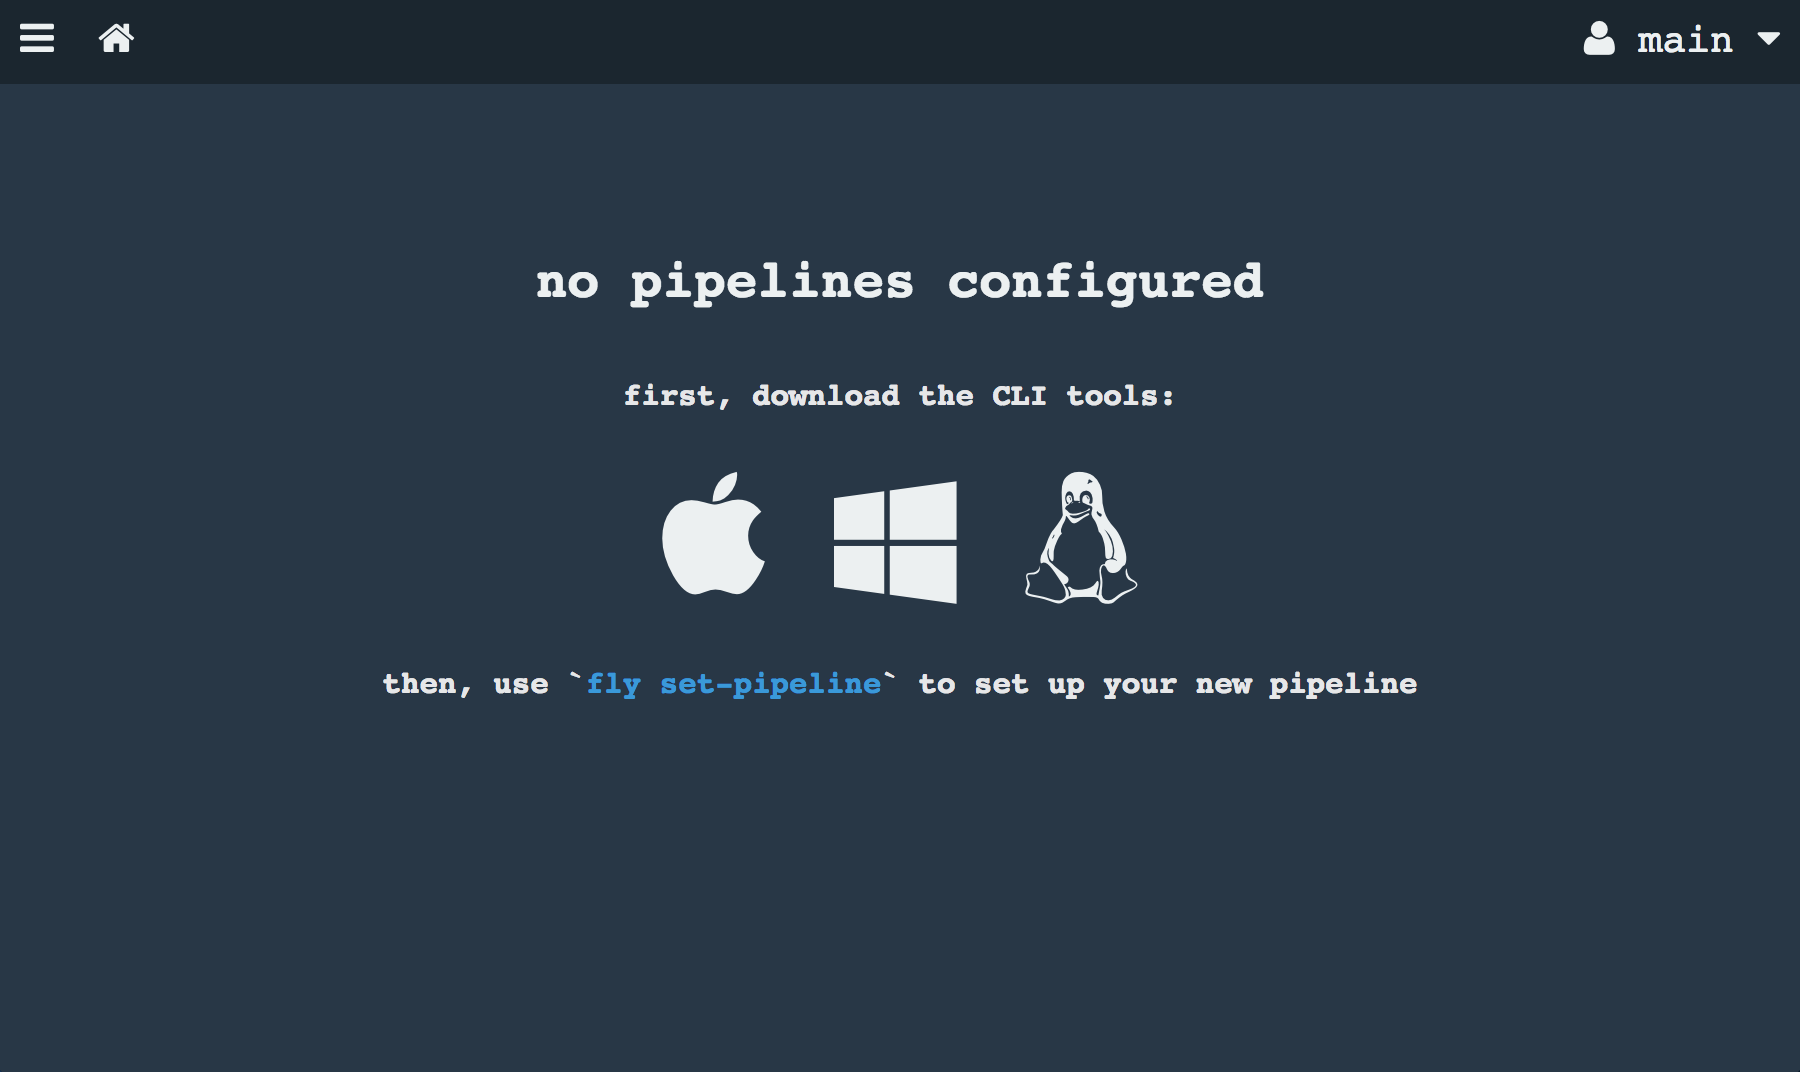
Click on the icon that matches your operating system to download the fly CLI. Then copy the binary to a directory that’s in your $PATH and make the binary executable:
sudo mkdir -p /usr/local/bin
sudo mv ~/Downloads/fly /usr/local/bin
sudo chmod 0755 /usr/local/bin/fly
Next, use fly to log in to your concourse instance. In the command below, you’re giving your target the name tutorial, which must accompany every subsequent fly command, so as to identify the concourse instance you’re targeting:
$ fly --target tutorial login --concourse-url {{concourse_url}} --team-name {{team_name}}$ fly --target tutorial syncNow that we’re logged in to the concourse instance, we can begin to work towards putting together a basic build pipeline.
4. Basic Build Pipeline
Create a yaml file named pipeline.yml to describe the build pipeline similar to the following:
---
resources:
- name: articulate-repo (1)
  type: git
  source:
    uri: https://github.com/{{username}}/articulate.git

jobs:
- name: build-project (2)
  public: true
  serial: true
  plan:
  - get: articulate-repo (3)
    trigger: true
  - task: maven-build (4)
file: articulate-repo/maven-build.yml| 1 | defines a single resource, of type git (See Concourse Resource Types for more information) named articulate-repo |
| 2 | a single job named build-project consisting of two steps |
| 3 | the first step specifies getting or cloning a copy of the articulate repository |
| 4 | the second step specifies the running of a task named maven-build which is to be specified in a file named maven-build.yml |
Make sure to replace the git resource uri with the uri to your articulate repository.
Next, define the maven build task. Here’s an example:
---
platform: linux

image_resource: (1)
  type: docker-image
  source: {repository: maven, tag: 3.5.2-jdk-8-alpine}

inputs: (2)
- name: articulate-repo

outputs: (3)
- name: artifacts

run: (4)
path: articulate-repo/build.sh| 1 | This task will run inside a docker container based on an image that has the jdk and maven pre-installed |
| 2 | This task’s inputs will consist of the git repository cloned in the previous step |
| 3 | Tells Concourse to create a folder named artifacts into which we can place the output of this task (the articulate jar file) |
| 4 | Finally, the task will consist of running a shell script named build.sh |
Finally, here’s the shell script:
#!/bin/sh

set -e -u -x

cd articulate-repo
mvn package
cp target/*.jar ../artifacts
This one’s rather self-explanatory:
-
We
cdinto the cloned repository, then -
Run the maven goal
mvn packageto produce our jar file, and finally -
Finally copy the articat to the output directory, so it can be picked up by concourse
Notice the naming convention here: because the job’s "get" step is named articulate-repo, Concourse uses it as the name of the directory where the repository is cloned.
Make sure build.sh is executable by setting the exec bit on it:
$ chmod 755 build.shCommit all three files (pipeline.yml, maven-build.yml, and build.sh) into your git repository, and push the changes back to github.
Next we tell concourse about our pipeline:
$ fly --target tutorial set-pipeline --config pipeline.yml --pipeline articulate-pipelineYou’ll be prompted whether you wish to apply the displayed pipeline configuration. Reply with a 'y' (affirmative) and press Enter. The pipeline will be created.
Re-visit the concourse ui in a web browser. You should now see your pipeline:
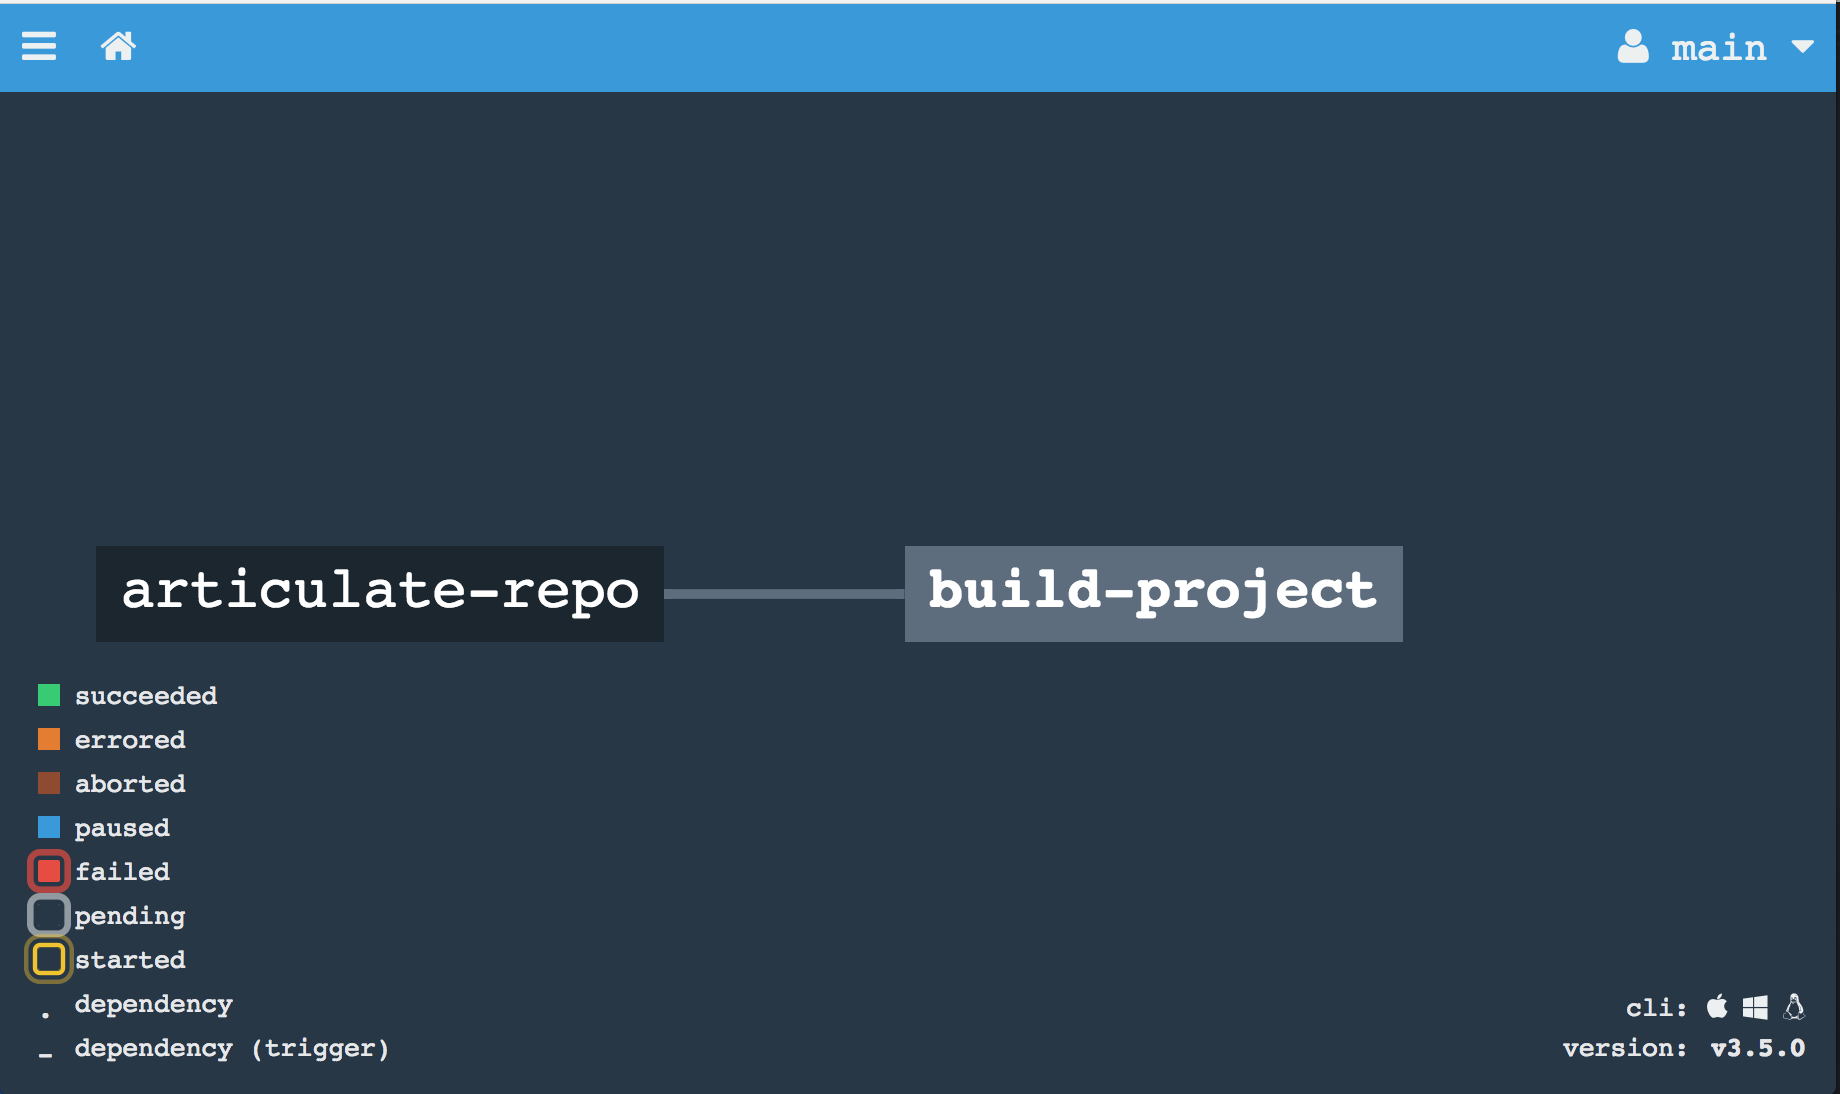
The blue bar at the top signifies that your pipeline is initially paused.
Unpause it:
$ fly --target tutorial unpause-pipeline --pipeline articulate-pipelineThe solid line from the repository to your "build-project" job signifies that a commit to the repository will automatically trigger the job.
The initial build might take a little more time than subsequent builds as the container image needs to be downloaded from the docker hub.
In the Concourse UI, you can click on the job and drill down into a view of the builds for this job.
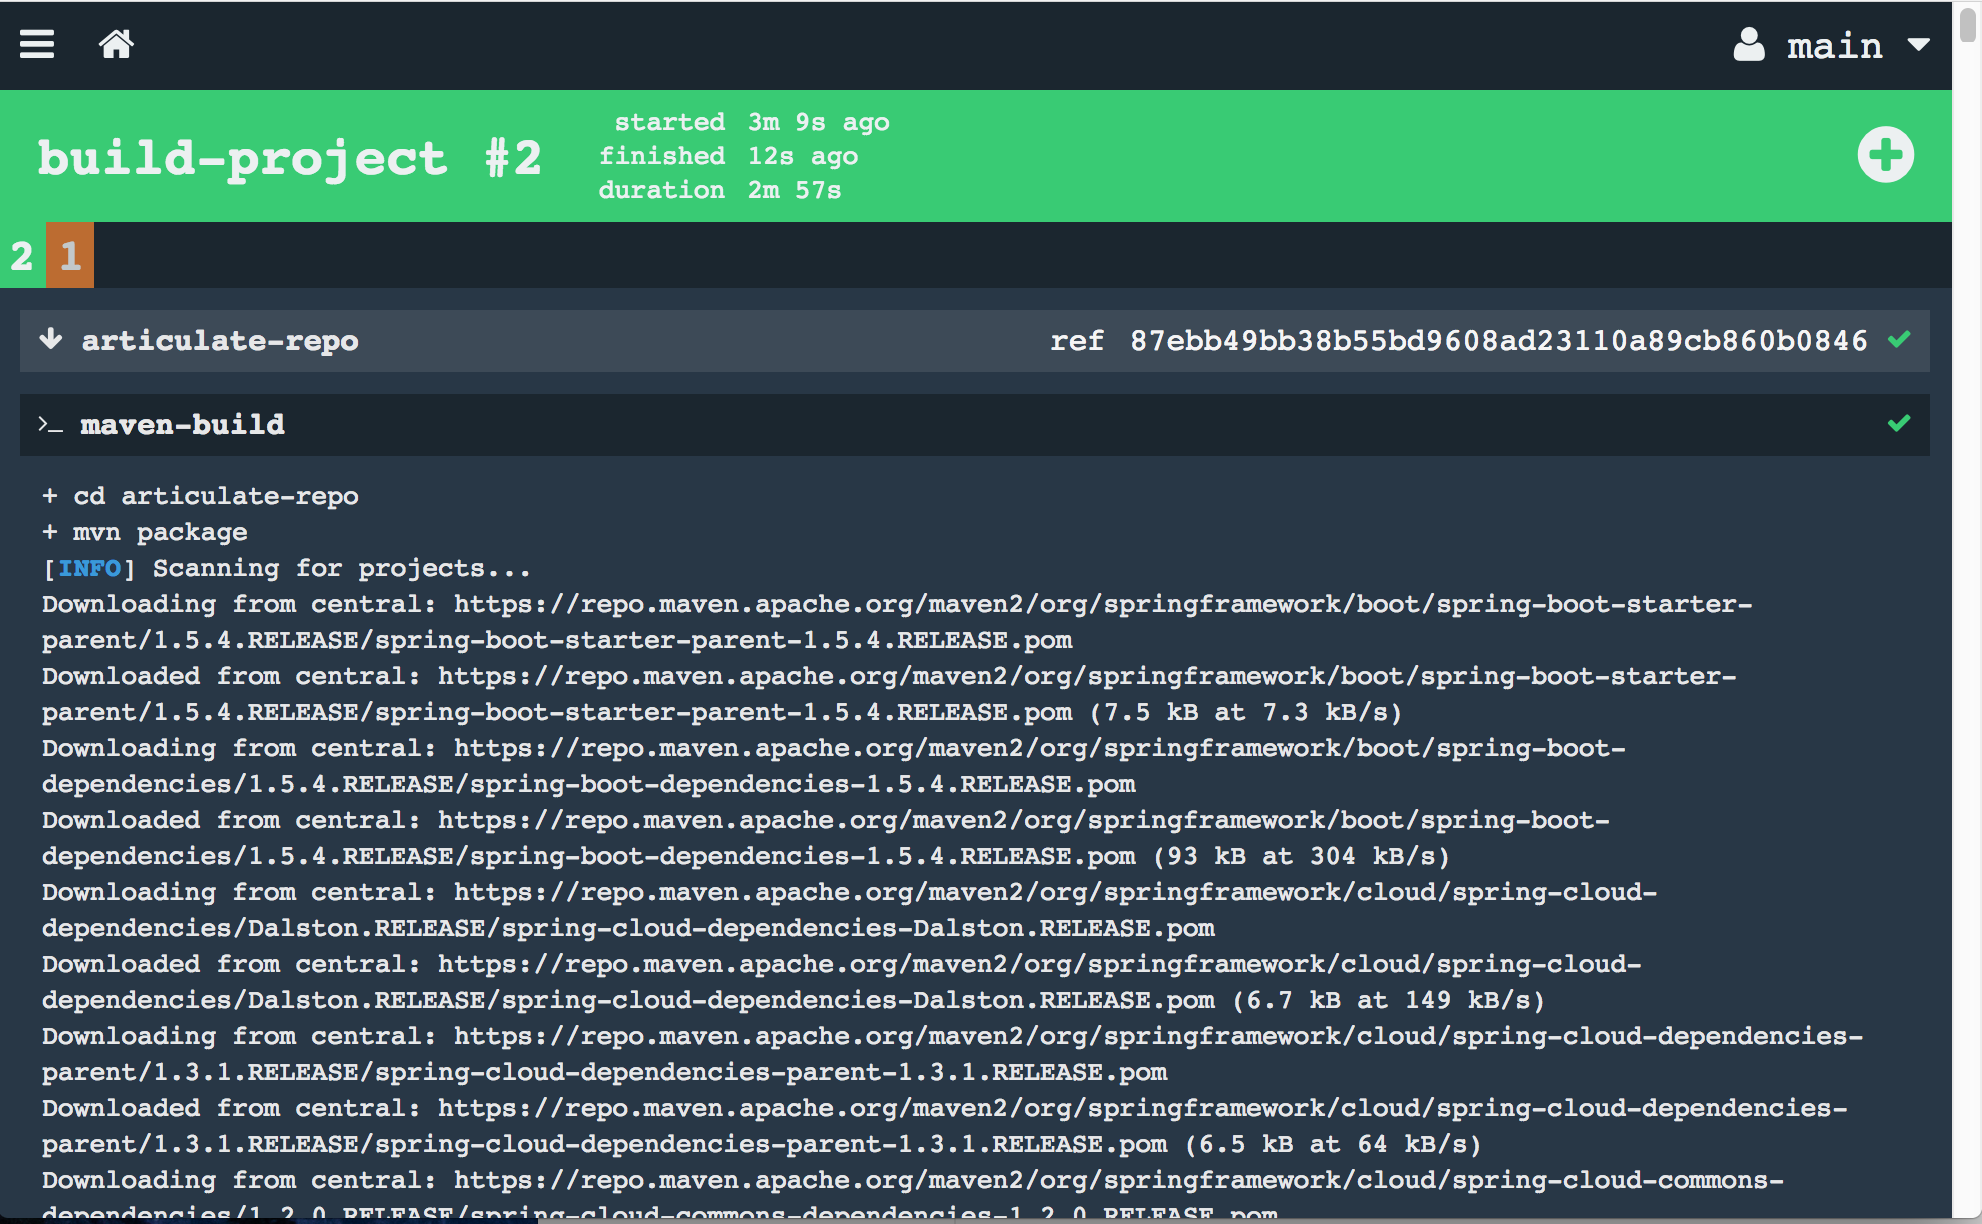
The '+' button on the upper right hand corner can be used to manually trigger the job. Here’s the command to trigger a job from the command line using fly:
$ fly -t tutorial trigger-job --job articulate-pipeline/build-projectUsually, this job will be triggered automatically each time we push a commit to our repository.
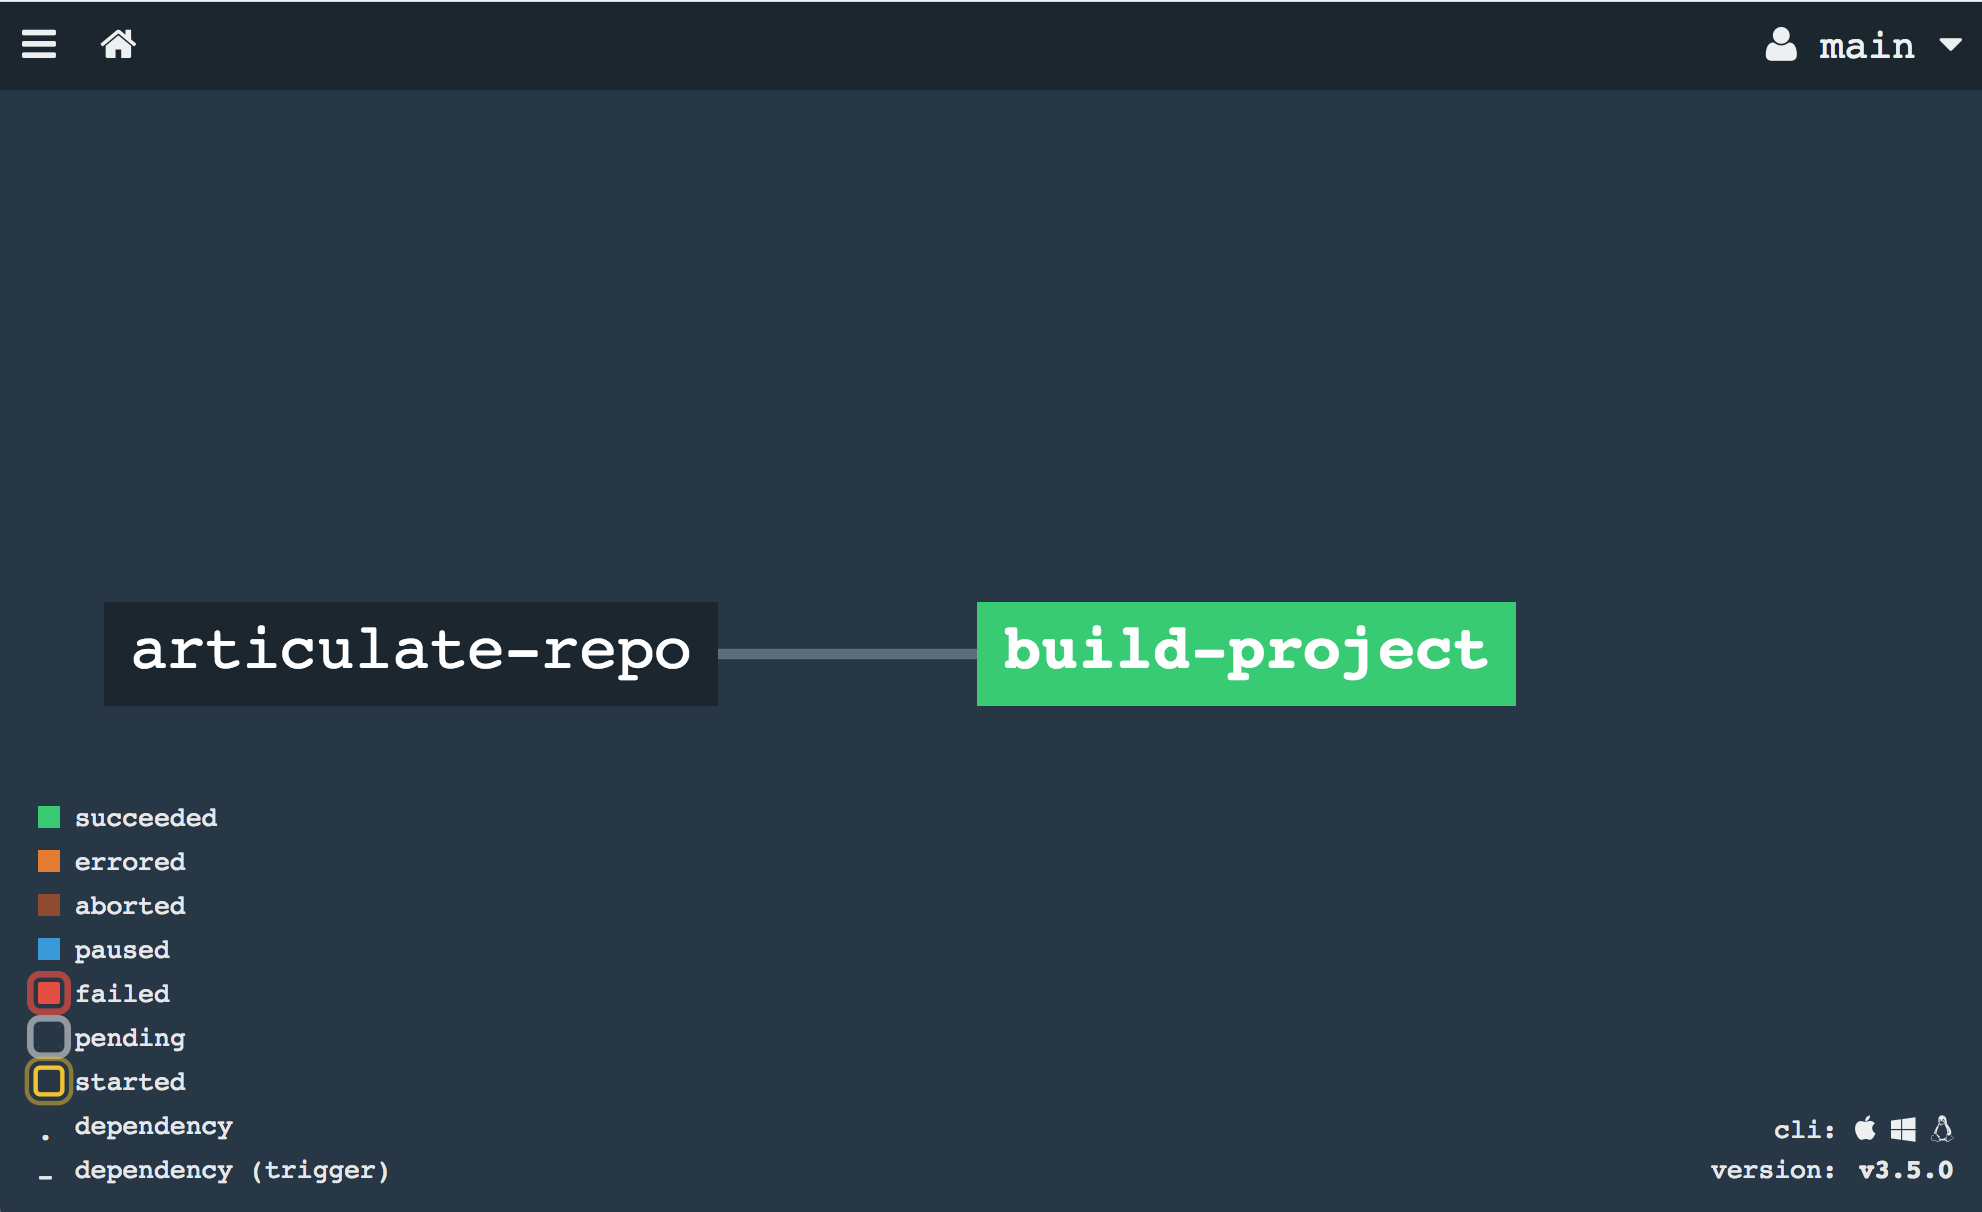
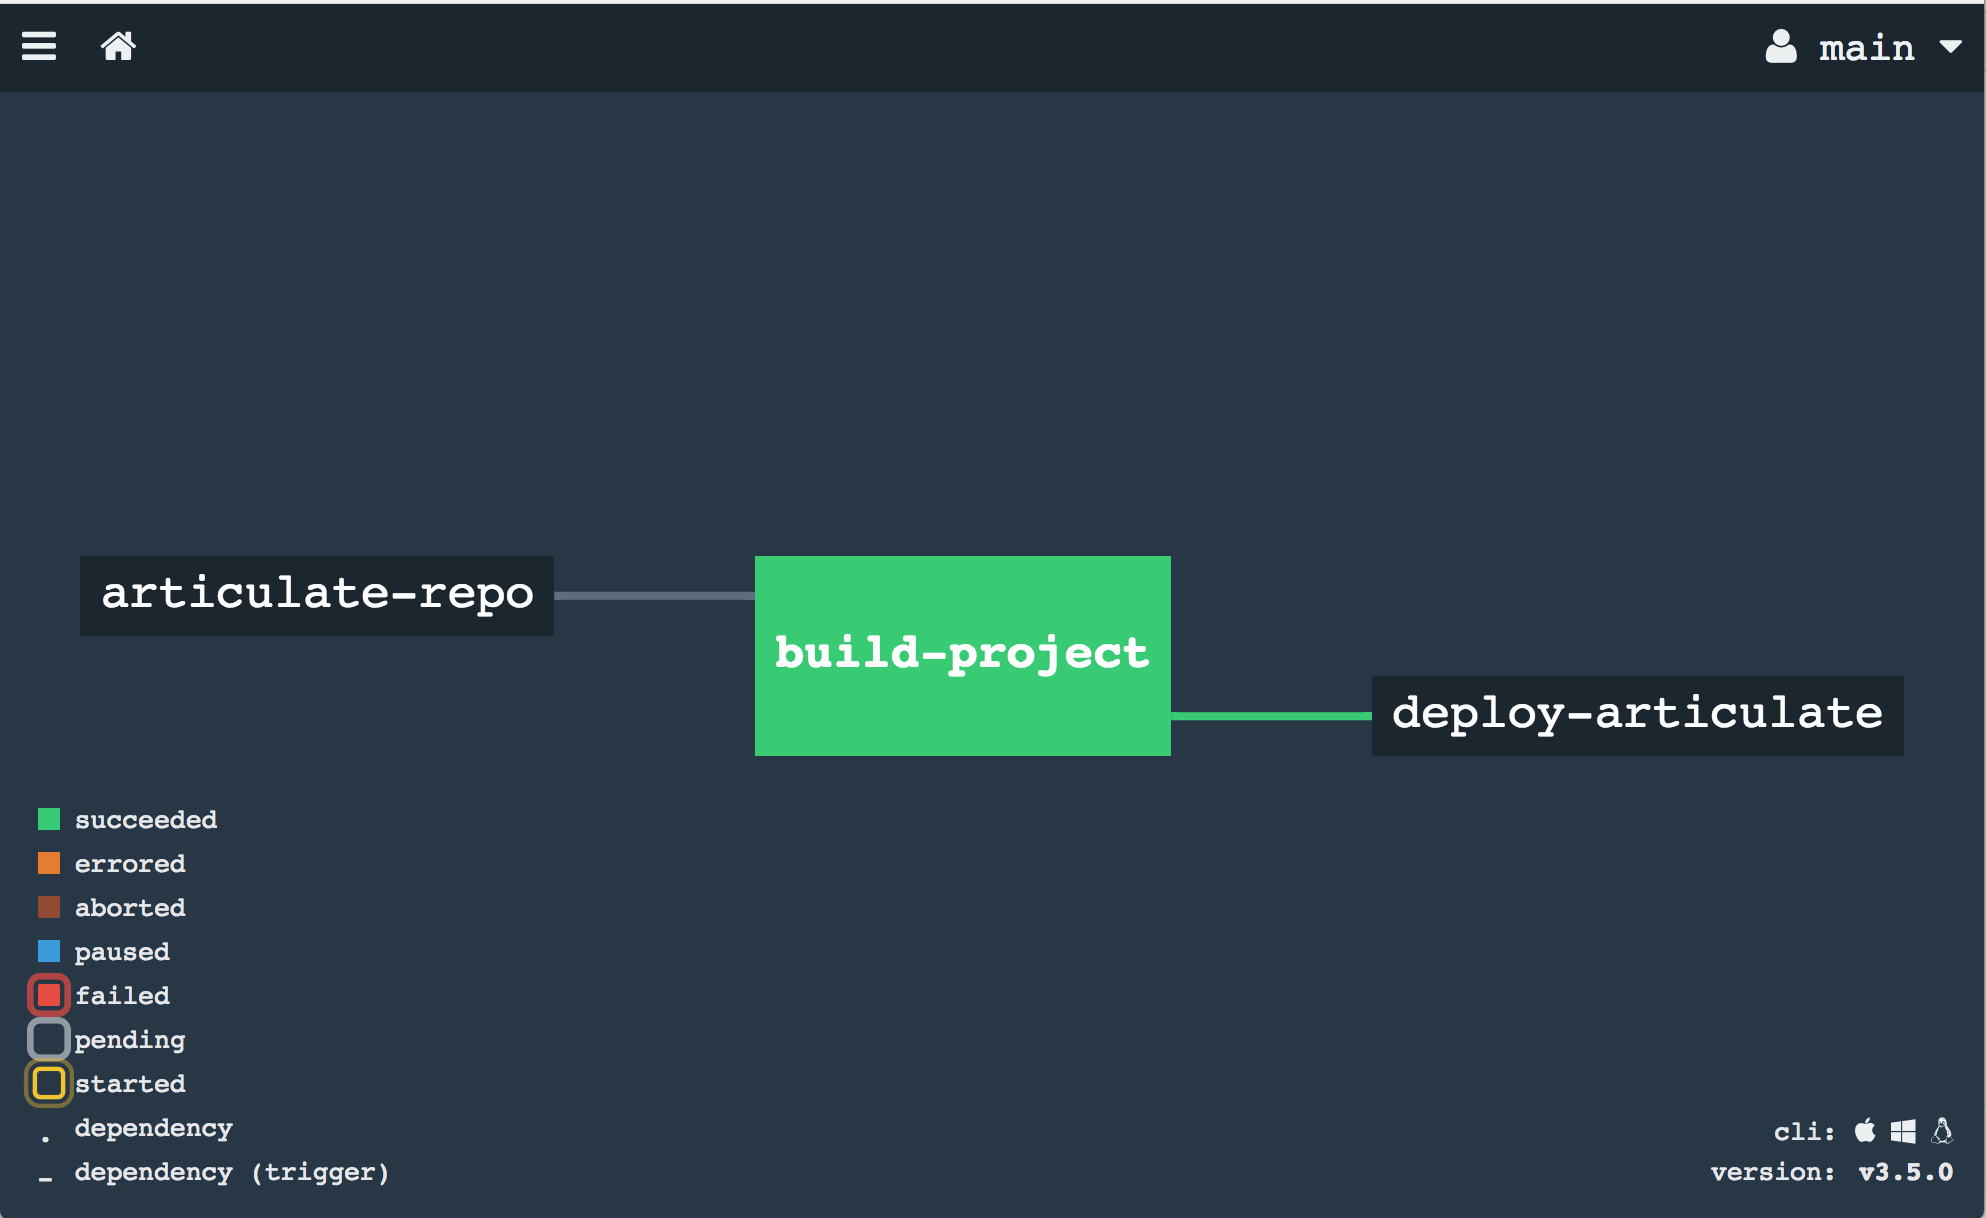
Notice how the pipeline is color-coded green after the latest job has passed:
5. Add Deploy Step
Automatically building our project is a great start. Next, we’d like to proceed and deploy our application to cloud foundry.
This can be done with the Concourse cf resource.
Edit the pipeline yaml file as follows:
-
add a cf resource
-
add a
putstep to the job that uses that resource to push the artifact to cloudfoundry
   source:
     uri: https://github.com/{{username}}/articulate.git

+- name: deploy-articulate
+  type: cf
+  source:
+    api: {{cf-api}}
+    username: {{cf-username}}
+    password: {{cf-password}}
+    organization: {{cf-organization}}
+    space: {{cf-space}}
+
 jobs:
 - name: build-project
   public: true
@@ -14,3 +23,7 @@ jobs:
     trigger: true
   - task: maven-build
     file: articulate-repo/maven-build.yml
+  - put: deploy-articulate
+    params:
+      manifest: articulate-repo/manifest.yml
+      path: artifacts/articulate-0.0.3-SNAPSHOT.jar
After making the above edit, we need to update Concourse with the new pipeline information. But note how above we externalized a number of variables: the target cloud foundry api, username, password, etc..
First, create a file named credentials.yml that looks similar to this:
cf-api: https://api.run.pivotal.io
cf-username: {{your_username}}
cf-password: {{your_password}}
cf-organization: {{your_target_cf_org}}
cf-space: {{your_target_cf_space}}
Be sure not to commit this file to your git repository. Also, be sure to replace the above references for username, password, etc.. with your PCF target and credentials information.
Now we can invoke the set-pipeline command once more, but with an additional argument to bind the credentials.yml file to the pipeline:
$ fly --target tutorial set-pipeline --config pipeline.yml --pipeline articulate-pipeline --load-vars-from credentials.ymlRefresh your Concourse UI, and note how we now have an additional "box" on the right-hand side of our pipeline reflecting this new deployment step:
Finally, commit your changes to pipeline.yml and git push those changes back to your git repository. This will have the side effect of triggering a new build. This new build will now also deploy articulate to cloudfoundry.
Here’s a screenshot catching the build in the act of doing a cf push:
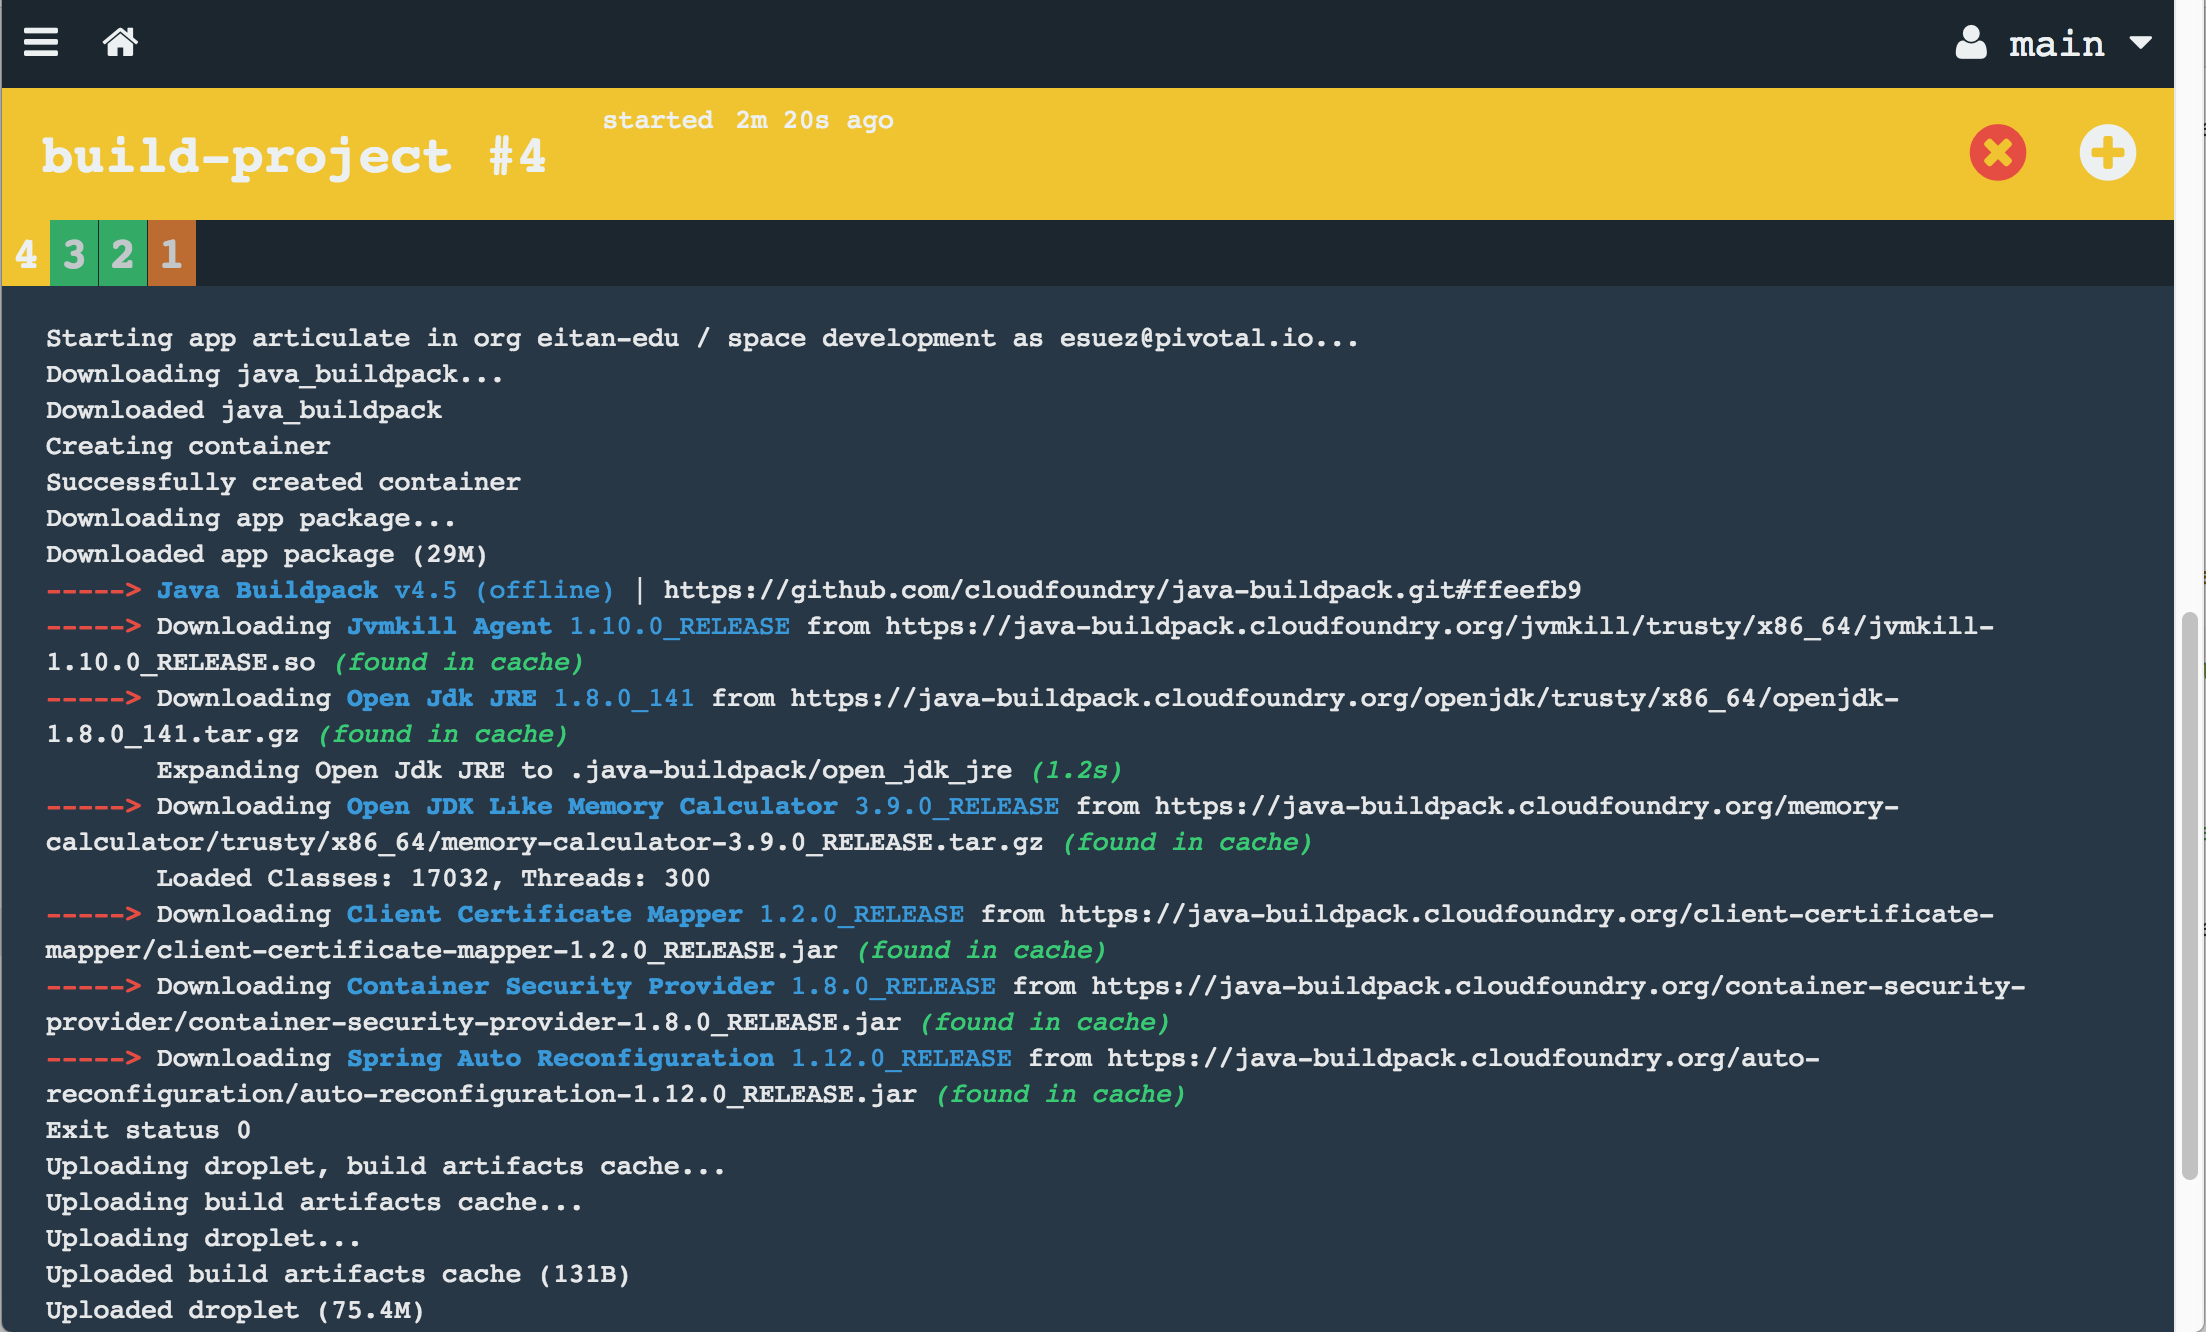
The output above should look familiar. Finally, you can check your PCF apps manager to see that your application has actually be deployed:
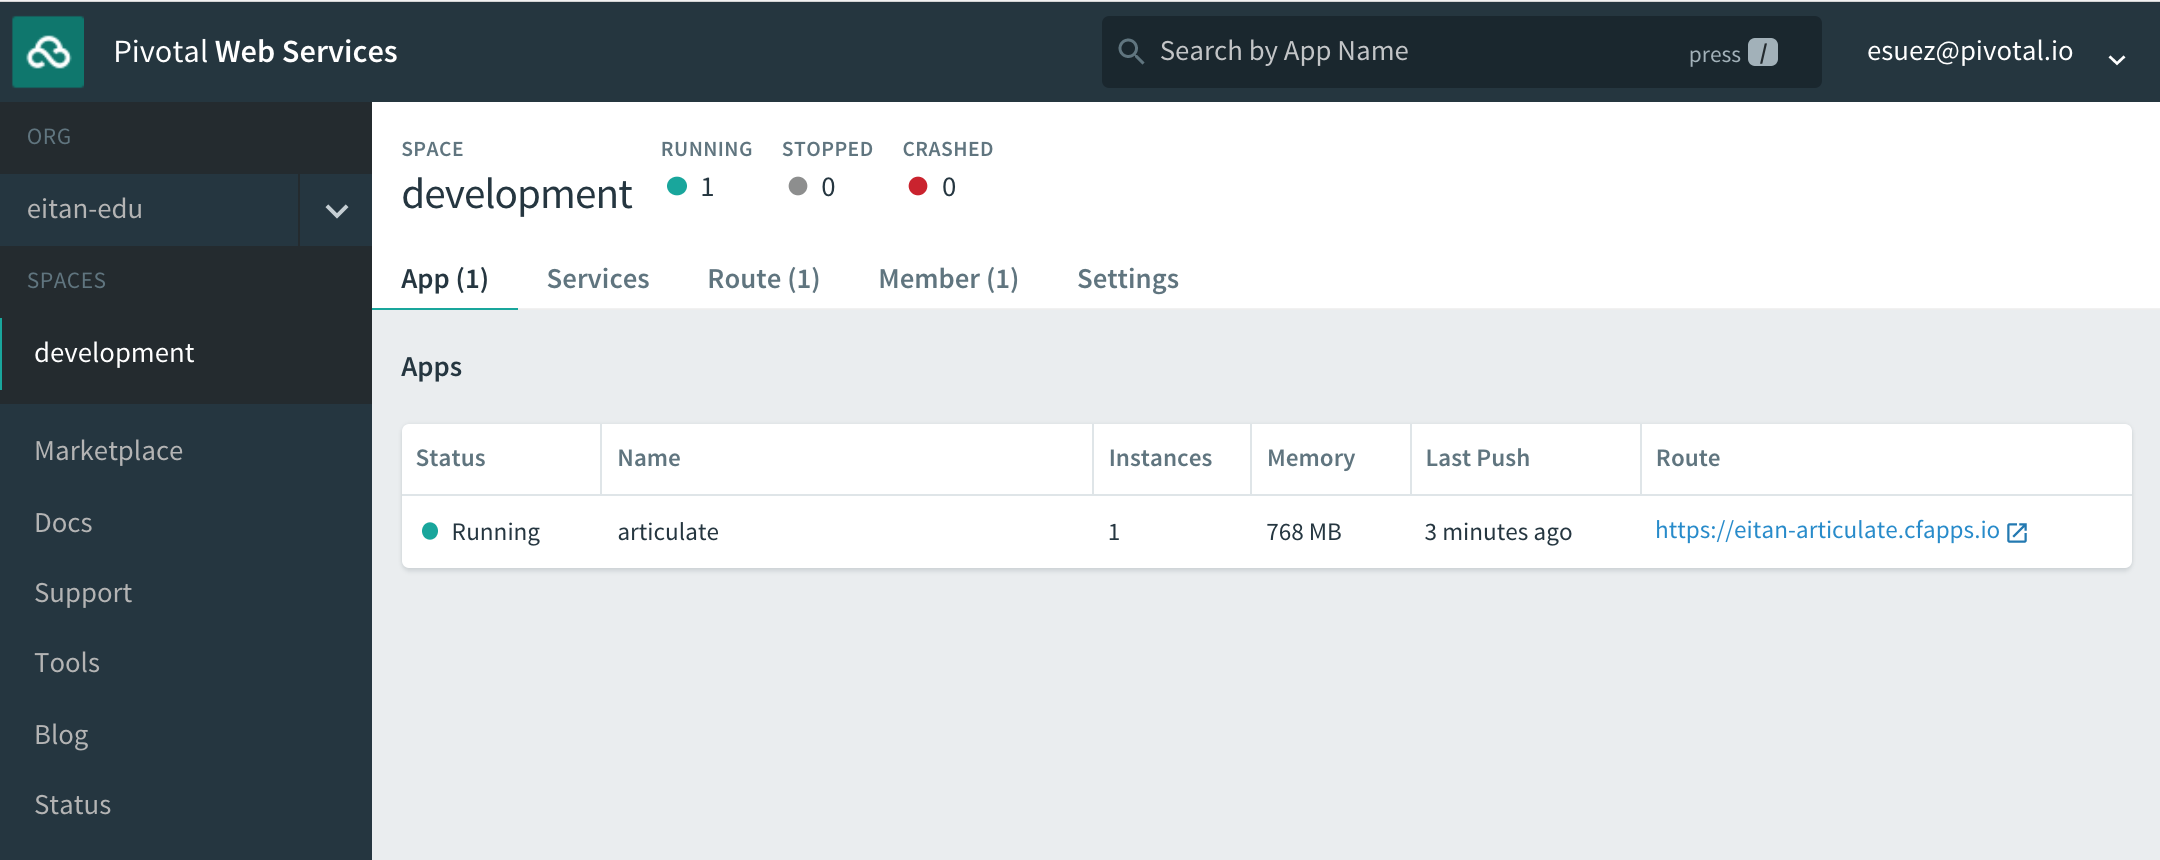
Of course, also click on the application link and visit your deployed application.
6. Cache artifacts
Each time our job runs, it runs in a new container with no memory of previous job runs. It’d be nice if we could have concourse cache the downloaded maven artifacts to speed up our build.
Concourse tasks can be configured to specify directories to be cached. See https://concourse.ci/running-tasks.html#caches
Here’s how it works: a task can populate some directory within the current working directory, which Concourse will save and make available for subsequent runs. By default maven caches dependencies in ${HOME}/.m2 which is outside the current working directory.
This means we’ll need to do two things:
-
configure maven to read and write dependencies to a different folder, say
${pwd}/.m2 -
configure the build task by adding a
cachesoption that references that directory.
This procedure is fully described in the following article.
With maven, we configure the local repository with a settings.xml file, which the following addition to our build.sh script dynamically generates:
 set -e -u -x

+
+M2_HOME=${HOME}/.m2
+mkdir -p ${M2_HOME}
+
+ROOT_FOLDER=$( pwd )
+M2_LOCAL_REPO="${ROOT_FOLDER}/.m2"
+
+mkdir -p "${M2_LOCAL_REPO}/repository"
+
+cat > ${M2_HOME}/settings.xml <<EOF
+
+<settings xmlns="http://maven.apache.org/SETTINGS/1.0.0"
+      xmlns:xsi="http://www.w3.org/2001/XMLSchema-instance"
+      xsi:schemaLocation="http://maven.apache.org/SETTINGS/1.0.0
+                          https://maven.apache.org/xsd/settings-1.0.0.xsd">
+      <localRepository>${M2_LOCAL_REPO}/repository</localRepository>
+</settings>
+
+EOF
+
+
 cd articulate-repo
 mvn package
 cp target/*.jar ../artifacts
Next, let’s configure the maven build task with the cache:
 run:
   path: articulate-repo/build.sh
+
+caches:
+- path: .m2/
Commit and push these changes to your git repository, and verify that the feature works:
-
The first build will accumulate the cache. Take note of how long that build takes to complete.
-
Now, trigger the build manually one more time (click on the '+' sign in the upper right-hand corner)
Compare the time this second build took to complete with the previous build. In my case, here’s the maven summary output for each run:
[INFO] ------------------------------------------------------------------------
[INFO] BUILD SUCCESS
[INFO] ------------------------------------------------------------------------
[INFO] Total time: 02:28 min
[INFO] Finished at: 2017-11-29T18:00:01Z
[INFO] Final Memory: 42M/247M
[INFO] ------------------------------------------------------------------------[INFO] BUILD SUCCESS
[INFO] ------------------------------------------------------------------------
[INFO] Total time: 4.860 s
[INFO] Finished at: 2017-11-29T18:02:19Z
[INFO] Final Memory: 41M/351M
[INFO] ------------------------------------------------------------------------7. Test the Pipeline
With our pipeline in place, each push to the git repository will trigger a new build, followed by a deployment.
Let’s test this:
-
Edit articulate’s
index.htmltemplate, which you’ll find undersrc/main/resources/templates -
Change the welcome message from
Welcome to Articulate!toWelcome to My Articulate Application! -
Commit and push the change to GitHub, and watch the pipeline react.
-
After the build is complete, visit your articulate application’s front page in PCF and verify that the welcome message reflects your change.
8. Evolving the Pipeline
There’s much more to Concourse that we don’t have time to cover in this lab.
Here are some likely ways in which this pipeline would evolve over time:
-
After building the project, publish the artifacts to an artifact repository, such as Nexus or Artifactory
-
Separate the deploy task into its own job that would be triggered by a successful build. This job would fetch the artifact from the artifact repository and deploy the application to a CI environment
-
Deployment would be followed by the running of functional tests that ensure the correctness of our application
-
A subsequent job may automatically push the application to a QA environment, perhaps for exploratory testing
-
Yet another job would be made available to deploy the application to production. This job would not be triggered automatically, but would be kicked off manually after the team makes the decision to release to production