-
How to set up a git repository to hold configuration data
-
How to set up a config server (
config-server) with a git backend -
How to set up a client (
greeting-config) to pull configuration from theconfig-server -
How to change log levels for a running application (
greeting-config) -
How to use
@ConfigurationPropertiesto capture configuration changes (greeting-config) -
How to use
@RefreshScopeto capture configuration changes (greeting-config) -
How to override configuration values by profile (
greeting-config) -
How to use Spring Cloud Service to provision and configure a Config Server
-
How to use Cloud Bus to notify applications (
greeting-config) to refresh configuration at scale
1. Set up the app-config Repo
To start, we need a repository to hold application configuration.
-
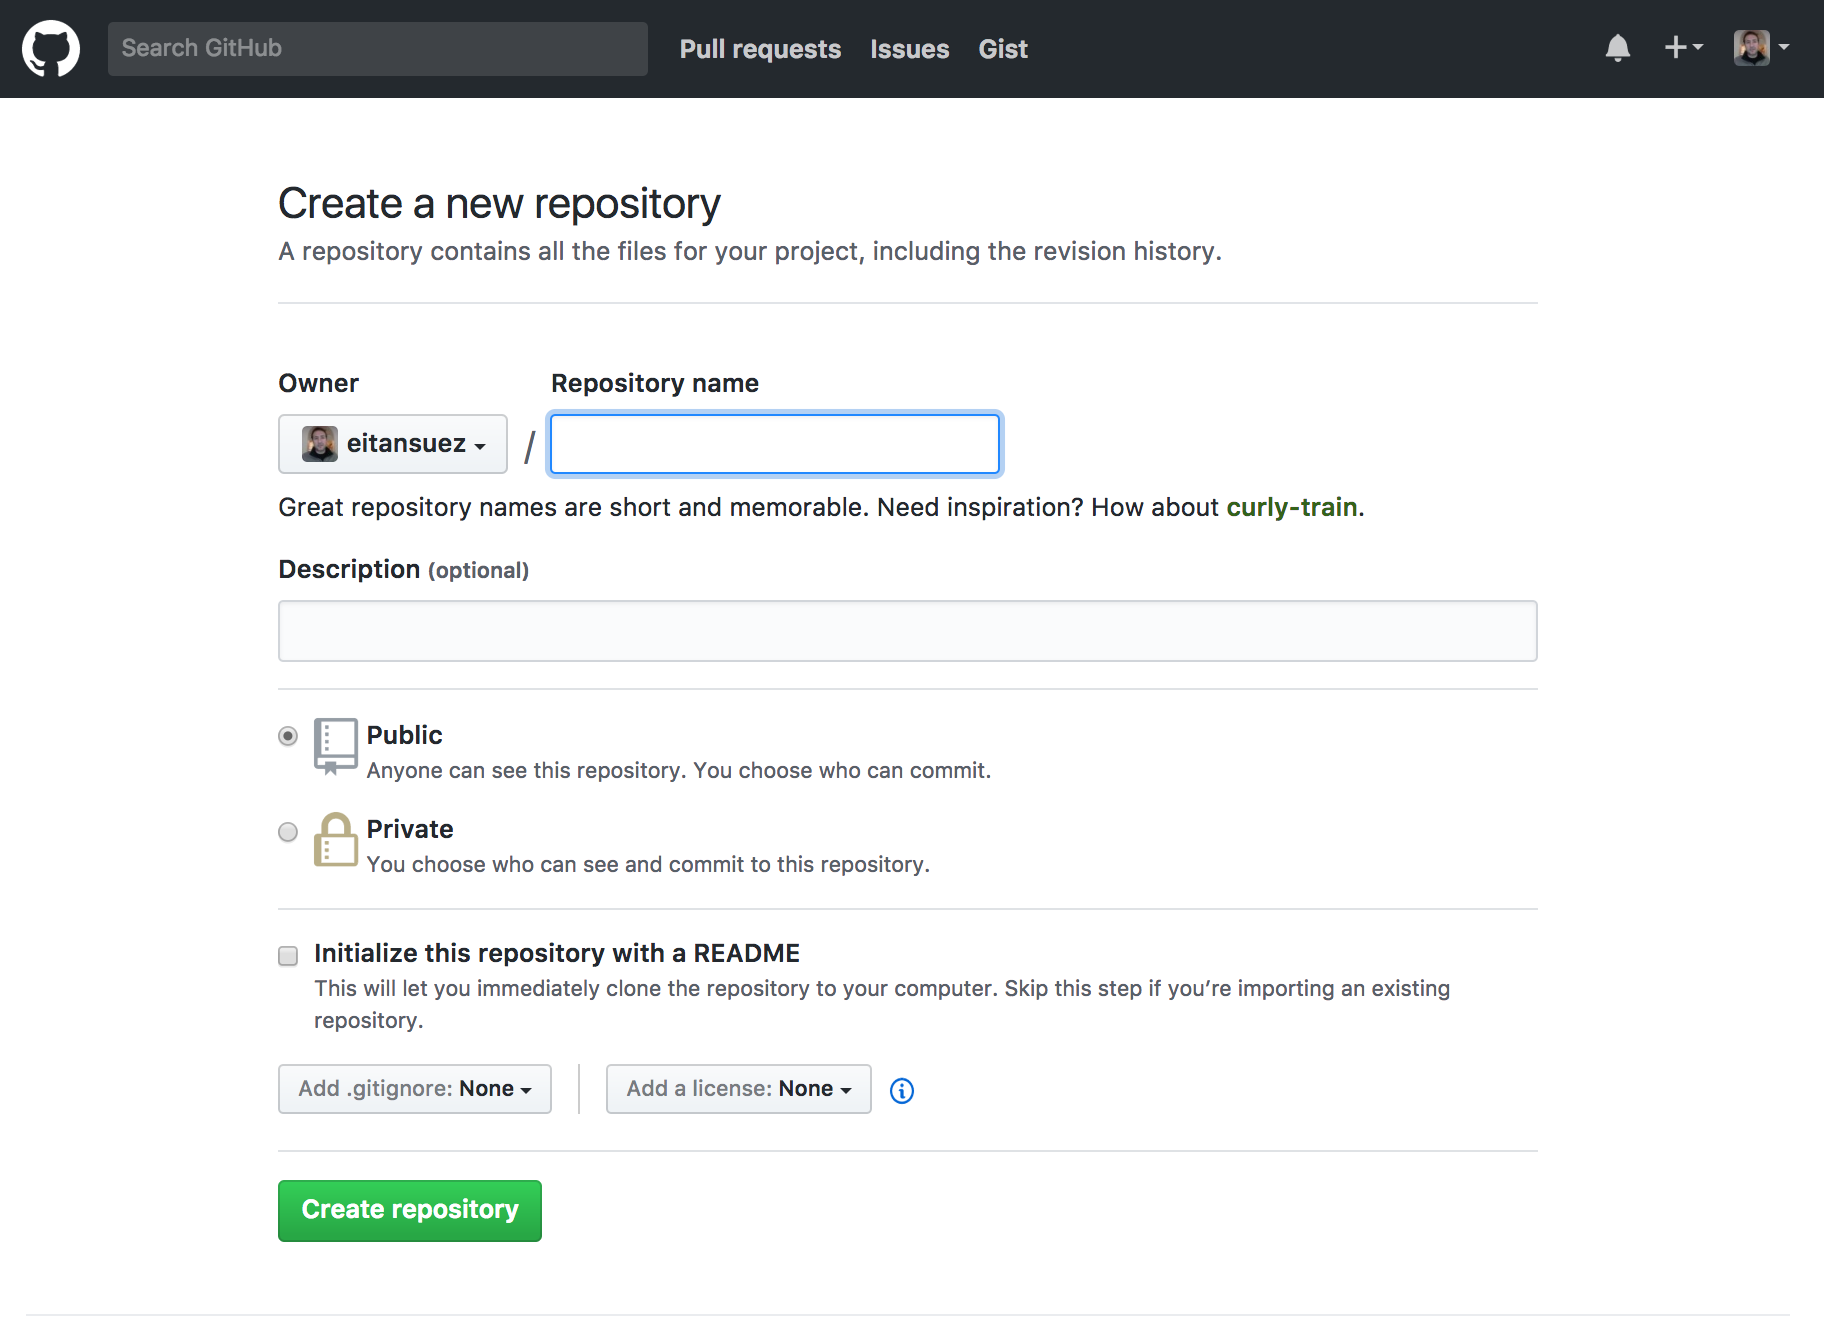
Create a public repository on github, and name it app-config
-
After creating your public repository, follow the instructions that github supplies to create a new (local) repository on the command line and to configure the github repository you just created as its "remote"
This repository will serve as the source of configuration data for our Spring applications.
2. Set up config-server
-
Review the project
config-serverin the spring cloud services labs you recently cloned. -
Review the project’s
pom.xmlfile. Notice thespring-cloud-config-serverdependency:<dependency> <groupId>org.springframework.cloud</groupId> <artifactId>spring-cloud-config-server</artifactId> </dependency>This dependency turns a spring boot application into a spring configuration service.
-
Look at the class
ConfigServerApplication.javapackage io.pivotal; import org.springframework.boot.SpringApplication; import org.springframework.boot.autoconfigure.SpringBootApplication; import org.springframework.cloud.config.server.EnableConfigServer; @SpringBootApplication @EnableConfigServer public class ConfigServerApplication { public static void main(String[] args) { SpringApplication.run(ConfigServerApplication.class, args); } }Note the
@EnableConfigServerannotation. That embeds theconfig-server. -
Configure the
config-serverwith the GitHub repository you just created. This will be the source of the configuration data. Edit theapplication.ymlfile:server: port: 8888 spring: cloud: config: server: git: uri: https://github.com/eitansuez/app-config.gitMake sure to use your
app-configrepository url above. -
Open a terminal window and start the
config-server.$ cd config-server $ mvn spring-boot:runYour
config-serverwill be running locally on port 8888 (once you see a Started ConfigServerApplication.. message). You will not be returned to a command prompt and must leave this window open. -
Let’s add some configuration. Edit your
app-configrepo. Create a file calledhello-world.yml. Add the content below to the file.name: John Doe -
Push the changes back to GitHub.
-
Confirm that the application named
hello-worldis now configured with this name property by visiting this config server url: http://localhost:8888/hello-world/defaultBecause the returned payload is JSON, we recommend using something that will pretty-print the document. A good tool for this is the Chrome JSON Formatter plug-in. 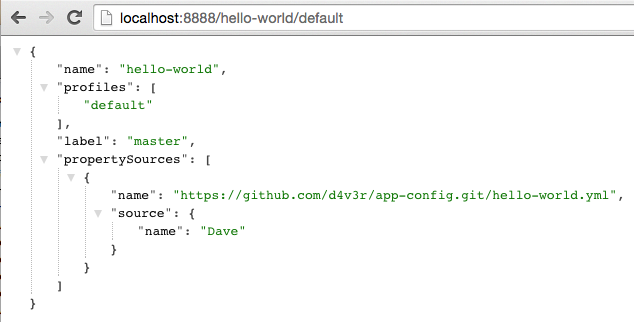
3. Set up greeting-config
-
Review the
greeting-configproject, and specifically itspom.xmlfile.<dependency> <groupId>io.pivotal.spring.cloud</groupId> <artifactId>spring-cloud-services-starter-config-client</artifactId> </dependency>By adding
spring-cloud-services-starter-config-clientas a dependency, this application will consume configuration from theconfig-server.greeting-configis a config client. -
Notice that the
bootstrap.ymlfile defines the spring application’s name:spring: application: name: greeting-config cloud: config: uri: http://localhost:8888/This value is used in several places within Spring Cloud: locating configuration files by name, service discovery/registration by name, etc. In this lab, it will be used to locate config files for the
greeting-configapplication.Absent from the bootstrap.yml is the
spring.cloud.config.uri, which defines howgreeting-configreaches theconfig-server. Since there is nospring.cloud.config.uridefined in this file, the default value ofhttp://localhost:8888is used. Notice that this is the same host and port of theconfig-serverapplication. -
Open a new terminal window. Start the
greeting-configapplication:$ cd greeting-config $ mvn spring-boot:run -
Confirm the
greeting-configapp is up. Browse to http://localhost:8080. You should be prompted to authenticate. Why?spring-cloud-services-starter-config-clienthas a dependency on Spring Security. Unless the given application has other security configuration, this will cause all application and actuator endpoints to be protected by HTTP Basic authentication. -
Spring Security automatically generates basic authentication credentials if none have been set explicitly, as in this case. The username is simply
user, and the password is written by Spring Security to the application’s log. Search your application’s console output for a line that looks like this:Using default security password: xxxxx-xxxxx-xxxxx-xxxxx-xxxxxThe username and password can be explicitly set via the configuration parameters security.user.nameandsecurity.user.password. -
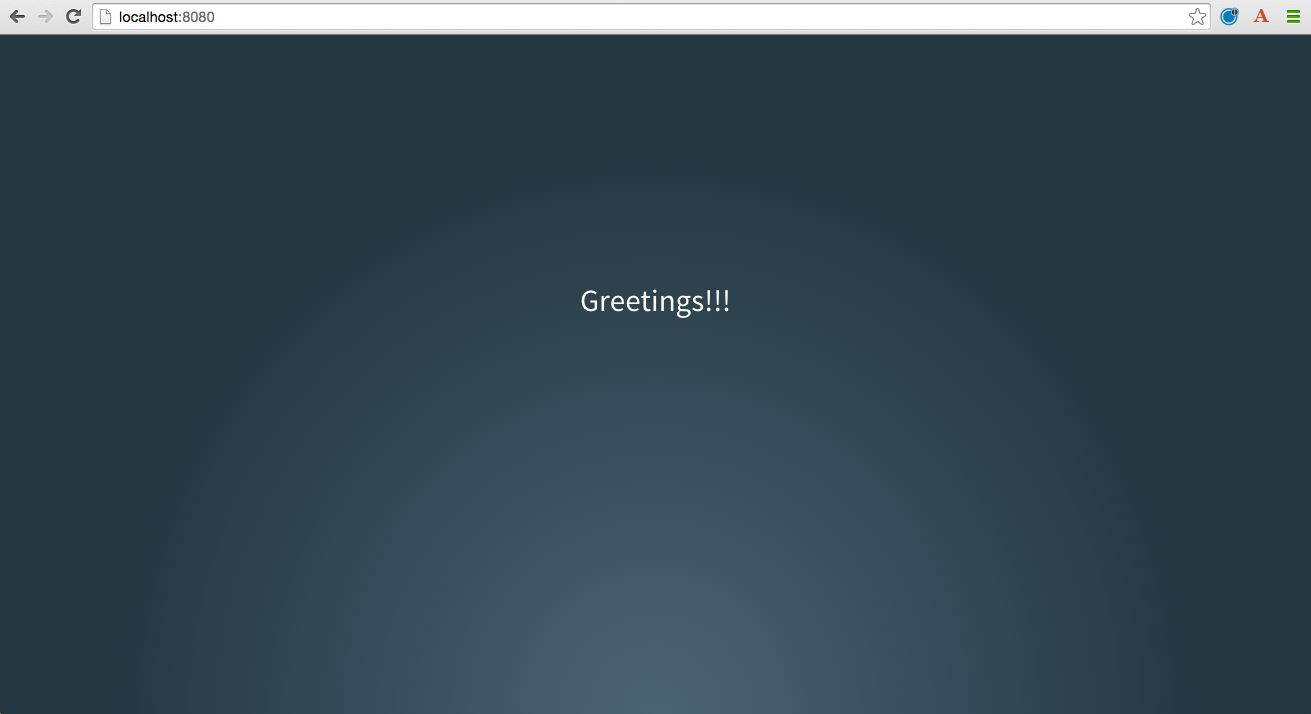
After logging in, you should see the message "Greetings!!!".
-
Stop the
greeting-configapplication
4. Unsecure the Endpoints
For these labs we don’t need Spring Security’s default behavior of securing every endpoint. This will be our first example of using the config-server to provide configuration for the greeting-config application.
-
Edit your
app-configrepository. Create a file calledgreeting-config.yml. Add the content below to the file and push the changes back to GitHub.security: basic: enabled: false # turn off securing our application endpoints management: security: enabled: false # turn off securing the actuator endpoints -
Browse to http://localhost:8888/greeting-config/default to review the configuration the
config-serveris providing forgreeting-configapplication.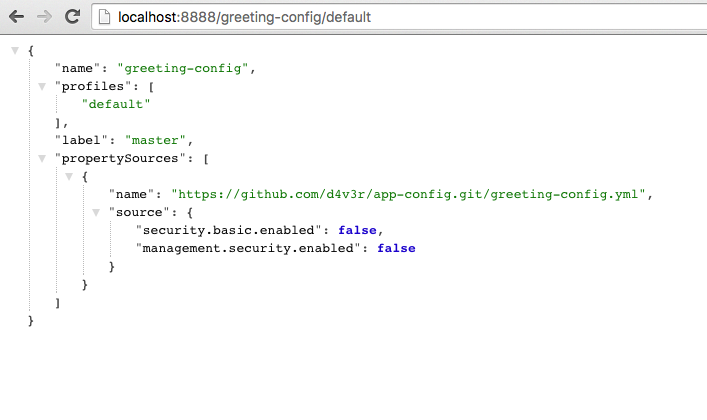
-
Start the
greeting-configapplication:mvn spring-boot:run -
Review the logs for the
greeting-configapplication. You can see that configuration is being sourced from thegreeting-config.ymlfile.2015-11-02 08:57:32.962 INFO 58597 --- [lication.main()] b.c.PropertySourceBootstrapConfiguration : Located property source: CompositePropertySource [name='configService', propertySources=[MapPropertySource [name='https://github.com/d4v3r/app-config.git/greeting-config.yml']]] -
Browse to http://localhost:8080. You should no longer be prompted to authenticate.
5. Changing Logging Levels
Next you will change the logging level of the greeting-config application.
-
View the
getGreeting()method of theGreetingControllerclass:@RequestMapping("/") String getGreeting(Model model) { logger.debug("Adding greeting"); model.addAttribute("msg", "Greetings!!!"); if(greetingProperties.isDisplayFortune()){ logger.debug("Adding fortune"); model.addAttribute("fortune", fortuneService.getFortune()); } return "greeting"; //resolves to the greeting.vm velocity template }We want to see these debug messages. By default only log levels of
ERROR,WARNandINFOwill be logged. You will change the log level toDEBUGusing configuration. All log output will be directed toSystem.out&System.errorby default, so logs will be output to the terminal window(s). -
In your
app-configrepository, add the content below to thegreeting-config.ymlfile and push the changes back to GitHub.security: basic: enabled: false management: security: enabled: false logging: # <----New sections below level: io: pivotal: DEBUG greeting: displayFortune: false quoteServiceURL: http://quote-service-dev.cfapps.io/quoteWe have added several configuration parameters that will be used throughout this lab. For this exercise, we have set the log level for classes in the
io.pivotalpackage toDEBUG. -
While watching the
greeting-configterminal, refresh the http://localhost:8080/ url. Notice there are noDEBUGlogs yet. -
Does the
config-serversee the change in your git repo? Let’s check what theconfig-serveris serving. Browse to http://localhost:8888/greeting-config/default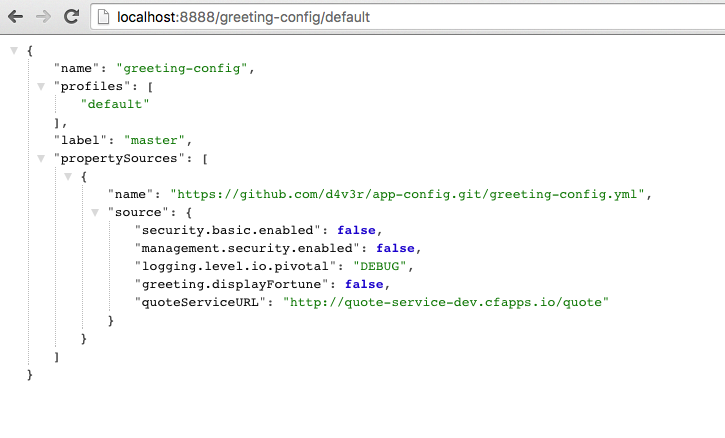
The propertySources value has changed! The
config-serverhas picked up the changes to the git repo. (If you don’t see the change, verify that you have pushed the greeting-config.yml to GitHub.) -
Review the following file:
greeting-config/pom.xml. For thegreeting-configapplication to pick up the configuration changes, it must include theactuatordependency. Theactuatoradds several additional endpoints to the application for operational visibility and tasks that need to be carried out. In this case, we have added the actuator so that we can use the/refreshendpoint, which allows us to refresh the application config on demand.<dependency> <groupId>org.springframework.boot</groupId> <artifactId>spring-boot-starter-actuator</artifactId> </dependency> -
For the
greeting-configapplication to pick up the configuration changes, it must be told to do so. Notifygreeting-configapp to pick up the new config by POSTing to thegreeting-config/refreshendpoint. Open a new terminal window and execute the following:curl -X POST http://localhost:8080/refresh -
Refresh the
greeting-confighttp://localhost:8080/ url while viewing thegreeting-configterminal. You should see the debug line "Adding greeting"
Congratulations! You have used the config-server and actuator to change the logging level of the greeting-config application without restarting the greeting-config application.
6. Turning on a Feature with @ConfigurationProperties
Use of @ConfigurationProperties is a common way to externalize, group, and validate configuration in Spring applications. @ConfigurationProperties beans are automatically rebound when application config is refreshed.
-
Review
greeting-config/src/main/java/io/pivotal/greeting/GreetingProperties.java. Use of the@ConfigurationPropertiesannotation allows for reading of configuration values. Configuration keys are a combination of theprefixand the field names. In this case, there is one field (displayFortune). Thereforegreeting.displayFortuneis used to turn the display of fortunes on/off. Remaining code is typical getter/setters for the fields.package io.pivotal.greeting; import org.springframework.boot.context.properties.ConfigurationProperties; @ConfigurationProperties(prefix = "greeting") public class GreetingProperties { private boolean displayFortune; public boolean isDisplayFortune() { return displayFortune; } public void setDisplayFortune(boolean displayFortune) { this.displayFortune = displayFortune; } } -
Review
greeting-config/src/main/java/io/pivotal/greeting/GreetingController.java. Note how thegreetingProperties.isDisplayFortune()is used to turn the display of fortunes on/off. There are times when you want to turn features on/off on demand. In this case, we want the fortune feature "on" with our greeting.package io.pivotal.greeting; import io.pivotal.fortune.FortuneService; import org.slf4j.Logger; import org.slf4j.LoggerFactory; import org.springframework.boot.context.properties.EnableConfigurationProperties; import org.springframework.stereotype.Controller; import org.springframework.ui.Model; import org.springframework.web.bind.annotation.RequestMapping; @Controller @EnableConfigurationProperties(GreetingProperties.class) public class GreetingController { private final Logger logger = LoggerFactory.getLogger(GreetingController.class); private final GreetingProperties greetingProperties; private final FortuneService fortuneService; public GreetingController(GreetingProperties greetingProperties, FortuneService fortuneService) { this.greetingProperties = greetingProperties; this.fortuneService = fortuneService; } @RequestMapping("/") String getGreeting(Model model) { logger.debug("Adding greeting"); model.addAttribute("msg", "Greetings!!!"); if (greetingProperties.isDisplayFortune()) { logger.debug("Adding fortune"); model.addAttribute("fortune", fortuneService.getFortune()); } return "greeting"; // resolves to the greeting.ftl template } } -
Edit your
app-configrepository. Changegreeting.displayFortunefromfalsetotruein thegreeting-config.ymland push the changes back to GitHub.security: basic: enabled: false management: security: enabled: false logging: level: io: pivotal: DEBUG greeting: displayFortune: true # <----Change to true quoteServiceURL: http://quote-service-dev.cfapps.io/quote -
Notify
greeting-configapp to pick up the new config by POSTing to the/refreshendpoint.curl -X POST http://localhost:8080/refresh -
Then refresh the http://localhost:8080/ url and see the fortune included.
Congratulations! You have turned on a feature without restarting using the config-server, actuator and @ConfigurationProperties.
7. Reinitializing Beans with @RefreshScope
Now you will use the config-server to obtain a service URI rather than hardcoding it in your application code.
Beans annotated with the @RefreshScope will be recreated when refreshed so they can pick up new config values.
-
Review
greeting-config/src/main/java/io/pivotal/quote/QuoteService.java.QuoteServiceuses the@RefreshScopeannotation. Beans with the@RefreshScopeannotation will be recreated when refreshing configuration. The@Valueannotation allows for injecting the value of thequoteServiceURLconfiguration parameter.In this case, we are using a third party service to get quotes. We want to keep our environments aligned with the third party. So we are going to override configuration values by profile (next section).
package io.pivotal.quote; import org.slf4j.Logger; import org.slf4j.LoggerFactory; import org.springframework.beans.factory.annotation.Value; import org.springframework.cloud.context.config.annotation.RefreshScope; import org.springframework.stereotype.Service; import org.springframework.web.client.RestTemplate; @Service @RefreshScope public class QuoteService { private final Logger logger = LoggerFactory.getLogger(QuoteService.class); @Value("${quoteServiceURL:}") private String quoteServiceURL; public String getQuoteServiceURI() { return quoteServiceURL; } public Quote getQuote() { logger.info("quoteServiceURL: {}", quoteServiceURL); RestTemplate restTemplate = new RestTemplate(); Quote quote = restTemplate.getForObject(quoteServiceURL, Quote.class); return quote; } } -
Review
greeting-config/src/main/java/io/pivotal/quote/QuoteController.java.QuoteControllercalls theQuoteServicefor quotes.package io.pivotal.quote; import org.slf4j.Logger; import org.slf4j.LoggerFactory; import org.springframework.stereotype.Controller; import org.springframework.ui.Model; import org.springframework.web.bind.annotation.RequestMapping; @Controller public class QuoteController { private final Logger logger = LoggerFactory.getLogger(QuoteController.class); private final QuoteService quoteService; public QuoteController(QuoteService quoteService) { this.quoteService = quoteService; } @RequestMapping("/random-quote") String getView(Model model) { logger.debug("returning random quote"); model.addAttribute("quote", quoteService.getQuote()); model.addAttribute("uri", quoteService.getQuoteServiceURI()); return "quote"; } } -
In your browser, hit the http://localhost:8080/random-quote url. Note where the data is being served from:
http://quote-service-dev.cfapps.io/quote
8. Override Configuration Values By Profile
-
Stop the
greeting-configapplication using Command-C or CTRL-C in the terminal window. -
Set the active profile to qa for the
greeting-configapplication. In the example below, we use an environment variable to set the active profile.Mac, Linux:
SPRING_PROFILES_ACTIVE=qa mvn spring-boot:runWindows:
$ set SPRING_PROFILES_ACTIVE=qa $ mvn spring-boot:run -
Make sure the profile is set by browsing to the http://localhost:8080/env endpoint (provided by
actuator). Under profiles,qashould be listed.
-
In your
app-configrepository, create a new file:greeting-config-qa.yml. Fill it in with the following content:quoteServiceURL: http://quote-service-qa.cfapps.io/quoteMake sure to commit and push to GitHub.
-
Browse to http://localhost:8080/random-quote. Quotes are still being served from
http://quote-service-dev.cfapps.io/quote. -
Refresh the application configuration values
curl -X POST http://localhost:8080/refresh -
Refresh the http://localhost:8080/random-quote url. Quotes are now being served from QA.
-
Stop both the
config-serverandgreeting-configapplications.
9. Deploy the greeting-config Application to PCF
-
Package the
greeting-configapplication. Execute the following from thegreeting-configdirectory:mvn clean package -
Deploy the
greeting-configapplication to PCF, without starting the application:cf push greeting-config -p target/greeting-config-0.0.1-SNAPSHOT.jar -m 768M --random-route --no-start -
Create a Config Server Service Instance
Spring Cloud Services provides the
p-config-servermanaged service for provisioning config servers on demand. Pass it as an argument to thecreate-servicecf command.First, familiarize yourself with the command:
cf help create-serviceAs you probably suspect, this config server must be configured with the uri of its backing git repository. This configuration is provided with the
-ccommand flag. The information is json-encoded, like so:{ "git": { "uri": "https://github.com/{{github_username}}/app-config.git" } }Here is the full command:
Mac, Linux:
cf create-service p-config-server standard config-server -c '{ "git": { "uri": "https://github.com/{{github_username}}/app-config.git" } }'Windows:
cf create-service p-config-server standard config-server -c "{ \"git\": { \"uri\": \"https://github.com/{{github_username}}/app-config.git\" } }"For more information on creating a config server service instance, consult the documentation here.
Feel free to name your service anything you like, it doesn’t have to be named
config-server. The Config Server instance will take a few moments to initialize and then be ready for use.Invoke either the
cf servicescommand orcf service config-serverto view the status of the service you just created.The Apps Manager also provides a means to access a dashboard for your Config Server. In a browser, navigate to the apps manager, and to your space. You should see your config server service displayed in there (it may be in a separate tab named
services). Click on the service, and in the subsequent view, select theManagelink.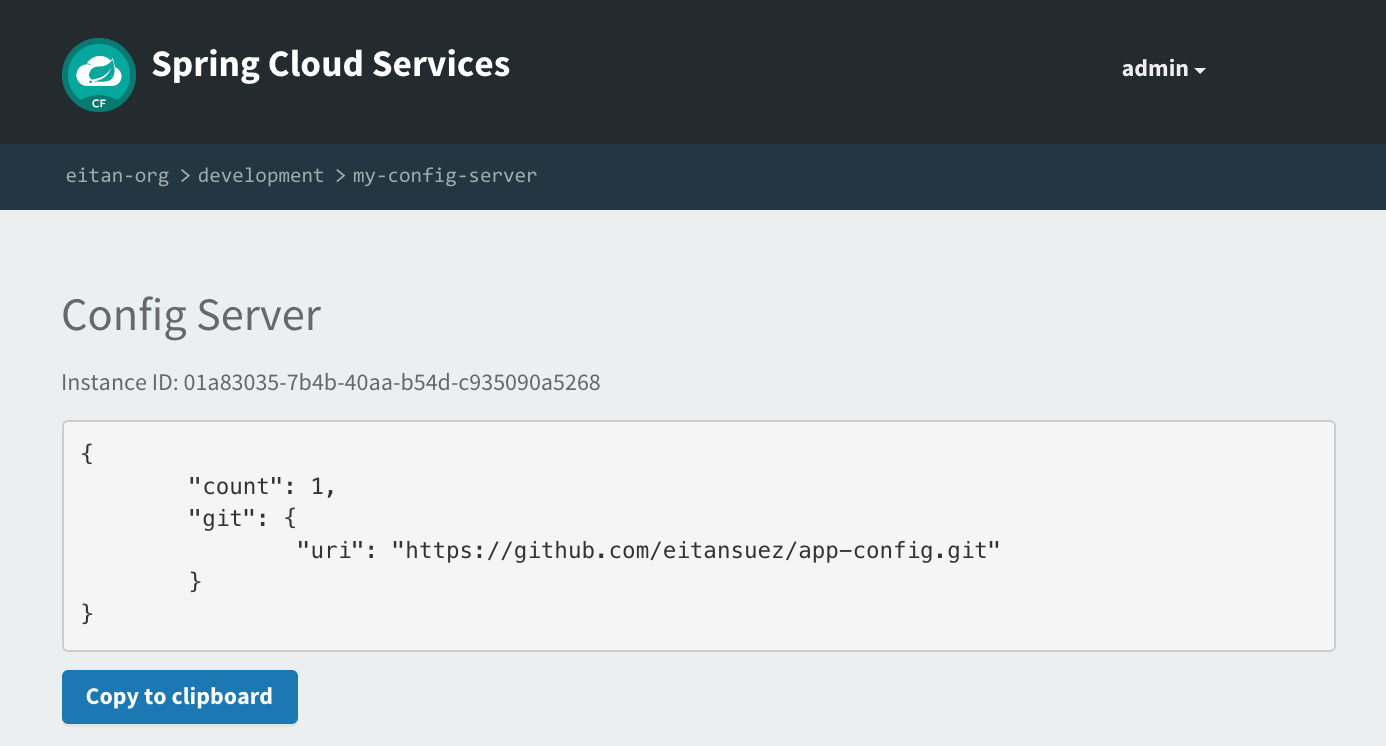
-
Bind the
config-serverservice to thegreeting-configapp. This will enable thegreeting-configapp to read configuration values from theconfig-server.cf bind-service greeting-config config-serverYou can safely ignore the TIP: Use 'cf restage' to ensure your env variable changes take effect message from the CLI. Our app doesn’t need to be restaged at this time because it isn’t currently running.
-
Start the
greeting-configapp.cf start greeting-config -
Browse to your
greeting-configapplication. Are your configuration settings that were set when developing locally mirrored on PCF?-
Is the log level for
io.pivotalpackage set toDEBUG? Yes, this can be confirmed withcf logscommand while refreshing thegreeting-configroot endpoint. -
Is
greeting-configapp displaying the fortune? Yes, this can be confirmed by visiting thegreeting-config/endpoint. -
Is the
greeting-configapp serving quotes fromhttp://quote-service-qa.cfapps.io/quote? No, this can be confirmed by visiting thegreeting-config/random-quoteendpoint. Why not? When developing locally we used an environment variable to set the active profile, we need to do the same on PCF.$ cf set-env greeting-config SPRING_PROFILES_ACTIVE qa $ cf restart greeting-configYou can safely ignore the TIP: Use 'cf restage' to ensure your env variable changes take effect message from the CLI. Our app doesn’t need to be restaged but just re-started.
-
Then confirm quotes are being served from http://quote-service-qa.cfapps.io/quote
10. Refreshing Application Configuration at Scale with Cloud Bus
Until now you have been notifying your application to pick up new configuration by POSTing to the /refresh endpoint.
When running several instances of your application, this poses several problems:
-
Refreshing each individual instance is time consuming and too much overhead
-
When running on Cloud Foundry you don’t have control over which instances you hit when sending the POST request due to load balancing provided by the
router
Cloud Bus addresses the issues listed above by providing a single endpoint to refresh all application instances via a pub/sub notification.
-
Create a RabbitMQ service instance:
cf create-service cloudamqp lemur cloud-bus -
Bind it to
greeting-config:cf bind-service greeting-config cloud-busYou can safely ignore the TIP: Use 'cf restage' to ensure your env variable changes take effect message from the CLI. Our app doesn’t need to be restaged. We will push it again with new functionality in a moment.
-
Include the cloud bus dependency in the
greeting-config/pom.xml. You will need to paste this in your file.<dependency> <groupId>org.springframework.cloud</groupId> <artifactId>spring-cloud-starter-bus-amqp</artifactId> </dependency> -
Repackage the
greeting-configapplication:mvn clean package -
Deploy the application and scale the number of instances.
cf push greeting-config -p target/greeting-config-0.0.1-SNAPSHOT.jar -i 3Invoke the command cf help pushand study the command line arguments that can be passed to the push command. What does the -i flag control? -
Observe your application’s logs, specifically what GreetingController is emitting:
cf logs greeting-config | grep GreetingController -
Generate log messages by refreshing the
greeting-configroot endpoint several times in your browser.All app instances are creating debug statements. Notice the
[App/X]portion of each log statement, which denotes which application instance is logging.2015-09-28T20:53:06.07-0500 [App/2] OUT 2015-09-29 01:53:06.071 DEBUG 34 --- [io-64495-exec-6] io.pivotal.greeting.GreetingController : Adding fortune 2015-09-28T20:53:06.16-0500 [App/1] OUT 2015-09-29 01:53:06.160 DEBUG 33 --- [io-63186-exec-5] io.pivotal.greeting.GreetingController : Adding greeting 2015-09-28T20:53:06.16-0500 [App/1] OUT 2015-09-29 01:53:06.160 DEBUG 33 --- [io-63186-exec-5] io.pivotal.greeting.GreetingController : Adding fortune 2015-09-28T20:53:06.24-0500 [App/1] OUT 2015-09-29 01:53:06.246 DEBUG 33 --- [io-63186-exec-9] io.pivotal.greeting.GreetingController : Adding greeting 2015-09-28T20:53:06.24-0500 [App/1] OUT 2015-09-29 01:53:06.247 DEBUG 33 --- [io-63186-exec-9] io.pivotal.greeting.GreetingController : Adding fortune 2015-09-28T20:53:06.41-0500 [App/0] OUT 2015-09-29 01:53:06.410 DEBUG 33 --- [io-63566-exec-3] io.pivotal.greeting.GreetingController : Adding greeting -
Turn logging down. In your
app-configrepository, edit thegreeting-config.yml. Set the log level toINFO.logging: level: io: pivotal: INFO -
Don’t forget to push your commit back to Github.
-
Notify applications to pickup the change. Open a new terminal window. Send a POST to the
greeting-config/bus/refreshendpoint. Use yourgreeting-configURL not the literal below.Using curl:
curl -k -X POST https://{{greeting_config_hostname}}/bus/refreshUsing httpie:
http --verify no POST https://{{greeting_config_hostname}}/bus/refresh -
Refresh the
greeting-configroot endpoint several times in your browser. No more logs! -
Stop tailing logs from the
greeting-configapplication.