In this lab, we explore yet another Spring Cloud project: Spring Cloud Config.
This project was developed entirely by the Pivotal Spring team. The focus here is on configuration, and the main idea is to provide configuration information to applications as a service.
Imagine a REST API with endpoints that can be used to retrieve a json document which represents the configuration for a specific application (e.g. greeting, fortune) in a specific environment (test, qa, staging, prod).
Spring Cloud’s Config Server has a similar feel to many other Spring Cloud projects: it’s based on Spring Boot as a foundation, with associated starter dependencies for the server and client, annotations to enable a Spring Boot application as a config server, and more.
Let’s introduce a Spring Cloud config server to our system under test to gain insight into this product and what it has to offer.
1. Review The Current Configuration
At the moment each service’s configuration lies in its application.yml, a resource file bundled with each project, and into the build artifact itself. Spring also supports overriding of configuration via Java system properties, and via environment variables, which is convenient.
Let’s review the configuration properties currently in place. Here’s the fortune service’s configuration:
spring:
  application:
    name: fortune

management:
  security:
    enabled: false

server:
  port: 8081
We mainly disable security for the management endpoints, for convenience. Otherwise, there’s really not much configuration in place for this service.
And here’s the configuration for greeting:
spring:
  application:
    name: greeting

management:
  security:
    enabled: false

greeting:
  displayFortune: true

fortune:
  ribbon:
    NFLoadBalancerRuleClassName: com.netflix.loadbalancer.WeightedResponseTimeRule
This is a little more interesting. We have a sort of feature toggle: whether or not to display fortunes, and we also configure the load balancing algorithm used to fetch fortunes.
With Spring Cloud Config, we externalize these configurations to a version control system: a git repository. The property spring.application.name becomes the handle by which applications identify themselves to the config server. Each application’s configuration is placed in either a .properties or .yml file whose name is the spring.application.name (aka service id).
Spring Cloud provides a means of reducing duplication in configuration by allowing us to place common configuration in a file named application.yml.
2. Create a local git repository
Begin by creating a local git repository:
-
Select a working directory, and in it, create a subdirectory named
config-repo:$ mkdir config-repo $ cd config-repo -
Initialize this directory as a git repository:
$ git init -
In this directory, create a file named
application.ymlthat will contain the following general configuration that will apply to all applications:config-repo/application.ymlmanagement: security: enabled: false (1) logging: level: io: pivotal: training: INFO (2)1 Disable security for management endpoints by default 2 Set the default logging level to INFO for all applications Notice that, for the fortune service, we require no additional configuration.
-
Create a file named
greeting.yml(the name has to match the spring.application.name for the greeting application), and port over its configuration, as follows:greeting: displayFortune: true fortune: ribbon: NFLoadBalancerRuleClassName: com.netflix.loadbalancer.WeightedResponseTimeRule -
Add and commit both files to the git repository:
$ git add .
$ git commit -m "initial configuration"
Make sure to note the full path of the directory config-repo. We’ll need it shortly when we configure our config server.
3. Create a Config Server
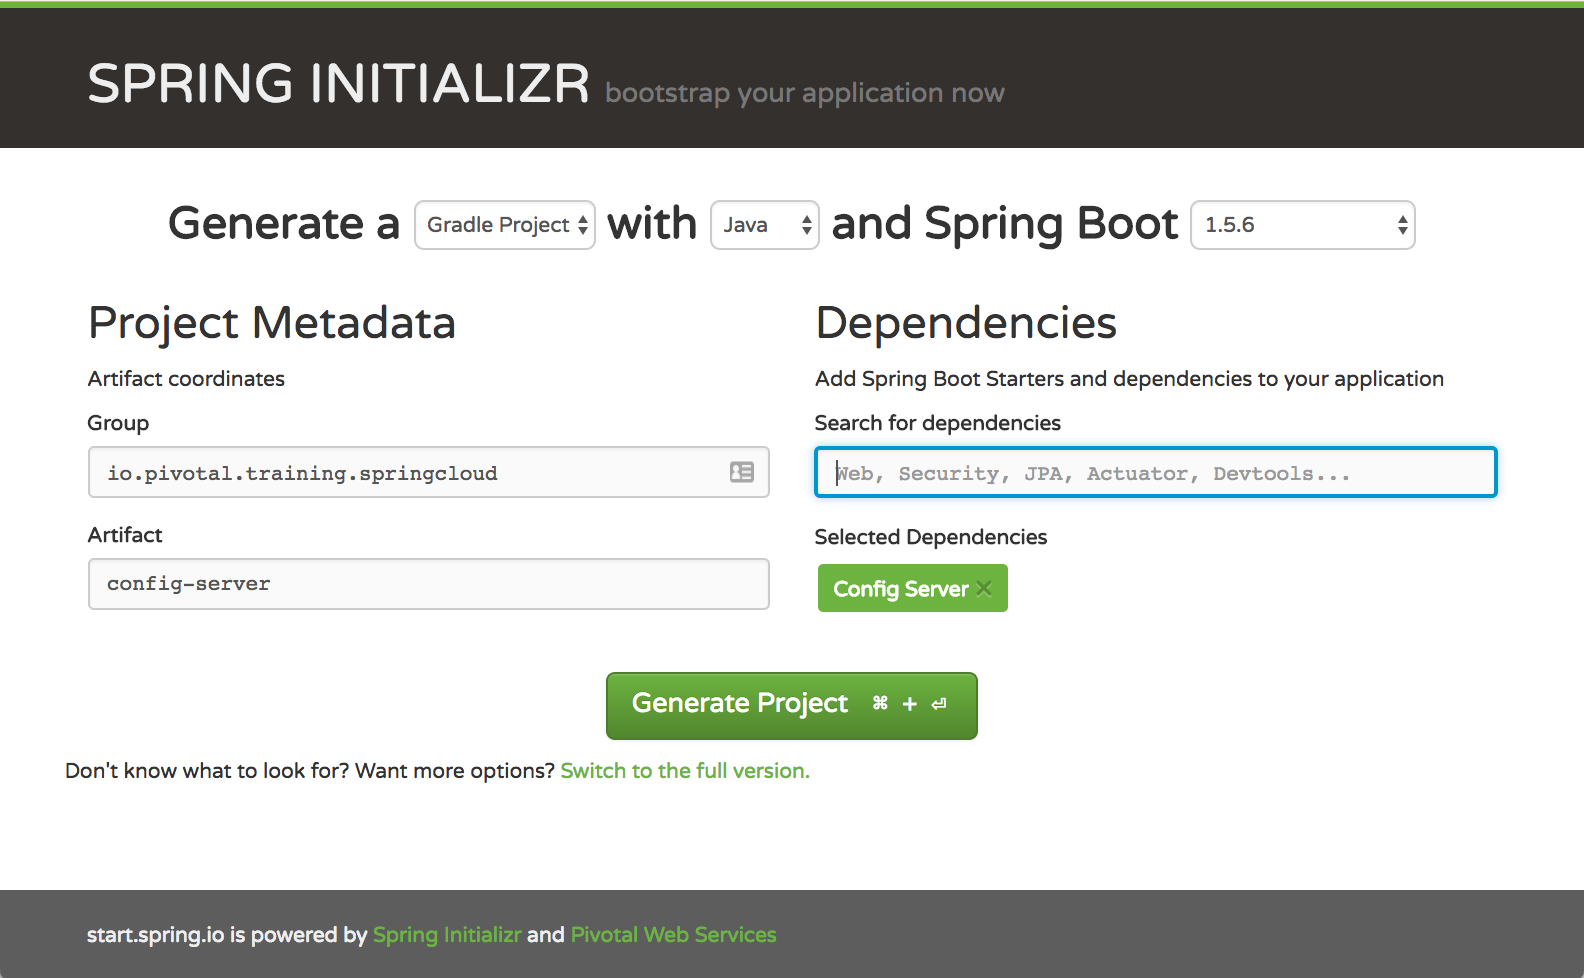
Visit the Spring initializr at http://start.spring.io/ and create a new gradle project with the config server as a dependency, as shown in this screenshot:
As usual, click Generate Project, unzip the downloaded zip file alongside the other projects (greeting-app, fortune-service, eureka-server), and import the project into your IDE.
-
Study the project’s build file. You’ll see the
spring-cloud-config-serverdependency. -
Enable the configuration server by annotating the application class with
@EnableConfigServer:config-server/src/main/java/io/pivotal/training/springcloud/configserver/ConfigServerApplication.java@@ -2,8 +2,10 @@ package io.pivotal.training.springcloud.configserver; import org.springframework.boot.SpringApplication; import org.springframework.boot.autoconfigure.SpringBootApplication; +import org.springframework.cloud.config.server.EnableConfigServer; @SpringBootApplication +@EnableConfigServer public class ConfigServerApplication { public static void main(String[] args) { -
Configure the application to run on an available port. Let’s use port number 8090. Also, configure the config server to fetch configuration information from the local git repository we configured earlier:
server.port=8090
spring.cloud.config.server.git.uri=file://${user.home}/work/config-repo
On Windows, the git uri needs to be specified with three foreslashes instead of two, as in file:///${user.home}/work/config-repo. Also, be sure to use the path to your config-repo folder, the one shown above is just an example.
Ok, let’s test this config server. Start up the application:
$ gradle bootRunVisit the following URLs:
In the screenshot below, we see how the configuration for the greeting application contains both the greeting-specific configuration properties and the general configuration (logging level, management security).
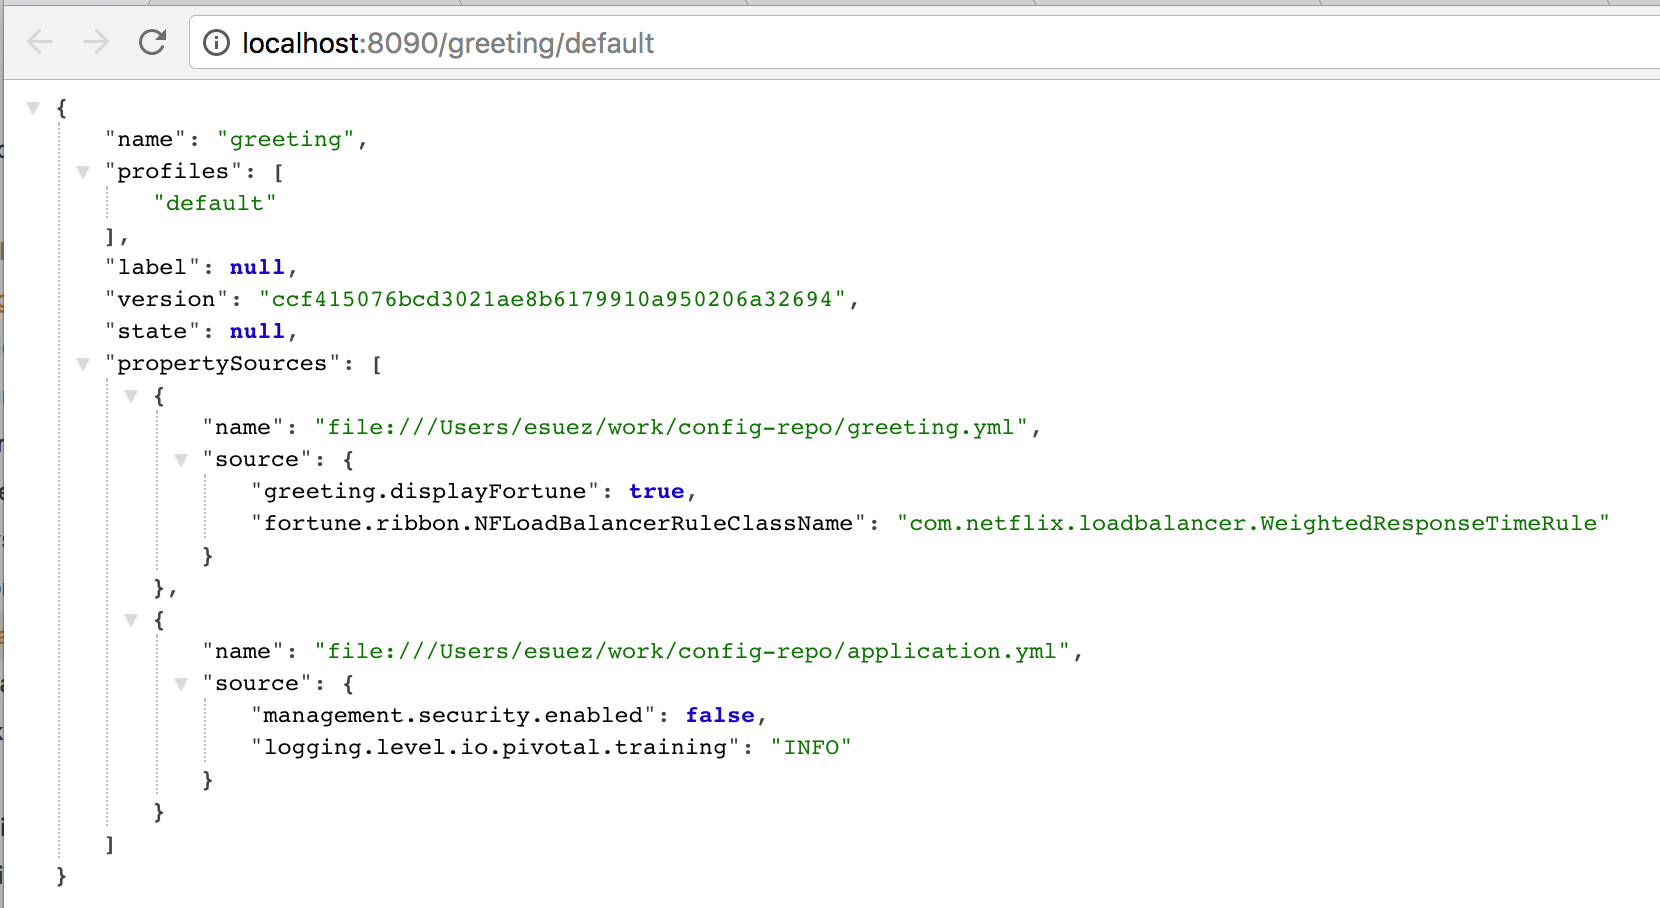
In a similar manner, we can define additional configurations for the same applications for different environments, using Spring Profiles. For example, any configuration for the greeting application that is unique to the "qa" profile can be written to the file greeting-qa.yml and that information will override any values specified in the default profile. The config server always returns a union of all matching files. For example, for the application named "greeting" and the profile named "qa", the url becomes http://localhost:8090/greeting/qa, and if any of these files exist, their configuration would be returned as a single json response:
-
application.yml (or .properties)
-
application-qa.yml
-
greeting.yml
-
greeting-qa.yml
The more specific files always supersede or override the more general ones.
4. Register the Config Server with Eureka
Before turning our attention to the clients, let’s address the question: how should clients locate the config server?
We could configure clients with the config server url using the configuration property spring.cloud.config.uri. But wait, we have a service registry, why not have the config server register with eureka, so that clients can just discover its url? Let’s take that latter route.
As you already know, to make any Spring Boot application a eureka client, do the following:
-
Add the
spring-cloud-starter-eurekadependency to the build file, and.. -
Enable the application as a discovery client, as shown in this diff:
config-server/build.gradle@@ -28,6 +28,7 @@ ext { dependencies { compile 'org.springframework.cloud:spring-cloud-config-server' + compile 'org.springframework.cloud:spring-cloud-starter-eureka' testCompile 'org.springframework.boot:spring-boot-starter-test' }config-server/src/main/java/io/pivotal/training/springcloud/configserver/ConfigServerApplication.java@@ -2,10 +2,12 @@ package io.pivotal.training.springcloud.configserver; import org.springframework.boot.SpringApplication; import org.springframework.boot.autoconfigure.SpringBootApplication; +import org.springframework.cloud.client.discovery.EnableDiscoveryClient; import org.springframework.cloud.config.server.EnableConfigServer; @SpringBootApplication @EnableConfigServer +@EnableDiscoveryClient public class ConfigServerApplication { public static void main(String[] args) { -
Also, the application registering with eureka must identify itself. So, set the
spring.application.nametoconfigserver. By default, config clients that are configured to lookup config servers with eureka are going to be looking for the service idconfigserver:config-server/src/main/resources/application.properties@@ -1,2 +1,3 @@ +spring.application.name=configserver server.port=8090 spring.cloud.config.server.git.uri=file://${user.home}/work/config-repo
Verify that a config server will now register with eureka as it initializes:
-
Start the eureka-server
-
Visit the eureka dashboard at http://localhost:8761/
-
Start the config-server
-
Refresh the dashboard, do you see a new serviceId named "CONFIGSERVER" show up in the registry?
-
Do the configuration endpoints (e.g. http://localhost:8090/greeting/default) still resolve?
5. Retrofit the clients
-
Begin by removing the configuration properties from the projects themselves. From now on, these will be fetched from the config repository, via the config server:
fortune-service/src/main/resources/application.yml@@ -2,9 +2,5 @@ spring: application: name: fortune -management: - security: - enabled: false - server: port: 8081greeting-app/src/main/resources/application.yml@@ -2,13 +2,3 @@ spring: application: name: greeting -management: - security: - enabled: false - -greeting: - displayFortune: true - -fortune: - ribbon: - NFLoadBalancerRuleClassName: com.netflix.loadbalancer.WeightedResponseTimeRuleThe remaining configuration (application name, server port) must be defined in a file named
bootstrap.yml. The spring application name must be available to the application at a very early stage, before the application.yml file is loaded. -
Rename both
application.ymlfiles tobootstrap.yml -
Add the Spring Cloud Config client dependency to both the fortune and greeting projects:
fortune-service/build.gradle@@ -49,6 +49,7 @@ dependencies { compile 'org.springframework.boot:spring-boot-starter-actuator' compile 'org.springframework.cloud:spring-cloud-starter-eureka' + compile 'org.springframework.cloud:spring-cloud-starter-config' runtime 'org.springframework.boot:spring-boot-devtools'greeting-app/build.gradle@@ -33,6 +33,7 @@ dependencies { compile 'org.springframework.cloud:spring-cloud-starter-hystrix' compile 'org.springframework.cloud:spring-cloud-starter-eureka' compile 'org.springframework.cloud:spring-cloud-starter-feign' + compile 'org.springframework.cloud:spring-cloud-starter-config' runtime 'org.springframework.boot:spring-boot-devtools' -
Finally, instruct each application to locate the config server via service discovery:
fortune-service/src/main/resources/bootstrap.yml@@ -1,6 +1,10 @@ spring: application: name: fortune + cloud: + config: + discovery: + enabled: true server: port: 8081greeting-app/src/main/resources/bootstrap.yml@@ -1,4 +1,7 @@ spring: application: name: greeting + cloud: + config: + discovery: + enabled: true
Test the solution.
-
Be sure to have the eureka and config servers running, and the config server registered with eureka.
-
Now start the fortune and greeting applications
-
Do they fetch their configuration information from the config server? The application’s startup log should have a line that reads something similar to this:
c.c.c.ConfigServicePropertySourceLocator : Fetching config from server at: http://localhost:8090/
-
Can you access their management endpoints, for example http://localhost:8080/env? If not, this is a sure sign that the application was unable to retrieve its configuration from the config server. Review your configuration, and the appplication’s logs for clues as to what might have gone wrong.
-
Do they register with eureka? The eureka dashboard should show entries for both FORTUNE and GREETING.
-
Does the greeting application function as expected? Does it display fortunes?
Notice how the end result of this refactoring is that we now have a single place to keep configuration information for all of our services, and for multiple environments.
The config server enables a number of capabilities. Here are some use cases:
-
feature toggles: in our case, we should be able to toggle displayFortune without having to restart services
-
change log levels: to diagnose the behavior of a running service
-
environments and profiles: we can manage the configuration of a set of services across multiple environments
-
encrypting configuration properties
Let’s test the first use case: feature toggles.
6. Toggle displayFortune
-
Visit the
greeting.ymlconfiguration file in theconfig-reporepository, and modify it as follows:config-repo/greeting.yml@@ -1,5 +1,5 @@ greeting: - displayFortune: true + displayFortune: false fortune: ribbon: -
Save the file and commit the change to git:
$ git add greeting.yml $ git commit -m "turning off displayFortune" -
Manually verify that the config server is aware of this change: visit http://localhost:8090/greeting/default. The value for the property
greeting.displayFortuneshould now befalse. -
Refresh the greeting application page. Fortunes should still be displaying. By design, applications will not update their configuration from the server until they’re instructed to do so.
-
Using some http client tool such as curl, httpie, or postman, submit an http POST to the greeting application, at the endpoint '/refresh'. Here’s an example, using httpie:
$ http post localhost:8080/refreshHere is the response:
HTTP/1.1 200
Content-Type: application/json;charset=UTF-8
Date: Wed, 06 Sep 2017 21:06:20 GMT
Transfer-Encoding: chunked
X-Application-Context: greeting

[
    "config.client.version",
    "greeting.displayFortune"
]
Note how the response displays the specific configuration properties that have changed. Now refresh the greeting application page and notice that fortunes are no longer displayed.
7. Congratulations
You’ve just externalized your system’s configuration with Spring Cloud Config Server. In the next lab, we explore deploying our solution to Pivotal Cloud Foundry, with the aid of a product named Spring Cloud Services.