Estimated Time: 60 minutes
1. Preface
Cloudfoundry is an extensible platform. Managed services can easily be plugged in and made available in the services marketplace. In this lab, we’ll use a feature known as space-scoped service brokers to register a custom managed service that provisions Mongodb databases for applications.
You’ll deploy an application that implements the service broker API, register it as a service broker in Cloudfoundry, and then put it to use by instantiating a mongodb instance (with create-service), and attaching that resource (with bind-service) to an application that will use it to persist album information.
2. Exercises
2.1. Setup
-
Download the following zip file, which contains the source code and precompiled jar file, ready for you to deploy (no building necessary). Copy the file to folder:
~/pivotal-cloud-foundry-developer-workshop/. -
Extract the the zip file to
~/pivotal-cloud-foundry-developer-workshop/cloudfoundry-mongodb-service-broker. -
OPTIONAL STEP - Import applications into your IDE such as Spring Tool Suite (STS).
STS Import Help:
Select Then select Gradle → Gradle Project. On the Import Gradle Project page, browse to the directory where you extracted the zip. Then push the "Build Model" button. Select the project. Click "Finish".
The above steps require the Gradle Support IDE extension to be installed. To install Gradle Support select . This will open a new tab to the Dashboard. Click on "IDE Extensions" then search for "Gradle". Select Gradle Support or Gradle (STS Legacy) Support and click the "Install" button. Complete the installation wizard and restart STS.
2.2. Service Broker API Overview
-
Review the documentation. Specifically, the sequence diagram. This is what we will implement.
2.3. Create a MongoDB Service Broker
2.3.1. About this Broker
This broker is implemented with Spring Boot, and leverages the Cloud Foundry Service Broker project. This project reduces the effort required to write a service broker in Java to the implementation of a handful of Spring beans. This blog entry by Scott Frederick originally introduced this project to the Spring Cloud in the Summer of 2016.
2.3.2. Implement Catalog Management
-
Review the documentation on implementing catalog management.
-
We need to implement catalog management in our
mongodb-service-brokerapplication. Fortunately, all the Service Broker API endpoints have been mapped by the Spring Cloud Service Broker project. For instance, thev2/catalogendpoint. -
We have an endpoint, but the Spring Cloud Service Broker can’t provide all the implementation. We need to describe our catalog. To to that, all we need to do is provide a
Catalogbean.Review the following file:
~/pivotal-cloud-foundry-developer-workshop/cloudfoundry-mongodb-service-broker/src/main/java/org/springframework/cloud/servicebroker/mongodb/config/CatalogConfig.java.@Configuration public class CatalogConfig { @Bean public Catalog catalog() { return new Catalog(Collections.singletonList( new ServiceDefinition( getEnvOrDefault("SERVICE_ID","mongodb-service-broker"), //env variable getEnvOrDefault("SERVICE_NAME","MongoDB"), //env variable "A simple MongoDB service broker implementation", true, false, Collections.singletonList( new Plan(getEnvOrDefault("PLAN_ID","mongo-plan"), //env variable "standard", "This is a default mongo plan. All services are created equally.", getPlanMetadata(), true)), Arrays.asList("mongodb", "document"), getServiceDefinitionMetadata(), null, null))); } ... -
Push the
mongodb-service-brokerapplication.cd ~/pivotal-cloud-foundry-developer-workshop/cloudfoundry-mongodb-service-broker/..and:
cf push mongodb-service-broker -p build/libs/cloudfoundry-mongodb-service-broker.jar -m 512M --random-route --no-start -
Set environment variables.
These environment variables get used by the broker to generate the catalog. These values should be unique across the entire Pivotal Cloud Foundry instance to meet the broker API specifications.
As a convention, append your initials to where specified.
cf set-env mongodb-service-broker SERVICE_ID mongodb-service-broker-{{initials}}cf set-env mongodb-service-broker SERVICE_NAME MongoDB-{{initials}}cf set-env mongodb-service-broker PLAN_ID mongo-plan-{{initials}}You can safely ignore the "TIP: Use 'cf restage' to ensure your env variable changes take effect" message. -
Start
mongodb-service-brokercf start mongodb-service-broker -
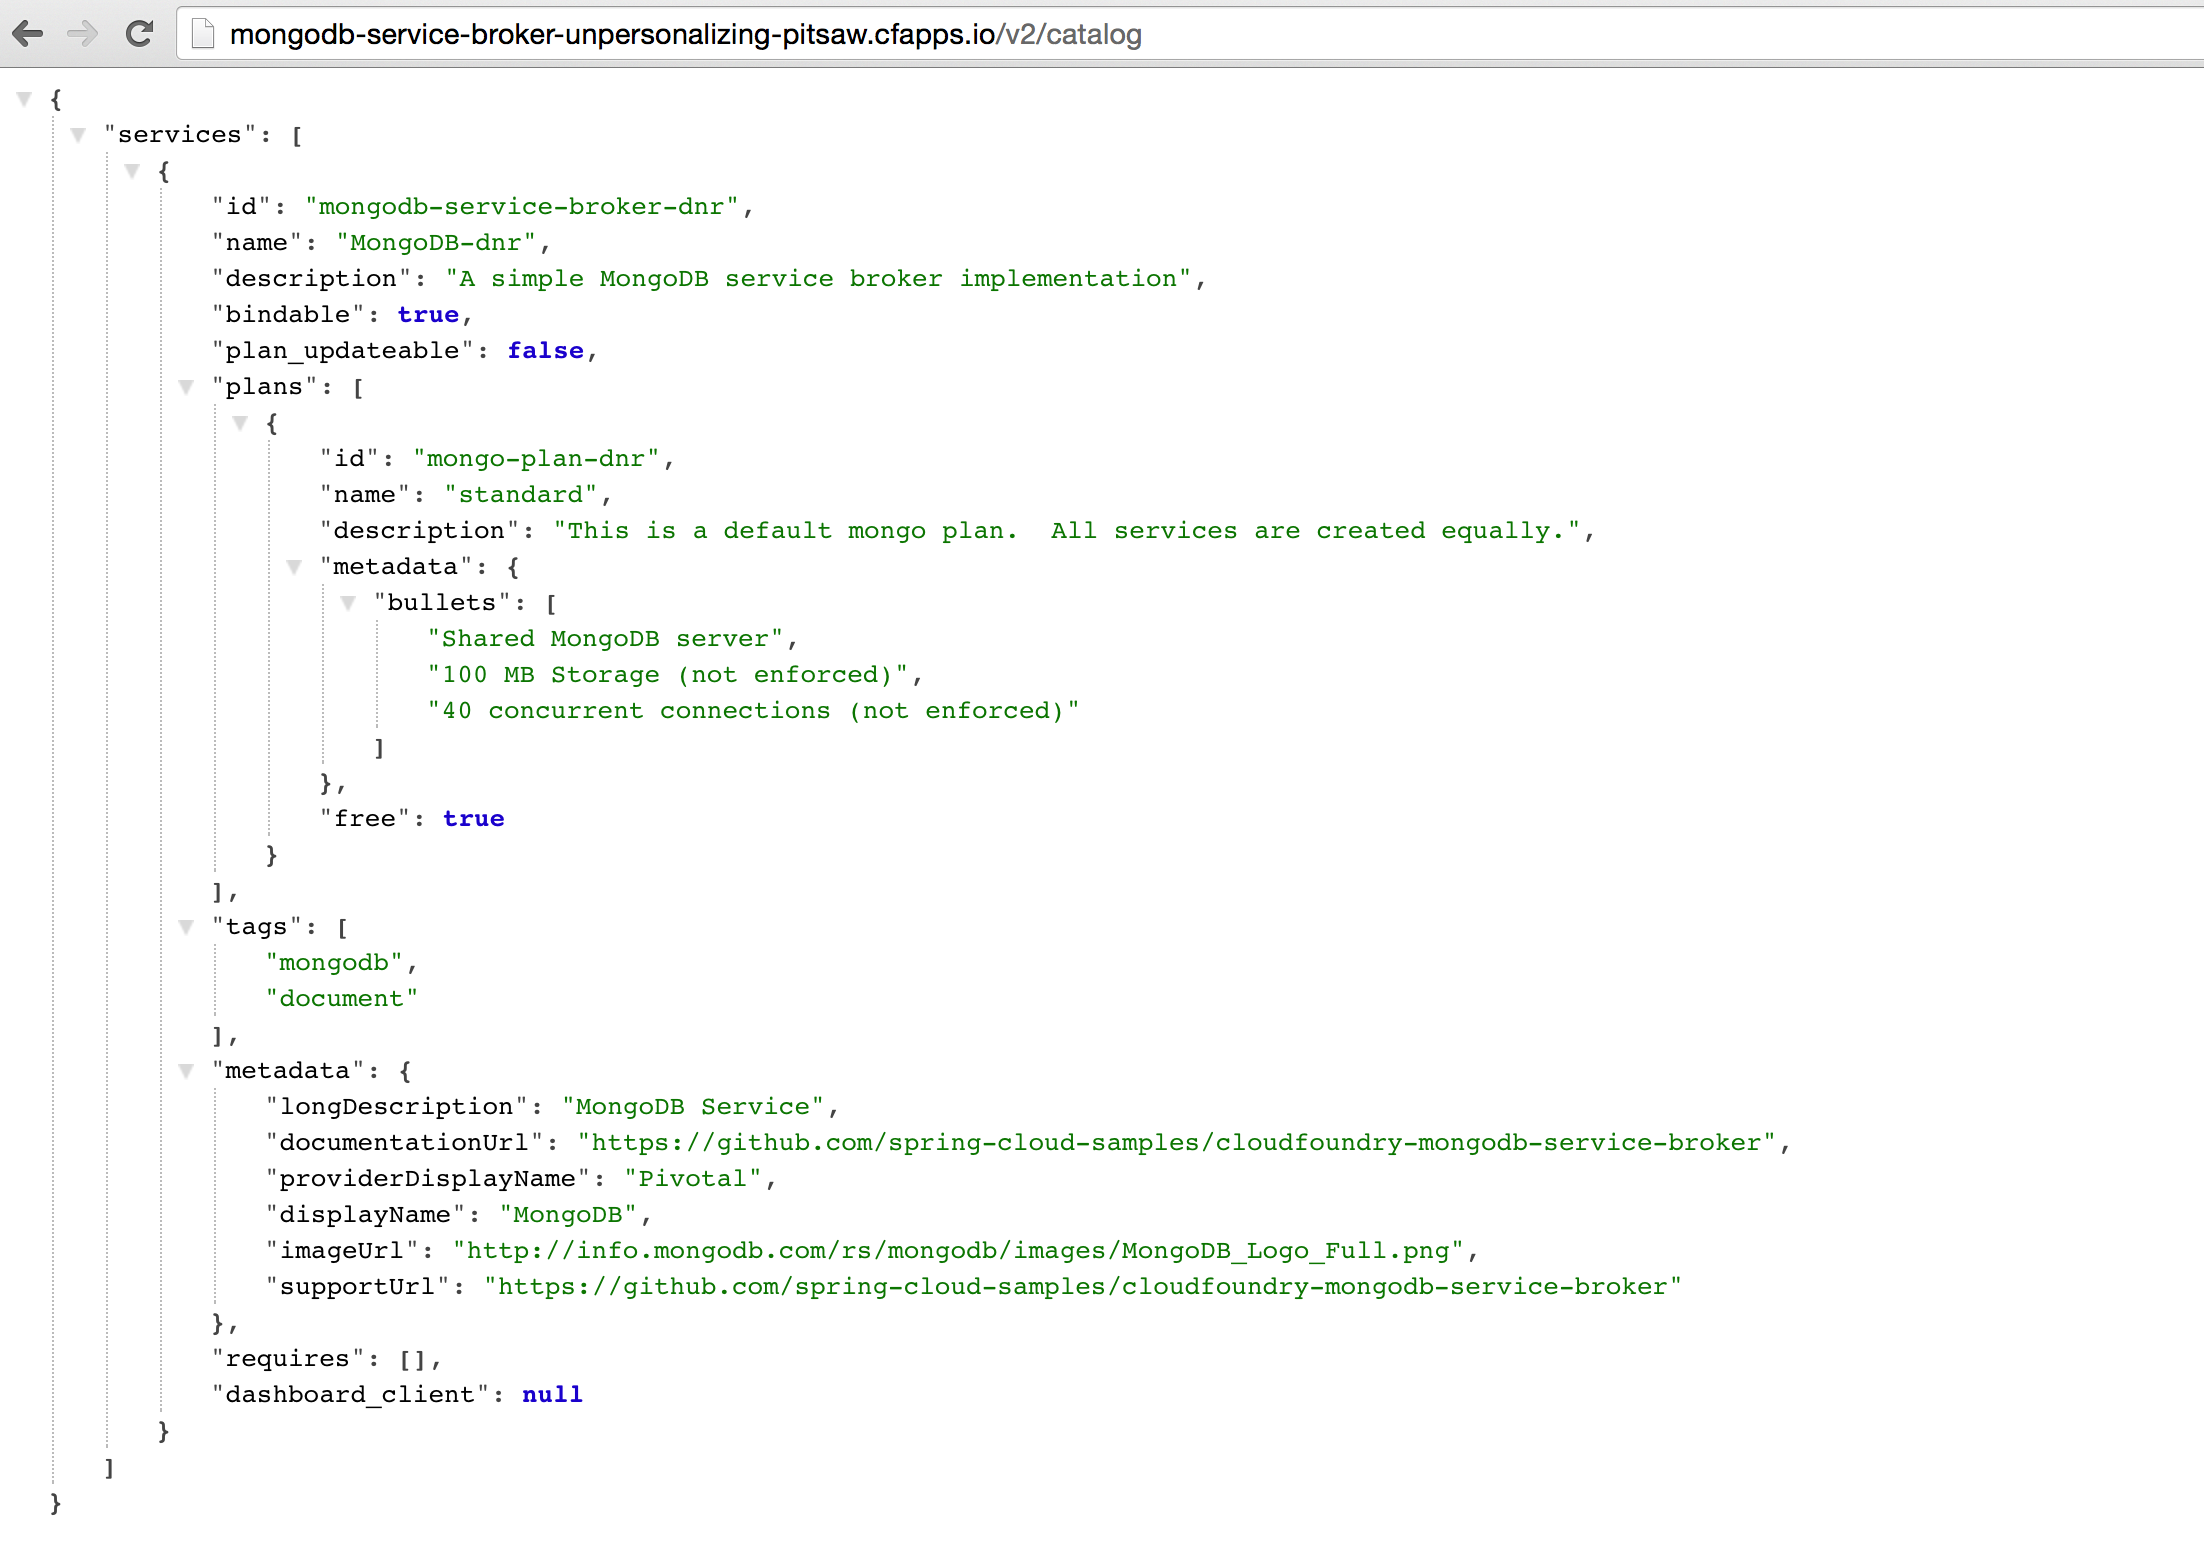
Verify your work. Using an http client (e.g. a browser), visit the application’s
v2/catalogendpoint. Because the application is secured with Basic Auth you will need to provide credentials.Username: pivotal
Password: keepitsimple
You should see response similar to the following (pic is using the JSON Formatter for Chrome):
-
Register your Service Broker.
We will be creating a Space-Scoped broker. Space-Scoped brokers help you during the development/testing of your service broker, because they are private to a space and don’t require an
adminto enable access (list it in the marketplace, provision service instances, etc).A unique broker name is required. Use your initials.
cf create-service-broker mongodb-service-broker-{{initials}} pivotal keepitsimple {{service_broker_app_url}} --space-scoped -
View the Service Brokers in your installation. You should see your new Service Broker.
cf service-brokers -
Verify that your service is listed in the marketplace.
cf marketplace
Congratulations, you have implemented and tested the catalog endpoint in your service broker!
Questions
-
Can a service broker support upgrade/downgrade of a service?
2.3.3. Implement Provisioning and Deprovisioning
-
Review the documentation on implementing provisioning and deprovisioning.
-
We need to implement provisioning/deprovisioning in our
mongodb-service-brokerapplication. To do so we just need to implement the ServiceInstanceService interface, because the Spring Cloud Service Broker project has already done the mapping.
Review the following file: ~/pivotal-cloud-foundry-developer-workshop/cloudfoundry-mongodb-service-broker/src/main/java/org/springframework/cloud/servicebroker/mongodb/service/MongoServiceInstanceService.java
Provisioning Code:
@Service
public class MongoServiceInstanceService implements ServiceInstanceService {
...

  @Override
  public CreateServiceInstanceResponse createServiceInstance(CreateServiceInstanceRequest request) {
    // make sure we haven't provisioned this before (check broker database)
    ServiceInstance instance = repository.findOne(request.getServiceInstanceId());
    if (instance != null) {
      throw new ServiceInstanceExistsException(request.getServiceInstanceId(), request.getServiceDefinitionId());
    }

    instance = new ServiceInstance(request);

    if (mongo.databaseExists(instance.getServiceInstanceId())) {
      // ensure the instance is empty
      mongo.deleteDatabase(instance.getServiceInstanceId());
    }

    DB db = mongo.createDatabase(instance.getServiceInstanceId());
    if (db == null) {
      throw new ServiceBrokerException("Failed to create new DB instance: " + instance.getServiceInstanceId());
      }
    //save to broker database for record keeping
    repository.save(instance);

    return new CreateServiceInstanceResponse();
  }
...Deprovisioning Code:
@Service
public class MongoServiceInstanceService implements ServiceInstanceService {
...
  @Override
  public DeleteServiceInstanceResponse deleteServiceInstance(DeleteServiceInstanceRequest request) throws   MongoServiceException {
    String instanceId = request.getServiceInstanceId();
    //locate record in broker database
    ServiceInstance instance = repository.findOne(instanceId);
    if (instance == null) {
      throw new ServiceInstanceDoesNotExistException(instanceId);
    }

    // delete mongo database
    mongo.deleteDatabase(instanceId);
    // delete record from broker database
    repository.delete(instanceId);
    return new DeleteServiceInstanceResponse();
  }
}Questions
-
The broker is required by the Cloud Controller to respond within how many seconds?
-
Does provisioning have to be done synchronously?
2.3.4. Implement Binding and Unbinding
-
Review the documentation on implementing binding and unbinding.
-
We need to implement binding/unbinding in our
mongodb-service-brokerapplication. To do so we just need to implement the ServiceInstanceBindingService interface, because the Spring Cloud Service Broker project has already done the mapping.
Review the following file: ~/pivotal-cloud-foundry-developer-workshop/cloudfoundry-mongodb-service-broker/src/main/java/org/springframework/cloud/servicebroker/mongodb/service/MongoServiceInstanceBindingService.java
Binding Code:
@Service
public class MongoServiceInstanceBindingService implements ServiceInstanceBindingService {
...
  @Override
  public CreateServiceInstanceBindingResponse createServiceInstanceBinding(CreateServiceInstanceBindingRequest request) {

    String bindingId = request.getBindingId();
    String serviceInstanceId = request.getServiceInstanceId();

    ServiceInstanceBinding binding = bindingRepository.findOne(bindingId);
    if (binding != null) {
      throw new ServiceInstanceBindingExistsException(serviceInstanceId, bindingId);
    }

    String database = serviceInstanceId;
    String username = bindingId;
    String password = "password";


    mongo.createUser(database, username, password);

    Map<String, Object> credentials =
        Collections.singletonMap("uri", (Object) mongo.getConnectionString(database, username, password));

    binding = new ServiceInstanceBinding(bindingId, serviceInstanceId, credentials, null, request.getBoundAppGuid());
    bindingRepository.save(binding);

    return new CreateServiceInstanceAppBindingResponse().withCredentials(credentials);
  }
...Unbinding Code:
@Service
public class MongoServiceInstanceBindingService implements ServiceInstanceBindingService {

  @Override
  public void deleteServiceInstanceBinding(DeleteServiceInstanceBindingRequest request) {
    String bindingId = request.getBindingId();
    ServiceInstanceBinding binding = getServiceInstanceBinding(bindingId);

    if (binding == null) {
      throw new ServiceInstanceBindingDoesNotExistException(bindingId);
    }

    mongo.deleteUser(binding.getServiceInstanceId(), bindingId);
    bindingRepository.delete(bindingId);
  }
}Congratulations! You have created a simple service broker.
Questions
-
Do all services have to be bindable?
2.4. Use the MongoDB Service Broker
-
Configure the
mongodb-service-brokerapplication to use a MongoDB instance.A MongoDB instance can be obtained in the following ways:
-
Your instructor will provision MongoDB and provide connectivity details to you
-
Use a MongoDB instance in your environment
-
Provision a MongoDB instance on AWS
You’ll need to communicate the mongo db hostname (or ip address) and password that the service broker will use via environment variables:
cf set-env mongodb-service-broker MONGODB_HOST {{mongodb_ip}}..and..
cf set-env mongodb-service-broker MONGODB_PASSWORD {{mongodb_password}}
-
-
Restart the application.
cf restart mongodb-service-broker -
Download Spring-Music. Copy the file to folder:
~/pivotal-cloud-foundry-developer-workshop/spring-music/(~is shorthand for the home directory in Linux, Mac and Unix based operating systems). You will need to create this directory in your home directory.Source is not required, but you may be curious how it works as you move through the labs.
-
Push
spring-musiccd ~/pivotal-cloud-foundry-developer-workshop/spring-music/..and:
cf push spring-music -p ./spring-music.jar -m 512M --random-route -
View
spring-musicin a browser. Click on the button on the top right of the screen. Notice that there are no services attached andspring-musicis using an embedded database.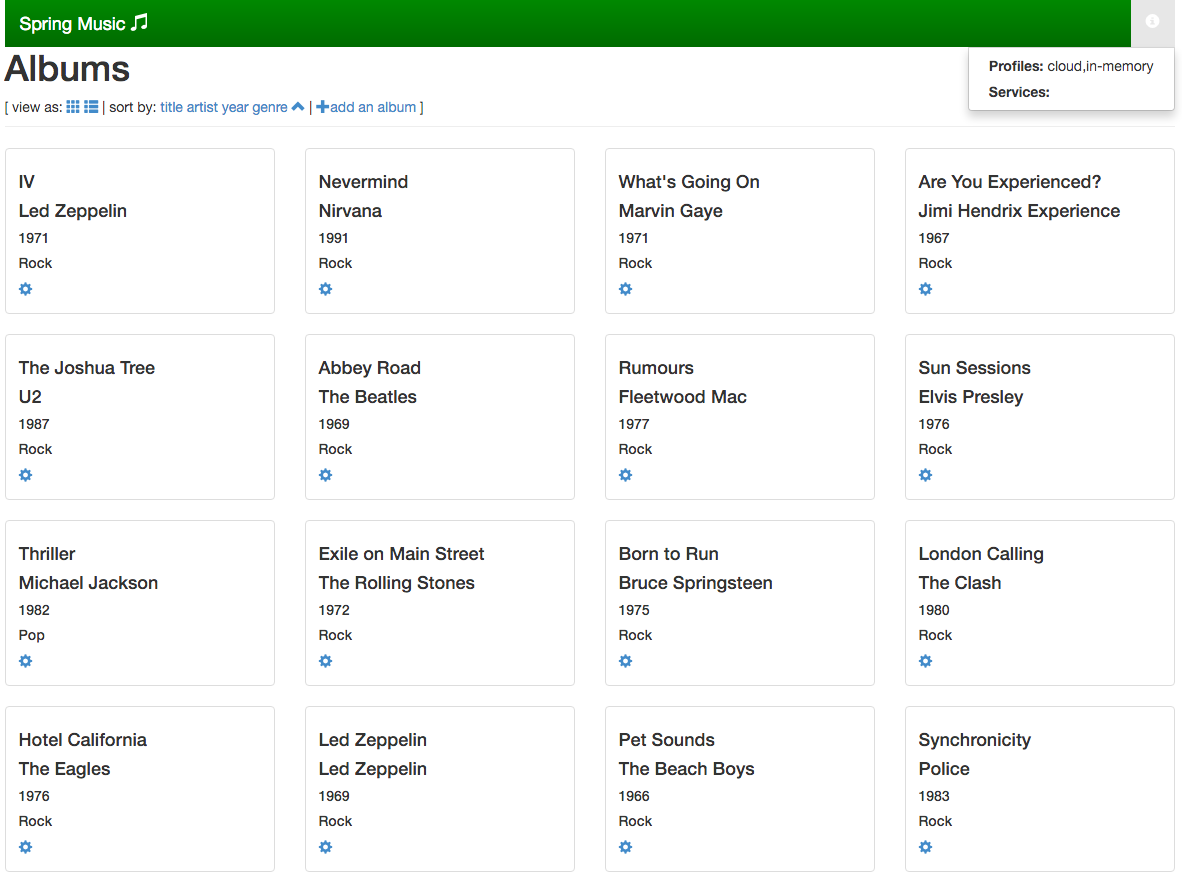
-
Create a MongoDB service instance.
For Example:
cf create-service MongoDB-{{initials}} standard mongo-service -
Bind the
spring-musictomongo-service.cf bind-service spring-music mongo-serviceYou can safely ignore the "TIP: Use 'cf restage spring-music' to ensure your env variable changes take effect" message. -
Restart
spring-musiccf restart spring-music -
Refresh
spring-musicin the browser. Click on theibutton in the top right of the screen. You are now using MongoDB!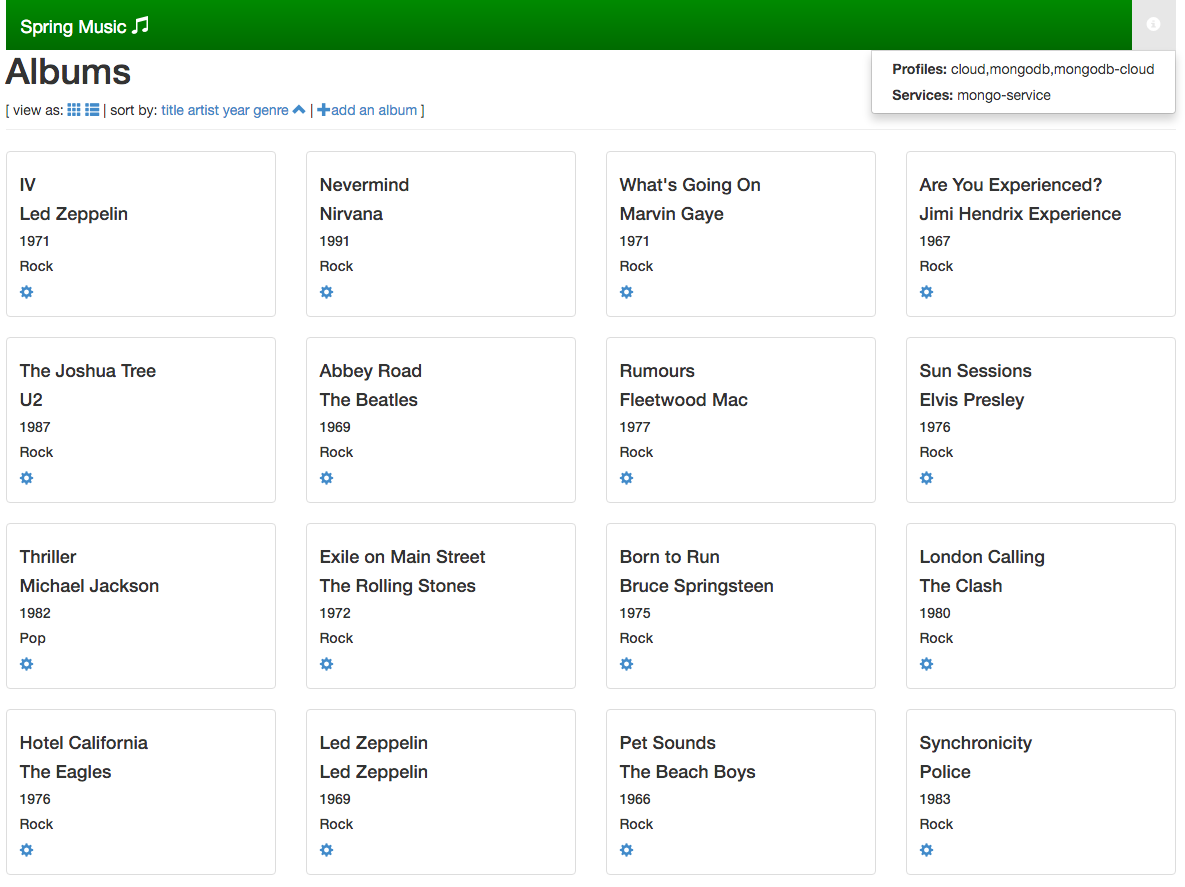
-
Optional Step: If you have access. View the data in MongoDB.
2.5. Clean up
-
Delete
spring-music.cf delete spring-music -
Delete the
mongo-serviceservice instance.cf delete-service mongo-service -
Delete the service broker.
For example:
cf delete-service-broker mongodb-service-broker-{{initials}} -
Delete
mongodb-service-brokerapplication.cf delete mongodb-service-broker -
If provisioned, terminate your AWS MongoDB instance by going to your AWS EC2 dashboard, selecting the MongoDB instance, and clicking Actions → Instance State → Terminate.
3. Beyond the class
Review other sample brokers.